Number of Standard bosses: 5 Level of Standard bosses: 59-60 Number of Expert bosses: 5 Level of Expert bosses: 62
Solo at 70?: Yes All cheevos while solo?: Yes
A level 70 player can easily kill everything in this dungeon. This guide is mainly designed to show you how to get the cheevos and do the quests. If the content becomes ‘relevant’ again then I will expand the boss guides as needed and add more detail.
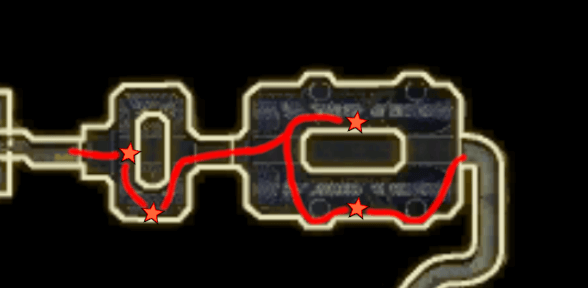
Jumping Platforms + Trash
Jumps
When you enter the dungeon you will need to make your way up a few jumping platforms. These platforms will boost your jump skill so you can easily make it to the next platform. Stand in the middle of the platform and face the next platform above you, then hit the spacebar and you will auto-jump to the next platform.
Jump up to the next platform
Stabs
Right click the storm fan blocking the entrance to the boss room to destroy it.
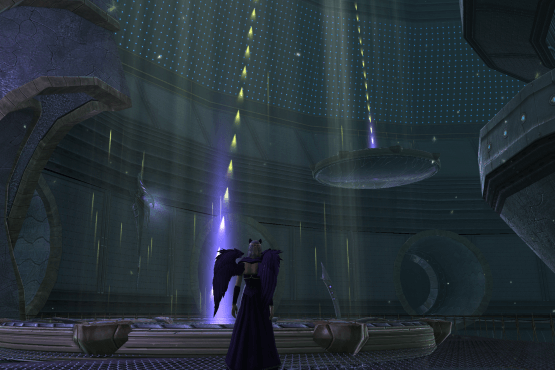
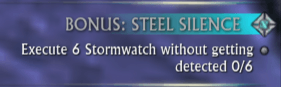
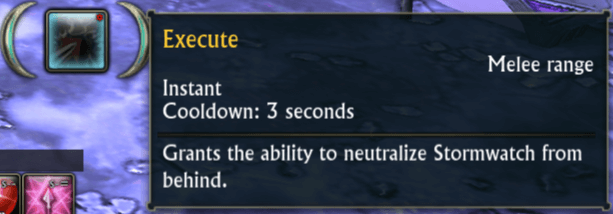
When you enter the boss room, you will be given a mini-quest called ‘Steel Silence’. This asks you to kill 6 of the Stormwatch mobs without getting detected. You will also be given the temprary ability called ‘Execute’
Use the Execute ability on the Stormwatch mobs to kill them. You need to stand behind the mobs for the ability to work. After you have used the ability, a red pulsing circle will appear around you for a few seconds, if another mobs enters this circle then you will be seen and this fails the quest. So after each kill you should move away from the mobs until the red circle has gone.
You can just ignore this quest and kill the trash as normal. The quest only awards a little gold.
Steel Silence quest
The Execute ability
Orbs
Around the back of the pillar to the left at /setwaypoint 618 525 is a white orb on the wall.
Standing near this white orb will activate the quest ‘Tale of the Shattered’ Click this orb, and the other 3 orbs around the dungeon to be told the Tale of the Shattered.
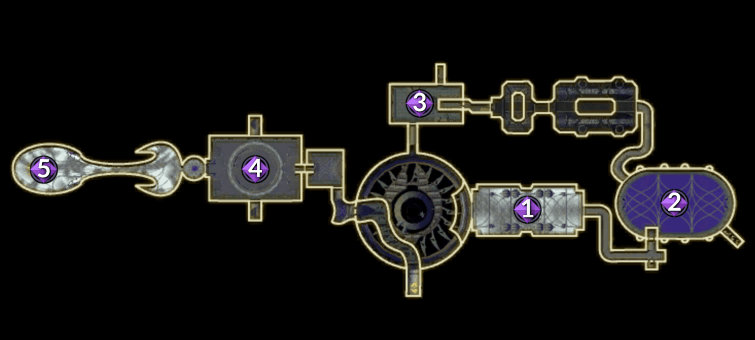
First Orb /setwaypoint 618 525 In first boss room
Second Orb /setwaypoint 772 553 In second boss room
Third Orb /setwaypoint 722 423 In the laser room
Fourth Orb /setwaypoint 394 504 In fourth boss room
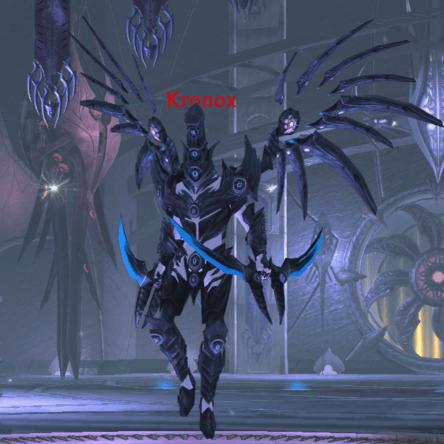
Boss 1 - Kronox
- Normal Mode + Expert Mode
There are a few abilities to watch for..
No Escape – The bosses main attack, this is a frontal cleave, don’t stand in front of the boss!
Keeper’s Gaze – Cast for 5 seconds – 4 adds will spawn around the boss and then slowly walk around the boss in a circle. Dont stand in front of them or they will ‘see’ you. If they see you then you will be stunned and the add will explode which will likely kill you. You can use the temporary backstab ability to kill them, stand behind an add and the backstab ability will pop up so you can use it. When you kill one, a blue circle will spawn where it died, standing in the blue will give you a DPS boost, but watch out for the next add circling round, move out before it sees you!
Arc Blast – The boss will knock everyone back and then cast Arc Blast for 5 seconds – Move into the green circle before the cast finishes or die!
Keeper’s Wrath/Purge – After 2 Arc Blasts he will emote: ‘Kronox prepares to obliterate anyone who is not behind cover’ and cast Keeper’s Wrath. The whole group needs to move out of line of sight of the boss, the 4 large pillars on either side of the room are perfect for this. After 4 seconds the boss will begin casting ‘Purge’, this is a 20 second cast, during the cast an add will be sent to each pillar. You need to carefully backstab the add, without letting it ‘see’ you and then stand in the circle that appears on his corpse to survive the end of the Purge cast. You can then go back into the boss area and the fight continues.
Charged energy field – After each purge ability, a square energy field will appear and cover the floor around one of the pillars. This will give you less pillars to hide behind the next time purge is cast. Be sure your group knows which pillar to go to!
Kronox
Route to the second boss
Right click the storm fan at the end of the room to go into the tunnels towards the second boss. Follow the tunnel round and then stand on the fan to be blown up the tunnel! If there is an artifact chest across from the fan, you will find you can get there if you use a speed buff or teleport forward ability, followed by a quick jump, before the fan blows you up, this can take quite a bit of practice! Go along the tunnel at the top and drop down into the boss room.
You will again be given a mini quest to kill the Stormwatch mobs, the quest is called ‘Creeping Madness’, this time you need to kill 10 of the mobs without being seen. Use the Execute ability on the Stormwatch mobs to kill them. You will also need to watch for the boss! He will be patrolling around the room, be careful not to agro him before you are done killing adds.
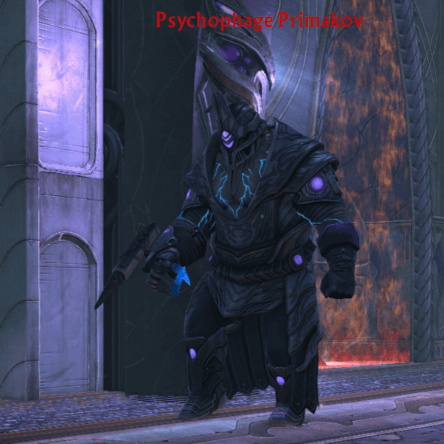
Boss 2 - Psychophage Primakov
- Normal Mode + Expert Mode
There are a few abilities to watch for..
Caustic Concoction – A random player will have a purple circle places beneath them. Move out of the purple!
Forced Conversion – The boss will chase a random player for 7 seconds – Ran away! – If the boss catches you then you will become mind controlled – Be sure the tank is ready to pick up the boss again after the ability is over.
Hypo Snipe – The boss will target one of the captives being held in the cells around the room and the captive will join the fight, kill it!
Chemical Spray – The boss throws a bottle at a random player dealing damage.
Lethal Hallucinations – When the bosses energy reaches 100% the boss will summon 6 Lethal Hallucination mobs – The tank needs to gather them up so they can be AoEd down with the boss.
Psychophage Primakov
Route to the third boss
To get out of the second boss area, right click the Storm Fan blocking the tunnel in the north west. Follow the tunnel around and break the next Storm Fan to enter the laser room.
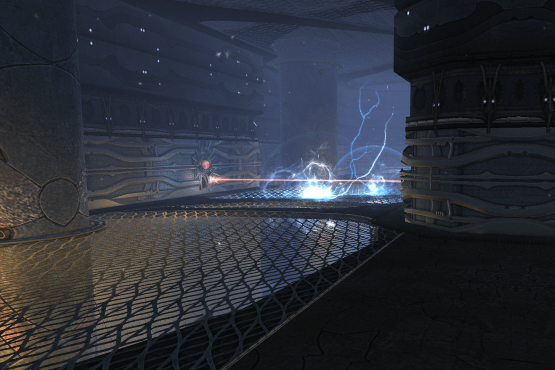
In the laser room, there are 4 levers to pull that will turn off the lasers. You should avoid walking into the lasers, but more importantly, don’t stand in the blue electrical circles that are moving around the room! Carefully make you way to each lever and pull it to clear the way. A low level group will likely want to send their tank in for this task, with the healer on standby to save the tanks life if needed!
Once you have cleared the way, click the Storm Fan into the next tunnel and drop down to the 4th boss room.
Lasers and electric circles are painful!
Follow the path to each lever while avoiding the bads!
Boss 3 - Overseer Cowel
- Normal Mode + Expert Mode
At the start of the encounter, the boss has 3 stacks of a shield buff called ‘Stasis Field’. While the boss has this buff he will be immune to all attacks.
To remove the shield you need to allow the adds to explode while they are stood next to the boss. Drag an add to near the boss, DPS it down to below 20% and then stop DPS. The add will have a pulsing yellow circle around them and will explode after a few seconds. IF the boss is inside the circle then it will remove 1 stack of his shield. Be careful not to stand in the circle yourself as it will deal damage to players. If you DPS the add too much and kill it then it wont explode, you will need to try again with another add. The adds wearing the long robes are not killable, so these are much easier to make explode, especially if you are a high level player that one-shots everything!
When the shield is fully removed the boss will become active and you can kill him. There are a few abilities to watch for..
Adds will spawn for the duration of the fight, you will still need to move out of any circle explosions, or be sure to kill them without letting them explode. The ranged adds towards the back of the room can be brutal to your healer, so you may want to assign a specific DPS to kill them off quickly.
Turret – The turret will be shooting into the room, avoid the expanding yellow/electric circles.
Painful Command – Red circle placed on a random player, radiates damage around that player, spread out!
At 50% health the boss will go back to his spawn point and transform into a mech. The following ability will be added to the fight
Cacophonic Crescendo – The boss will hurt everyone in the room and then pull them into melee range and after a few seconds, anyone still in melee range will be hurt some more! This can easily kill low level players, so move out asap.
Overseer Cowel
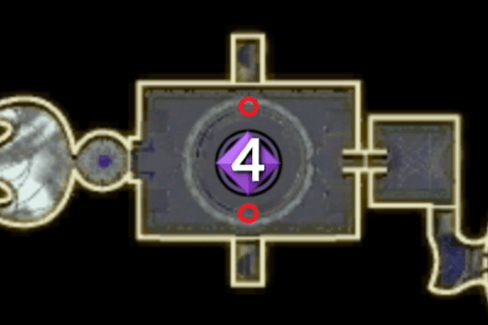
Route to the fourth Boss
Right click the Storm Fan to the south of the room to enter the next tunnel. Go through the tunnel and jump up the next set of platforms. From the second jumping platform you can see a large balcony below, this balcony may have one of the artifact chests on it, you can drop down to the balcony and then jump across to go back to the first jumping platform.. be careful not to fall off!
When you reach the top, go to the right into the small room, here you will find a Storm Legion Armor Rack, you need to click this rack and gain the disguise/costume before the next boss room will open.
Once you have the costume on you can continue into the next room. This time you will be given a mini quest to Use the 2 Field shut off levers, the quest is called ‘Wolves in Sheeps Clothing’, You will need to clear a path through the mobs to get to the levers on either side of the room. Use the Execute ability on the Stormwatch mobs to kill them. Pull the Field shut off lever and then right click the nearby Storm Fan to go into the tunnel and click the Synaptic Conduit.
Click this rack to gain the disguise/costume
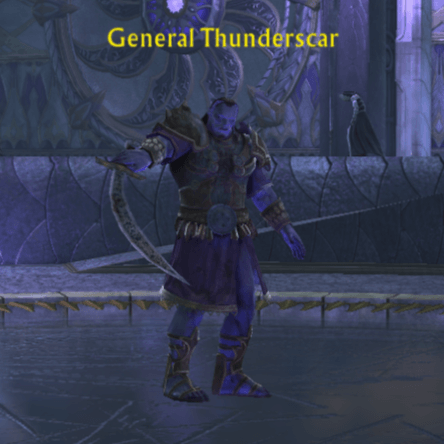
Boss 4 - General Thunderscar
- Normal Mode + Expert Mode
Thunderscar will not move from the centre of the room for the duration of the fight.
There are a few abilities to watch for..
Wild Lightning – Hits a random player and deals damage.
Electric Bolt – The boss’s main attack
Suppressing Winds – Cast on a random player, reduces movement speed for 6 seconds – This can be cleansed off – If its not cleased off then at the end of the 6 seconds it will drop a swirly circle on the ground that reduced movement speed for anyone who stands in it.
Fury of the Thunder – The boss pulls everyone in and then starts a 7 second channel. At the end of the channel, everyone inside the lower circular area will receive a lot of damage (death to low level players). Players need to run out and jump up to the upper area, use the ramps to make a quick 2 jumps up. After the cast is over, the upper area will then have dangerous laser beams so the group will need to jump back down. Most groups will stand at the top of the ramps to the north/south. You will still be pulled in and need to run back to your spot, but you wont get hit by the laser beams here.
Static Charge – Every 20 seconds, 2 or 3 purple wisps will appear and chase a player, if they hit the player then the player gets a Clinging Force stacking debuff that will increase damage taken from Wild Lightning. This debuff can be cleansed, It is this mechanic that will likely kill a low level group, add a support player to help with cleanses if needed!
When the boss is dead, take the lift on the west side up to the next area.
Safe spots for the fight
General Thunderscar
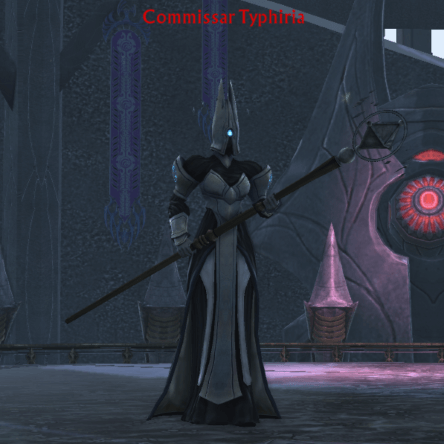
Boss 5 - Commissar Typhiria
- Normal Mode + Expert Mode
Typhiria will alternate between her normal form and her dragon form.
There are a few abilities to watch for..
Violent Energy – 4 blue circles will be released from Typhiria and shot out to the edge of the room in a straight line. Try to avoid being hit by them as they deal a lot of damage. The circles are released diagonally, so if you are stood right in front/behind or the side then you should miss them. Your other option is to stand in melee of Typhiria (within 3 meters) this will grant you the buff ‘Heroic Boon’, which will make you immune to the Violent energy damage.
Searing Flesh – A DoT placed on every player – The players will radiate AoE damage around them, spread out! – Every tick of damage will increase Typhirias energy.
Agony Torrent – Cast on a random player -A yellow orb will be thrown at the players current location, the player can move out of the way to avoid being hit. – If the player is hit then it will increase Typhirias energy.
Storm of Torment – A red circle around the boss that deals damage, move out.
Storm Blast – Targeted at a random player – A yellow rectangle from the boss to the players location, move out before it turns red and deals damage.
Broken Will – Every time you are hit by any of the above abilities you will gain a stacking debuff of Broken Will – At 10 stacks you will become mind controlled and attack other players for a short time (Pain Lash).
Dragon Form – If Typhiria reaches 100% energy then she will transform into a dragon for 30 seconds – The tank will need to kite the dragon around the room to avoid getting close and being damaged by the purple laser from the dragon.
Commissar Typhiria
Neutral Quests
This quest is available for Tower of the Shattered and is for Guardian and Defiant Characters.
Tower of the Shattered
Normal mode Tower of the Shattered PICK UP: The quest is picked up from Itoi Rinu in Tempest Bay at /setwaypoint 12925 11518 TO COMPLETE: Enter the Tower of the Shattered
This quest will autocomplete as soon as you enter the Tower of the Shattered dungeon.
Artifact Crates
Like all Storm Legion Dungeons, Tower of the Shattered has its own unique artifact sets that can only be collected inside the dungeon. In other dungeons, these are simple dropped by the mobs inside. In Tower of the Shattered, there are artifact crates scattered around that will give you a random artifact from the sets.
In the normal mode dungeon, there are 3 artifact crates per run – These give artifacts from the ‘Shattered Remnants‘ Set.
In the expert mode dungeon, there are 6 artifact crates per run – These give artifacts from the ‘Mind Breakers’ Set.
Achievements Available
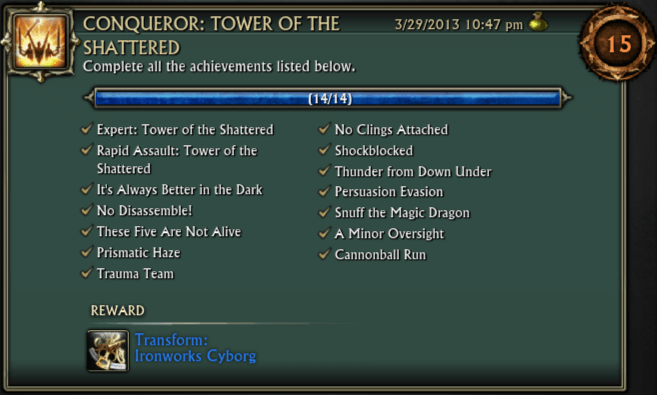
Conqueror: Tower of the Shattered
Complete all the cheevos in Tower of the Shattered
Completing this cheevo will grant you the item ‘Transform: Ironworks Cyborg’ – This item has unlimited uses and will transform you into a mech.
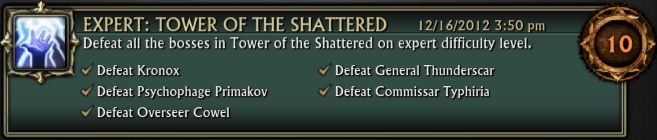
Expert: Tower of the Shattered
Defeat all the bosses in Tower of the Shattered on expert difficulty
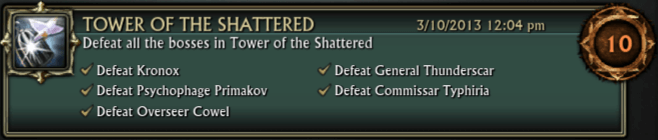
Tower of the Shattered
Defeat all the bosses in Tower of the Shattered on standard difficulty
Rapid Assault: Tower of the Shattered
Defeat all the bosses in expert Tower of the Shattered within 30 minutes
Kronox
You'll Shoot Your Eye Out
Defeat Kronox on expert difficulty.
No Disassemble!
Kill only 2 or less of the Keeper’s Gaze mobs that spawn.
It's Always Better in the Dark
Be careful not to stand in front of any of the keeper’s Gaze mobs, this is especially difficult when they come running in while you are behind the pillars, stand away from the pillar near the fence to avoid this.
These Five are not Alive
Kill 5 of the Keeper’s gaze mobs before you kill the boss.
Psychophage Primakov
The Doctor Is In
Defeat Psychophage Primakov on expert difficulty Note: The wrong boss is named on the cheevo.
Trauma Team
Don’t kill any of the Captives! A low level group may want to add in an off tank to gather the captives and tank them away from the boss.
Prismatic Haze
Kill the boss slowly to allow at least 4 of the Lethal Hallucinations waves to spawn. The boss will stun your character during the fight. If you are playing solo then the boss may reset while you are stunned, as there will technically be no-one in combat with him. To prevent this, you can bring another player with you, or use a pet spec so your pet stays in combat.
Overseer Cowel
Off The Air
Kill Overseer Cowel in expert mode.
Cannonball Run
Wave of Distortion is the damage from the expanding yellow/electric circles shot from the turret
A Minor Oversight
Have 4 of the dudes in robes (Legionary Sicari/Stormwatch Sicari) alive when the boss dies.
General Thunderscar
Thunderscorned
Kill General Thunderscar on expert difficulty
No Clings Attached
You will be hit by Clinging Force if you run into the purple orbs, avoid them!
Thunder from Down Under
Ensure you get out of the lower circle quickly after being pulled in. Use insoles and/or movement speed abilities to help!
Shockblocked
Don’t get hit by the laser beams in the upper area after the Fury of the Thunder cast.
Commissar Typhiria
Der Kommissar is Down
Kill Commissar Typhiria – The name in the cheevo is wrong!
Snuff the Magic Dragon
Kill the boss quickly and avoid the bad abilities so she doesn’t gain energy and turn into a dragon quicker.
Persuasion Evasion
Stay out of the bad abilities to keep your stacks of Broken Will below 10.
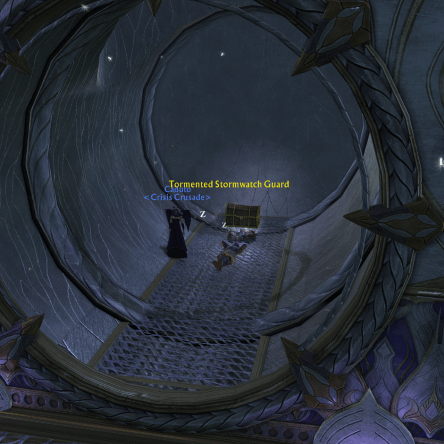
The Sinister Presence
Tower of Nightmares
The Sinister Presence is in the tunnel to the north of the 3rd boss room. /setwaypoint 545 411 Kill the Tormented Stormwatch Guard to spawn the Sinister Presence and then kill it.