Location: Tempest Bay Waypoint: /setwaypoint 12774 11756
Number of Standard bosses: 4 Level of Standard bosses: 52-56 Number of Expert bosses: 4 Level of Expert bosses: 60
Solo at 70?: Yes, but you may need two players for the wall defense on the route to second boss. All cheevos while solo?: No – You will need two players for ‘He’s Bugged’
A level 70 player can easily kill everything in this dungeon. This guide is mainly designed to show you how to get the cheevos and do the quests. If the content becomes ‘relevant’ again then I will expand the boss guides as needed and add more detail.
You're a Robot Harry
For the first half of the Storm Breaker Protocol dungeon you will be wearing a mech suit. Use the control panel at the beginning of the dungeon to put your mech suit on. This mech suit will replace your normal ability bar, giving you super mech abilities!
Ability 1 – Robo Rumble – AoE Melee – Use it 3 times in a row, the third hit does more damage and reduces cooldown for your other abilities.
Ability 2 – Eradication Pulse – Single target ranged – Press it once to charge your cannon, then press it again to deal damage.
Ability 3 – Rocket Salvo – AoE ranged – Deals good aoe damage and you can also use other abilities while Rocket Salvo is active.
Ability 4 – Inferno Cannon – AoE ranged – This is your best AOE ability, but it has 30 seconds cooldown.
Ability 5 – Shield Matrix – Shield – It has 40 seconds cooldown and it reduces the damage you take by 70% for 6 seconds.
Ability 7 – Overcharged Defibrilator – Resurrect – Has a 5 second cast time and a 30 second cooldown, it can be used while in combat to resurrect other players.
Last Ability – Evacuate – Allows you to leave your Mech suit. Be careful though, doing so while in the “Robot” part of the dungeon will teleport you to the start of the dungeon.
Heals – The mech suit doesn’t have any proper heal abilities. As you kill mobs in the dungeon, a lot of the mobs will drop green orbs, these can be run through to get healed. try to save these orbs for party members who have very low health.
These abilities will take a bit of practice to get used to. You cannot macro them together, so you will need to manage all the different cooldowns yourself. Try to use the high damage abilities (4&3) as soon as they are off cooldown, use abilities 1 and 2 while you wait for them to be ready again.
Being in the mech suit means that being an overpowered level 70 wont help you for the first 2 bosses! Your health has a set number and all your abilities do sets amount of damage. If you would prefer to do the dungeon without the suit on, simply type [/cast last resort] to kill yourself, then soul walk and don’t get back in the mech! You can also just jump off the platform at the beginning before you put the suit on. Low level groups will be unlikely to survive this!
Use the control panel to mech up!
It's robot time!
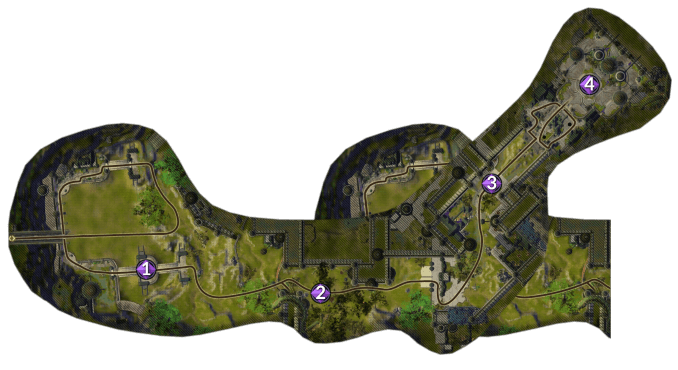
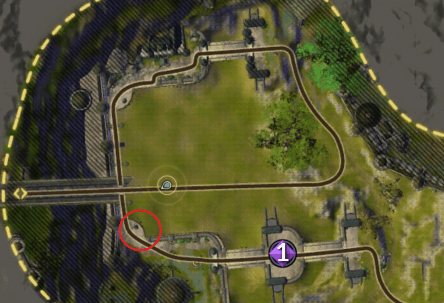
The route to the first boss
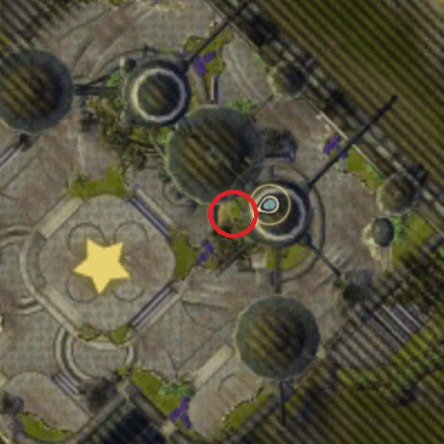
The intention is that you should go all the way around the path, killing all the trash on the way to the first boss. Most groups will skip the majority of this route by jumping up the wall at /setwaypoint 1175 815 marked with the red circle on the map to the right. This jump requires you to spam the spacebar so you end up ‘double jumping’ in the mech suit. A small % of players will be unable to achieve this and will need to go around the route. If you do need to go through the trash, kill the hives first and then all the trash around them, don’t pull too much at once and watch for the flying mobs!
Jump up here
Jump up at the red circle
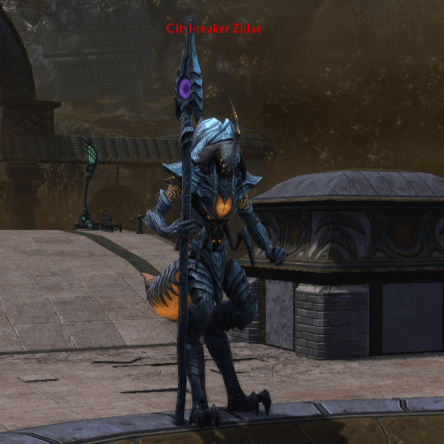
Boss 1 - Citybreaker Zidae
- Normal Mode + Expert Mode
Citybreaker Zidae will cast his attacks on the player closest to him, so swap around with your group members to help each other stay alive.
He starts the fight with 4 stacks of ‘Siege Chitin’, a damage reduction buff. You can remove these stacks by dragging Citybreaker Zidae near the barrels in the corners and making them explode. The stacks will reapply over time.
Try to stay out of the red AoE and especially out of the fire. He does a frontal cleave/knockback that can be quite painful, try not to get caught in it!
Citybreaker Zidae
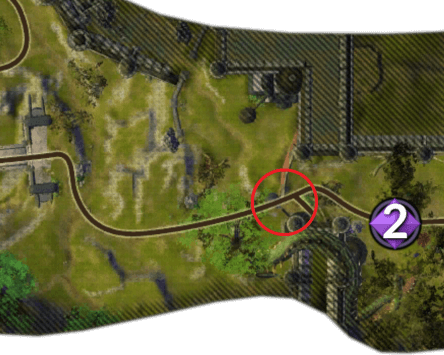
The route to the second boss
On the way to the second boss you will hit a wall! Some helpful Storm Legion engineers will come to place explosives to blow up the wall.. your job is to protect them! The area will be attacked by multiple mobs from different directions, the fight will last 2mins 30secs.
Keep a couple of players at the wall to protect the bombers, send a couple of players out to destroy the Hives, this will slow the attack.
There are barrels dotted around which you can use to heal.
If you fail, there is a control panel to the right of the wall that can be clicked to try again.
This bit can be really difficult for a solo player, get a friend to help you if you can!
Defend the engineers
Protect the wall bombers at the circle!
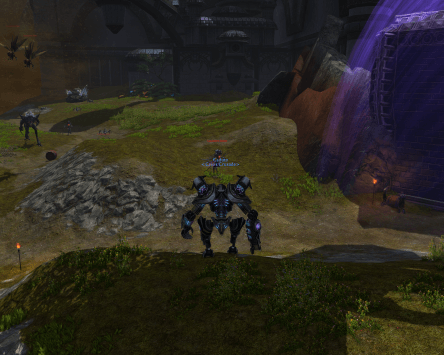
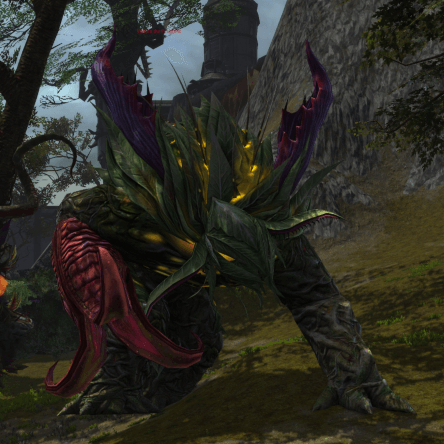
Boss 2 - Vellion the Pestilent
- Normal Mode + Expert Mode
The boss is split into separate ‘parts’ for you to attack. He has a left and right trunk (legs), a Pestilence Spewer (left arm), and the Exposed Viscera (part of his back).
To kill the boss you need to destroy both the trunks, this will make the boss crouch and you will be able to jump up to his back and attack the Exposed Viscera, once this is dead then the boss dies. To jump up, simple face the boss and jump towards him, the mech will land in the right spot. Ensure you turn to face the centre of the boss so you can attack the Viscera. You will have a short time up there to attack, use it! When you get thrown off the trunks will have regrown, so you need to kill them again to jump back up.. repeat until the boss is dead!
Vellion the Pestilent
The route to the third boss
Be sure to pick up your loot from the treasure chest at the exit from the second boss area.
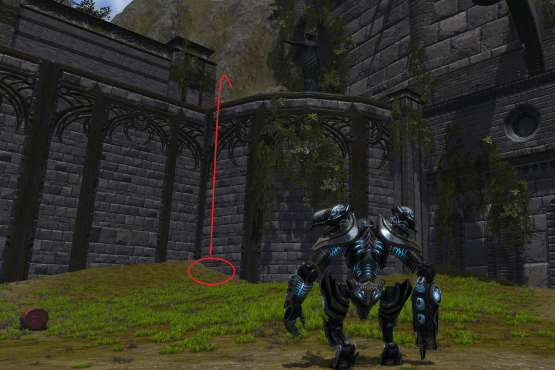
As you go up the slope you will be knocked back and lose your mech suit.. yay!
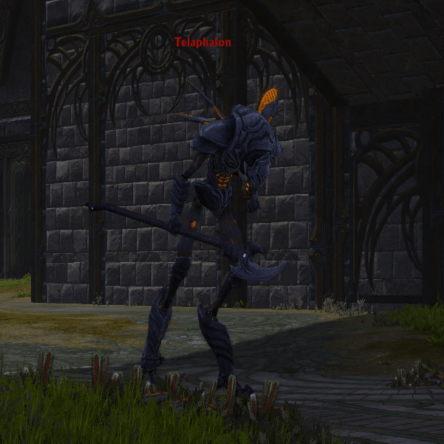
Boss 3 - Telaphalon
- Normal Mode + Expert Mode
Telaphalon has a few main abilities:
Chitin Weave – A random player will be wrapped in a cocoon. Another player needs to run up to the cocoon and use the reactive ability ‘Unravel’, then run away from the cocoon to unwind the web and break the cocoon.
Tectonic Rupture – Cast just after the Weave – This cast is 8 seconds long, if the cast finishes then the boss will deal 200k damage, at low level this is a wipe! You need to DPS the blue shield off the boss, this will make the cast bar turn blue so it can then be interrupted.
Magma Torrent – A damage over time debuff that can be cleansed.
Molten Ground – A fire circle under the boss, low level tanks will need to move out.
Gushing Wound – Dot on the tank – Just heal through this.
There will also be waves of adds coming up the slope towards the boss, if any of these adds reach the boss then they will each give him a buff that increases the bosses damage by 10%. You can go up to the bridge, using the control panel under the bridge, and use the cannons to shoot the adds, but even low level groups tend to just kill the boss before the adds arrive.
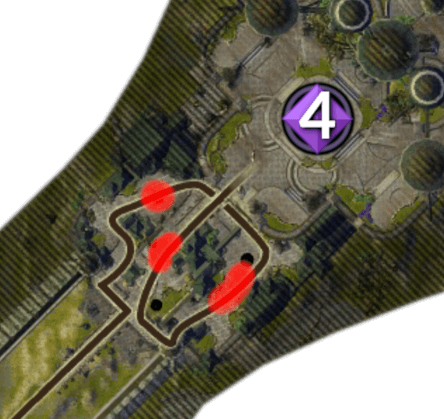
On the way to the 4th boss as you go around the plaza, you will encounter 3 Onslaught locations. At each location you need to fight off waves of attacking enemies.
At the entrance to the plaza you can pick up a tactical object, you have a choice between a healing turret or a landmine dropper. Both are pretty useful so just go with what your group needs!
Follow the path around the plaza till you hit the barriers, then fall back to the central location of that onslaught and make your stand there.
Before the last boss spawns there will be another onslaught on the boss platform while a teleporter is being built.. kill them all!
pic of boss
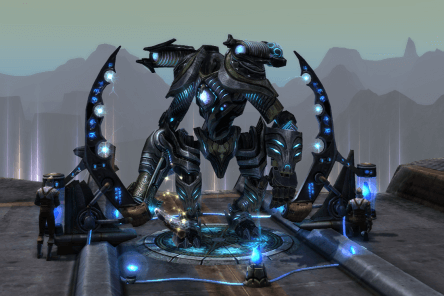
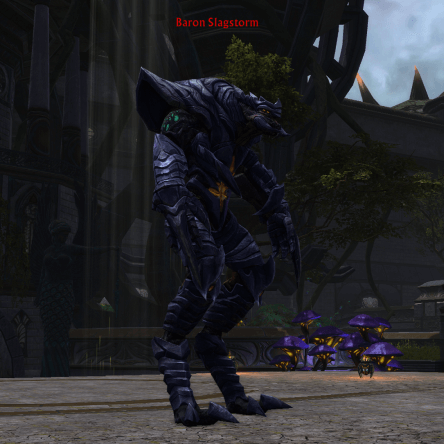
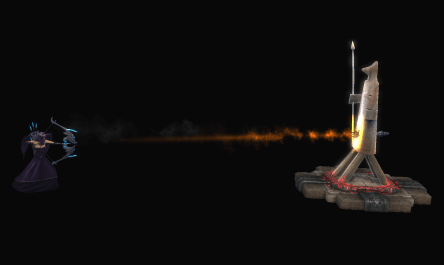
Boss 4 - Baron Slagstorm
- Normal Mode + Expert Mode
The boss has a few main abilities:
Ion Surge – A 20 second channel – Pick up the Negation Core and run it through the laser beams to the crystal that will spawn to the left or right of the platform, then DPS the crystal down before Ion Surge finishes casting. Low level groups will need all the DPS to run to the crystal.
Ion Shield – Boss will reflect all damage for 10 seconds, this can be purged or DPS should just stop attacking til the shield is gone.
Chain Lightning – Hits 4 players – Leaves a DoT than can be cleansed off.
Adds – Boss will summon two adds to help him out – Pull them to the boss and cleave them down, DPS may need to ST them down if too many are up and the tank starts to suffer.
Baron Slagstorm
Neutral Quests
These quests are available for Storm Breaker Protocol and are for Guardian and Defiant Characters.
QUEST: Deconstructing the Architects (Normal mode Storm Breaker Protocol) PICK UP: The quest is picked up from Itoi Rinu in Tempest Bay at /setwaypoint 12925 11518 TO COMPLETE: Deploy the Storm Breaker Protocol
This quest will autocomplete when you click to put on the mech suit at the start of the dungeon.
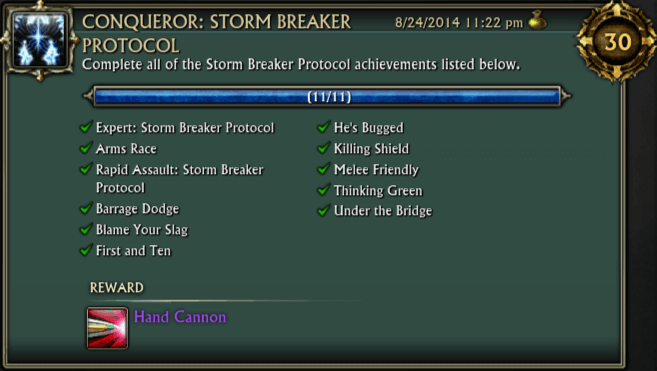
Achievements Available
Conqueror: Storm Breaker Protocol
Complete all the cheevos in Storm Breaker Protocol
This cheevo awards the ‘Hand Cannon’ trinket.
To use it, equip it to your character, then drag it to an action bar, click the action bar button to use it.
Using the trinket shoots a cannon shot at your target. This does very little damage and it pretty useless, it’s just a fluff item.
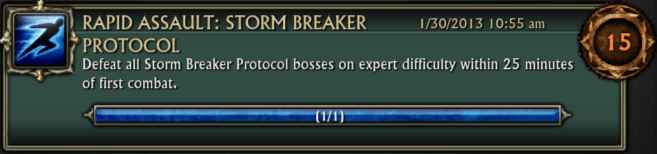
Rapid Assault: Storm Breaker Protocol
Finish Storm Breaker Protocol on expert difficulty within 25 minutes of first combat
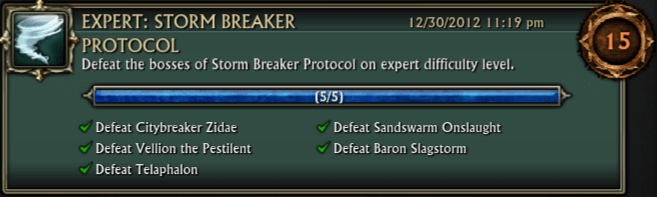
Expert: Storm Breaker Protocol
Defeat all the bosses in Storm Breaker Protocol on expert difficulty
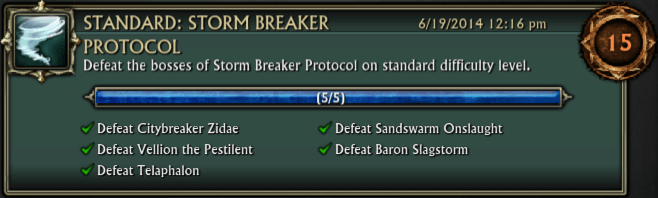
Standard: Storm Breaker Protocol
Defeat all the bosses in Storm Breaker Protocol on standard difficulty
Citybreaker Zidae
Killing Shield
The stacks are removed by taking the boss close to the barrels in the corners and exploding them. Be sure the boss stays towards the middle of the room and the stacks should not get removed.
Barrage Dodge
Stay out of the red on the floor, you only need to avoid the first cast of this spell, but the cheevo can be tricky to pop, so best to just stay out of all red! Attack with ranged spells and concentrate on where you are stood at all times.
Vellion the Pestilent
Thinking Green
Drag the boss away from the blossoms so they don’t get hit by AoE accidentally.
Arms Race
Carefully avoid hitting the Pestilent Spewer (the bosses left arm)
Melee Friendly
Stay at range, use ability 3 to kill all the things!
Telaphalon
He's Bugged
Allow 10 of the adds to reach the boss and give him stacks of the buff, you will need a good healer (or two) for this! It is likely you will need 2 players to be able to complete this cheevo, as the boss will ‘wrap’ you before he has ten stacks, you will need a second player to unwrap you, or to just kill the boss for you.
Under the Bridge
Kill Telaphalon before any of the adds reach him.. or use the cannons to kill the adds.
Baron Slagstorm
First and Ten
Get the boss to 80% quickly so he casts the first Ion Surge, run the Core to the crystal but allow the beams to hit you so you take 10 ticks of damage.. this may require you to have your own dedicated healer! Note: It is ten ticks of damage that needs to hit you, not ten separate beams. You can stand in the same beam for around 10 seconds to receive ten ticks of the damage, then kill the crystal quickly before the bosses cast is finished.
Blame Your Slag
Pulse Stream is from the laser beams between the platform and the crystal, just avoid them! Destabilization – I have tried to get this spell to hit me but it just wont! It’s possible that it was removed from the fight due to it breaking this cheevo, there was a patch to fix this cheevo shortly after release.
The Sinister Presence
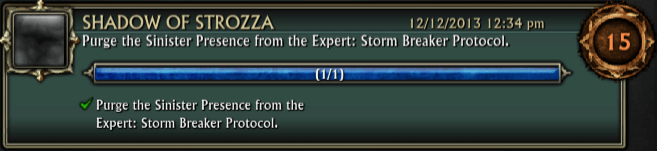
Shadow of Strozza
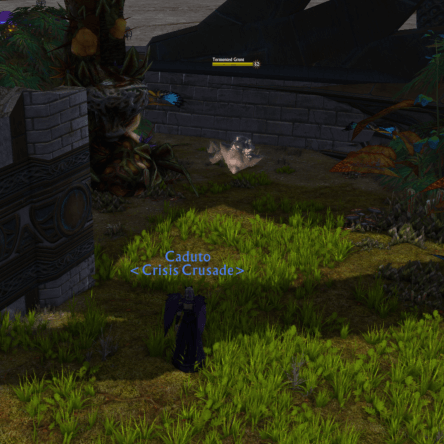
The Sinister Presence is found after the last boss. /setwaypoint 2533 349 Kill the Tormented Grunt to spawn the Sinister Presence and then kill it.