Quick Links for Guides on This Page
Settings to change before you start playing Adding Ability Bars
Edit Layout Chat Box Key Bindings Saving/Sharing your UI The UI went wrong! Changing Config File
One of the best things about Rift is the super versatile UI. There are many settings that can be changed to create a unique and functional UI tailored to your needs.
Some people will also use the Gadgets add on to supplement or even completely replace the UI.
You can find information about Recommended Add Ons here.
For a player just starting out there are a few settings that you will want to change straight away to make your journey more enjoyable. Once you are familiar with the main functions of the UI, you can then start tweaking settings, locations and sizes to make it work best for you.
Your Rift UI can be easily copied over to all your characters, this is explained below.
Settings to change before you start playing
In System > Settings > Interface
Settings to note are:
- Names > Tick the box to show your own name (personal preference really)
- Misc > Ensure ‘enable AoE looting’ is ticked — This loots all the corpses around you instead of having to right click each one.
- Misc > Tick to ‘Auto-Loot by default’ — This will make everything go straight in your bags instead of having a loot box pop up first.
- Misc > ‘Show additional overhead NPC icons’ — This places icons over most of the NPCs in the cities and can just be more confusing rather than helpful. Maybe you like it, maybe not, here is where you turn it off!.
- Combat > Tick the ‘Cast on target’s target’ option. — This will allow you to DPS through a tank (or other friendly target) or heal a tank through the enemy. Very useful!.
- Combat > Ensure ‘PVP Auto Flag’ is switched off — This will stop you from flagging PVP all the bloody time!
- Combat > ‘Hide Other Players’ Hit FX’. — This should be turned off if your computer is struggling during group fights.
- Social > Chat bubbles or not? — Up to you.. Profanity filter or not? Up to mummy and daddy.. and of course you want to know when your friends log on and off.
- Status Text > Tick all the boxes. — This allows you to see the actual numbers in health/XP bars and the percentages.. super useful.
- Display > ‘Use raid frames for parties’ tick this box.
- Display > Quest stickies – Turn it all the way up to 10.
- Display > Bag UI Scale – Turn it down to somewhere between 65 and 80% — This may not matter much at lower levels, but once you have loads of bags cluttering your screen you will be glad you got used to smaller tiles early on. You may want to reduce the size of the store and minion screen while you are here too (To about 90%).
You should look at every tab at some point and experiment with the settings until you feel they are right for you, especially with things like the colours and nameplates, which are all personal preference.
More in depth settings
Creating a UI that works for you
Adding Ability Bars
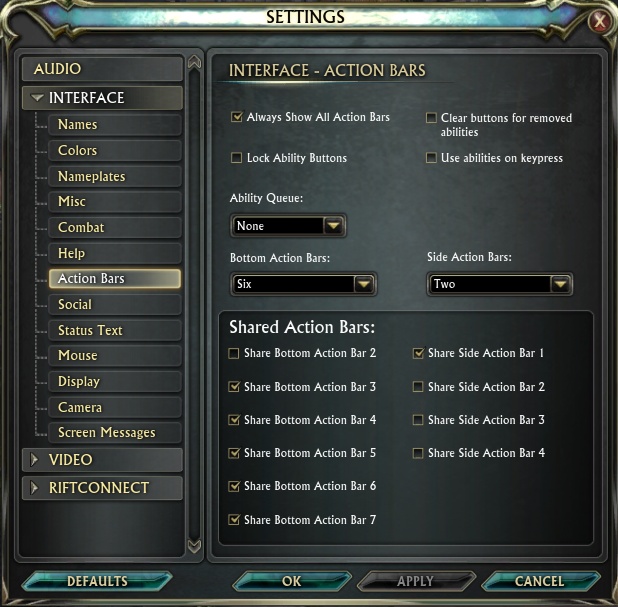
To change your number of ability/action bars go to..
system > settings > interface > action bars.
You can have up to 11 action bars total, 7 bottom and 4 side.
Your action bars are linked to the role that you have loaded, when you switch role you will have a fresh set of action to put all your skills into.
You can tick the box on the list of action bars to make that action bar shared across all your roles, this is great for skills/abilities that you use that are not linked to your spec, such as teleports, mounts and other fluff.
You can add key binds to all of your action bars in the Key Bindings menu
(explained below).
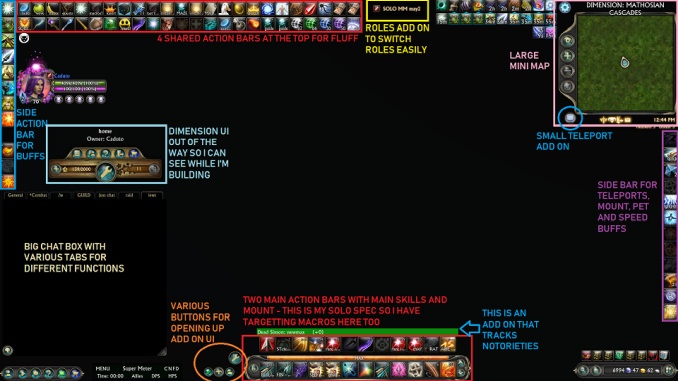
I use 8 action bars, 4 of which are just for fluff. Most people would consider this a lot!
Everyones UI is different, there is no right or wrong way to do this, however if you plan to raid (or do any group content) at end game then you will need a flexible UI to enable you to play your specs efficiently while still being able to see what is happening around you.
This will take a lot of tweaking as you level up and familiarise yourself with the game. Especially as you add addons.
As a new player, you should add 1 or 2 extra ability bars straight away as your first bar will fill up quickly!
Edit Layout
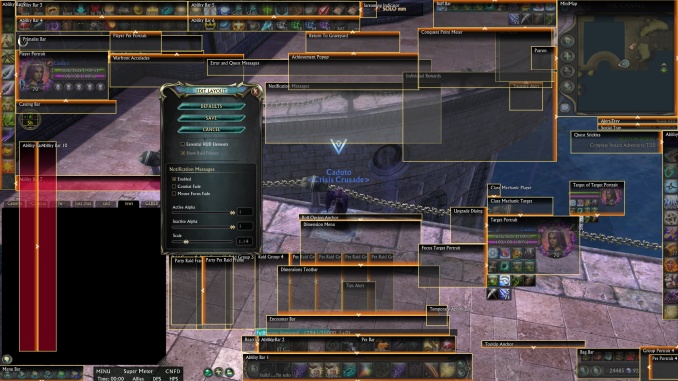
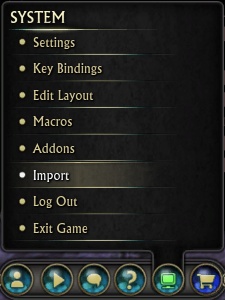
In the system menu you will also find the edit layout option.
This allows you to edit, resize or hide every UI element.
Be aware that there is a global UI scale slider in..
System > Settings > Interface > Display
..that will resize all your UI elements at once. Use this first to get a general preferred size and then you can use edit layout to resize specific elements individually .
Click and drag elements to move them around the screen. You can ‘snap’ them to other elements or leave them free floating.
Select an element to change its size, transparency and if you want it to disappear while you are in combat.
Chat Box
Layout and Chat Tabs
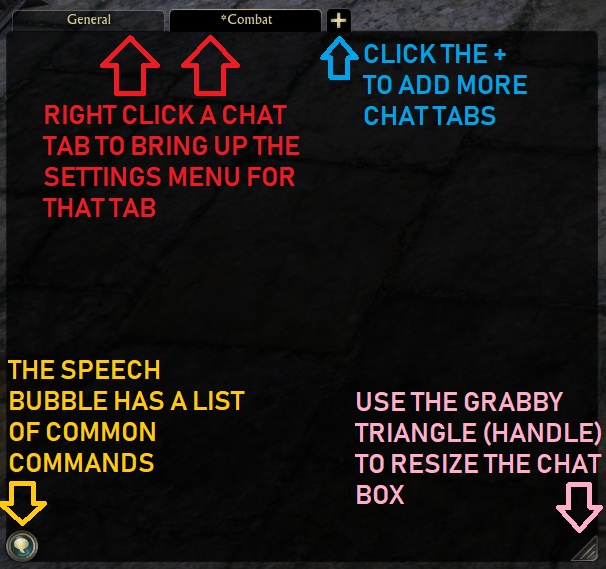
Click the + to create a new chat tab. Right click each chats tab top to open up a settings menu for that tab. You can make chat tabs with various different filters, so you can see only your loot in one tab, just guild chat or whispers in another, and maybe a chat tab just for zone events too. You can make up to 5 extra tabs (7 total) and tailor each of them with different filters so that you can keep track of everything easily.
You can change font size and background colour of each chat tab, as well as the text colour for each chat channel, by right clicking the tab and changing the general settings.
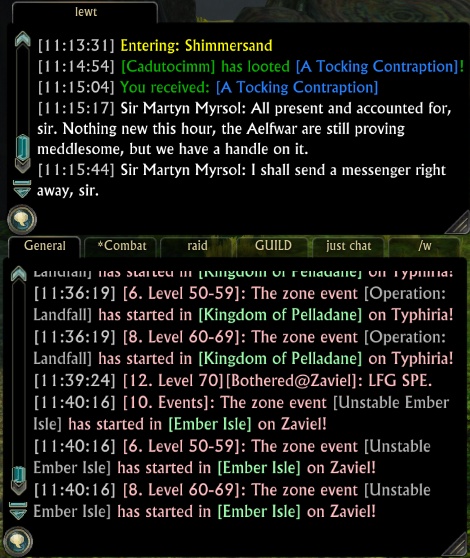
Click and drag the general tab top to move the whole chat box around. Right click the tab top to lock it in place when you are happy with the position.
You can also pull a chat tab out of the box and keep it separate, so you can keep an eye on two tabs at a time (as shown on the left).
Making your chat box a pleasent place!
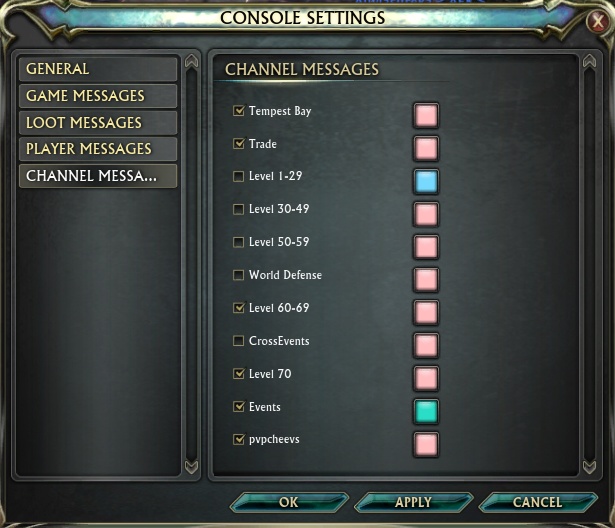
Some of the global chat channels can get a little ‘spicy’ at times.
You can create seperate chat tabs without some or all of the global channels to give yourself a break from the masses.
You can also leave a channel by typing “/leave level 1-29”
You can rejoin the channel by typing “/join level 1-29”
It is much easier to just tick or untick the channels in the chat settings though.
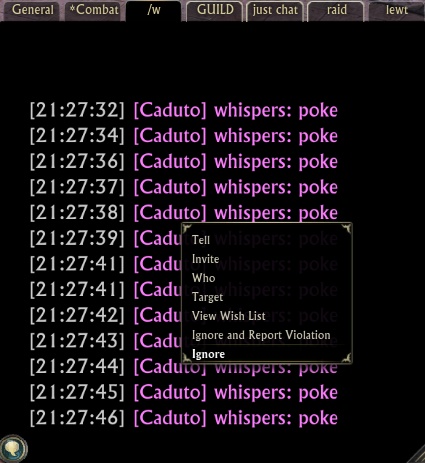
Ignoring Players
If a player is being particularly bothersome then you can left click on their name to instantly pop them on ignore. If you think they are Violating the Code of Conduct then you can report them using this same menu. You can also report players on this Official Gamigo Report Page, here you can include pictures or videos as well!
Players you have ignored will be added to your ignore list in the social UI/menu.
Ignoring a player ignores their entire account, all your characters will now be ignoring all their characters.
Ignored players will not be matched with you in dungeon groups.
An ignored player will not be notified when you put them on ignore, however, if they try to whisper you then they will get a message to say you are ignoring them.
Create your own channels!
You can create your own chat channels to talk with your friends. You may be invited to playermade channels that are shared by 2 or more guilds or that are for talking about certain game aspects such as dimensioneering.
To join a channel simply type..
/join [channel name]
Some channels will be hosted on a different shard to you, so you will need to type the shard name too, for instance:
To join the NA dimension channel — /join Dimensionaddicts@Deepwood
To join the EU dimension channel — /join Dimensionaddicts@Typhiria
Channel commands
When you join a channel it will be allocated a number in your chat list, this means not everyone will have the same channel numbers as you!
Where the # is the number of the channel…
You can select a channel to type in by just typing /#
You can leave a channel by just typing /leave #
You can create a list of people in the channel by typing /chatwho # (only works for small channels)
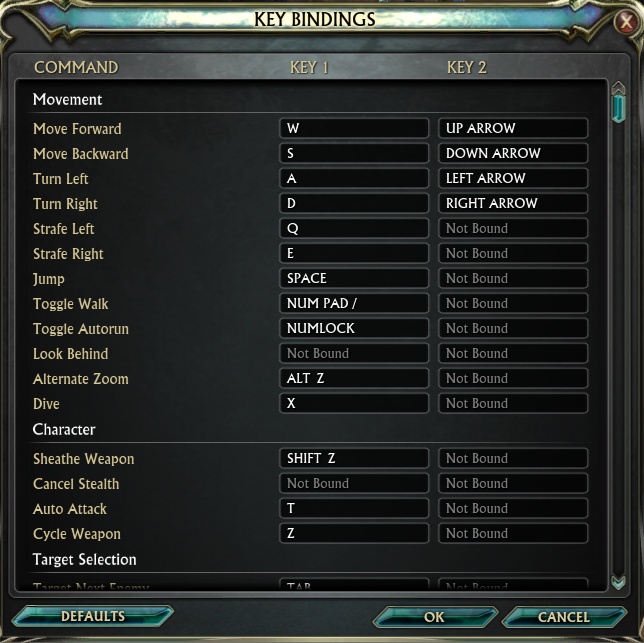
Key Bindings
In the system menu you will find the list of keybindings. Most of these are pretty standard, but you should go through all of them to familiarise yourself with the general controls and to change some to what you are more used to.
Keybindings to note are:
UI Toggles > Hide Other Players: Default is unbound, make sure you bind it to a key! Pressing that key will hide all other players around you, this is very useful in busy cities when you need to select NPC’s or during busy zone events if your computer is lagging a lot.
Other Players will only be hidden while the key is pressed, you can change this to a toggle by setting up a key bind of two keys, like CTRL+F11, then hit CTRL, then F11 and let go of CTRL first then release F11, this will keep other players hidden without keypress til you do the same again to unhide them.
You need to use different keys for the two types of toggle.
UI Toggles > Battle Pass: Default is unbound, even the newest of players can participate in the Battle Pass, bind a key to open up the UI and check the quests each day for ones you can do. As you level up you will be able to complete more of the quests.
Saving/Sharing your UI
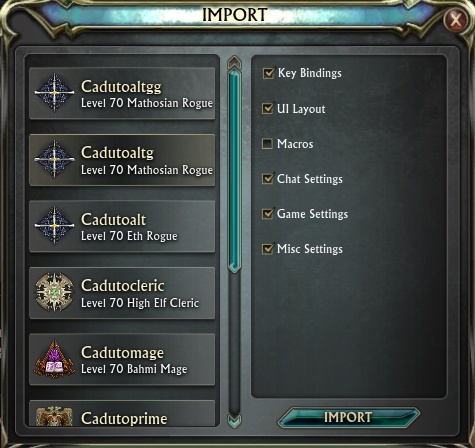
You can easily transfer all your UI settings between characters on the same shard.
Simply log into the character that you want to copy the UI on to and select the import option in the system menu.
Then select the character you want to Import FROM and which settings you want to import.
This will only work with characters on the same shard.
To copy your UI to other shards, you can create a level 15 mule character to copy your UI to and then transfer it over to the target shard, or you can use the UI import/export commands.
You can save your UI layout and keybindings using..
/exportui name
/exportkeybindings name
Then import it to another character using..
/importui name
/importkeybindings
This method is great for copying layouts between regions.
Note that this will not copy your macros.
The UI went wrong!
Sometimes we accidentally move or rearrange our UI in such a way that it becomes impossible to put it back right! And super rarely a piece of UI may just disappear with no obvious way to get it back.
In this case, the easiest thing to do is import your UI back from a different character that already has the same UI as your troubled character.
Or maybe you saved your UI using export command and can get it back by using the import command.
If neither of these options is available to you, then you may have to do the last resort, which is completely resetting all your UI changes.
To do this, type /resetuitodefaults into the chat box.
You can then start again from default.
When you have your UI looking as you want it, remember to use the export command, or create an alt just to import your UI to it and then hopefully you will never have to go back to default again!
Changing Config File
Changing your Rift config file can open up many options that are not available in game.
Be aware that any changes made are down to you to test and maintain. If they cause errors in your game then the changes are easy enough to reverse, just ensure you take a back up copy of the file before making any changes.
Finding your config file.
The config file is found in the main Rift install folder.
For most users this will be … C:\Users\*your name*\AppData\Roaming\RIFT\Rift.cfg
AppData is a hidden file, you will need to change your folder setting to show hidden files.
The file is a CFG file, you will need to open it using Notepad.
Making changes
When you make changes you will need to switch the file to read only. Otherwise rift will read the file, realise it’s ‘wrong’ and rewrite the correct numbers back!
Make changes only while the game is closed.
If you are unsure of the number you want, make small changes and check in game between each change.
Original Camera Distance Settings
[Camera]distanceScale = 20.000000
distanceScaleAlt = 3.000000
maxDistanceScale = 20.000000
maxDistanceScaleAlt = 20.000000
pitch = -0.421264
useAltDistScale = False
yaw = 0.000000
Modified Camera Distance Settings
[Camera]distanceScale = 20.000000
distanceScaleAlt = 40.000000
maxDistanceScale = 20.000000
maxDistanceScaleAlt = 40.000000
pitch = -0.421264
useAltDistScale = True
yaw = 0.000000
Changing your cameras view distance.
Rift is a third person game, so your camera floats behind your character, allowing you to see the world around them. Many players feel that they cant quite see enough of that world!
In the config file you can adjust the maximum camera distance, so it floats much further away from your character and allows you to see much more of the world.
Be aware that adjusting this setting will work your GPU much harder as it will have to render more of the world, this is only for systems that can handle this extra stress.
On the left you can see example numbers. Note only two numbers have changes, and the ‘useAltDistScale’ False has changed into True.
Changing the useAltDistScale to True will mean that the new distance settings are always used. If you prefer, you can leave this on False and then when in game you can use [ALT+Z] to switch between the normal and modified distances.
The maximum is 100.
You can play around with the other numbers if you wish!