
Introduction
There are 153 Bounty Artifact sets available to collect.
Completing each set will go towards a variety of cheevos, it is these cheevos that hold the rewards.
Handing in a complete set to a Bounty Hunter NPC will further your Achievements for Bounty Hunting. Each Achievement rank grants you a Title, some unique items (including Animal Calls, Mounted Trophies for your Dimensions, and a unique cloak), and access to a special vendor who will sell some interesting potions.
Remember to check the Auction House regularly for Bountys that you need, and that Bountys also drop from minion missions, especially those 4 hour missions! All bounties drop from the minions, but Relics are very rare compared to the epics.
Bounty artifacts come in two types; PVP and open world monsters.
Hunting PvP Bountys
PvP Bountys are of course found in PvP! You will find them in the loot chest ‘Reaper Supply Crate’ that you get when you win a PvP match.
Bountys do occasionally drop from players during the PvP matches but this is super rare.
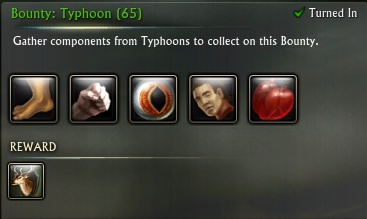
There are 47 sets to find, each with a Foot, Hand, Eye, Head and Heart.
The bountys that drop from the Reapers Supply Chest are completely random, there is no way to make certain classes drop, the classes/souls of the players within the PvP match have no bearing on the bounty drop.
The Primalist Bountys are the most rare as these were added last.
Mage
Bounty: Archon
Bounty: Chloromancer
Bounty: Dominator
Bounty: Elementalist
Bounty: Harbinger
Bounty: Necromancer
Bounty: Pyromancer
Bounty: Stormcaller
Bounty: Warlock
Bounty: Frostkeeper
Cleric
Bounty: Cabalist
Bounty: Defiler
Bounty: Druid
Bounty: Inquisitor
Bounty: Justicar
Bounty: Purifier
Bounty: Sentinel
Bounty: Shaman
Bounty: Warden
Bounty: Runeshaper
Rogue
Bounty: Assassin
Bounty: Bard
Bounty: Bladedancer
Bounty: Marksman
Bounty: Nightblade
Bounty: Ranger
Bounty: Riftstalker
Bounty: Saboteur
Bounty: Tactician
Bounty: Shadeborn
Warrior
Bounty: Beastmaster
Bounty: Champion
Bounty: Paladin
Bounty: Paragon
Bounty: Reaver
Bounty: Riftblade
Bounty: Tempest
Bounty: Void Knight
Bounty: Warlord
Bounty: Warchanter
Primalist
Bounty: Titan
Bounty: Preserver
Bounty: Vulcanist
Bounty: Dervish
Bounty: Typhoon
Bounty: Berserker
Bounty: Maelstom
Hunting Open World Bountys
There are 2 main ways to hunt open world bounty artifacts..
- Lots and Lots of killing! Whenever you kill a mob that gives you experience it will have a chance to drop a bounty artifact pertaining to that creature type. This means that you will occasionally loot a bounty artifact from pretty much any mob in the game at random. This is a super slow method taking weeks/months/years of killing. Bountys that drop from normal mobs should be considered a happy bonus and not really a proper way to farm them.
- Hunting ‘Most Wanted’ bounty mobs. Much like rares, these mobs are not always up, but killing one guarantees you a bounty artifact drop. In this guide you will find maps and lists showing you where to find each of the Bounty Mobs and what they drop.
Information
There are lots of different Most Wanted mobs roaming the lands waiting to be killed.
Each Most Wanted mob is a different race/creature and will drop the bounty artifacts from that creatures set.
Most Wanted mobs are split up into groups depending on their level, each group will spawn in specific zones. Each zone will have a small number of spawn locations where any of the Most Wanted mobs eligible for that zone can spawn.
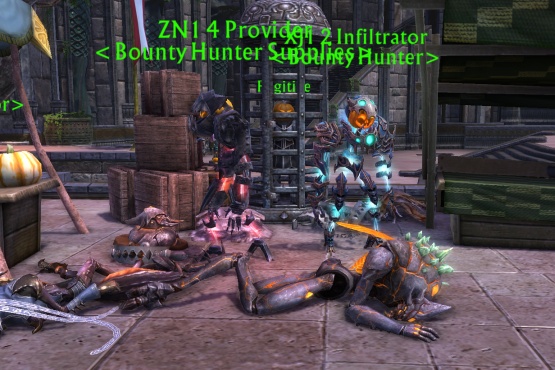
Most Wanted mobs are ‘passive’ when you meet them, they will not attack you unless you attack first! This can often make them easier to spot in a crowd of angry mobs.
All of the Most Wanted Mobs will have the guild tag < Most Wanted > except the ones in PTW which are tagged with < Rival Bounty Hunter > . Most of the Most Wanted mobs can be easily soloed, though remember you do need to mentor down if you wish to loot the artifact from them! A couple of the mobs are very difficult to solo and you may want to summon a friend to come help you for these. Your friend can stay unmentored just make sure the mentored player hits the mob first.
Spawn Timers
Only one Most Wanted mob can be up at a time on each shard for each zone or zone group. Once a mob is killed, there is a respawn timer, which can be anything from 30mins to 2+ hours long. The respawn rate is not based on player population. The Mathosian Bounties respawn much faster than the Storm Legion Bounties.
You should not feel like hunting these mobs is going to be a 24/7 endeavour. It will be much more beneficial for you to do a full check of all the locations/zones you need and then wait for a day before coming back to check again. Even just checking a single zone/zone group will likely net you a few bountys to kill, you can then choose a different zone to check every couple of hours.
Straight after the weekly server downtime (Tuesday morning) is not a good time to hunt bountys as they take a while to spawn in, it’s best to wait at least a few hours. Spawns are not effected by the daily reset.
Spawn Locations
Most Wanted mobs tend to spawn and stay still or walk in a small area about the size of a rift, except in PTW which has its own explanation. Different mobs may spawn in slightly different locations in a general area, so one mob may spawn at the top of the stairs and another near the bottom, or a mob may spawn inside a building while another just stands at the doorway and another wanders around outside. The target macro does work quite a distance (about 100 metres), so standing at the waypoint and clicking the macro should catch any that are up. The waypoints listed are the ‘centre’ of the various spawn points for the mobs, so the mob you find may not be exactly on the waypoint but will still be targetable.
It's Stuck in a Rock!
Occasionally, you may come across a Mob that is stuck in a rock or other scenery. Sometimes the mob will path back out of the rock within a few minutes, other times it will stay stuck til reset. You can try laying ground aoe near the rock to agro it, or sending a combat pet in to attack it, some tank taunt abilities will also work to draw the mob out.
You will find that the number of mobs stuck in rocks will increase as the week goes on, many of them will not be fixable until after the weekly downtime when they are all reset.
This is more common in the Storm Legion zones.
The Bounty is Running Away!
Sometimes you may approach a Bounty mob and see it start walking in a straight line away from the spawn location. When this happens you need to agro the mob and kill it ASAP, ensuring you are correctly mentored first! If you don’t kill it, the mob will keep walking in a straight line until it reaches the edge of the map, likely getting stuck in scenery and becoming unkillable along the way.
This is often the reason why you may find bounties at the edge of the map or stuck in random locations throughout the map, again, this is more common in the Storm Legion zones.
Quick Guide and Artifact Set Tracking
I have created a google sheets document which has all the maps and a checklist for completing the artifact sets.
This is not a full guide (links to the full guides are below) I made it for myself to use to keep track of the sets I still needed, feel free to use it and to change it however you see fit. You should use the pages with the full guides first till you are familiar with all the locations and then use the spreadsheet to keep track of your progress as you start to finish sets.
Download link
Select ‘file’ in the top left and then ‘make a copy’, this will save a version onto your google cloud which you can then edit.
Full Maps and Waypoints
You can find full maps, waypoints and pictures of each mob and location in the full guides linked below, click the zone name to go to the guide for that zone.
Where to find your sets
The spawn timers of each group are independant, so, for instance, if you have finished all the sets that drop in the level 35b zones then you no longer need to hunt there and can concentrate on all the other zones.
You can find the sets you need on the table below and then you will know which zones you still need to hunt in.
Level 19
Sets that are completed here:
Bounty: Crab
Bounty: Deer
Bounty: Faerie
Bounty: Fox
Bounty: Frog
Bounty: Goblin
Bounty: Hag
Bounty: Horse
Bounty: Lizard
Bounty: Owl
Bounty: Rat
Bounty: Satyr
Bounty: Squirrel
Bounty: Treant
Bounty: Wolf
Level 27
Sets that are completed here:
Bounty: Ant
Bounty: Basilisk
Bounty: Bat
Bounty: Bloodstrutter
Bounty: Bunny
Bounty: Cattle
Bounty: Cockatrice
Bounty: Corpse Candle
Bounty: Forest Troll
Bounty: Kobold
Bounty: Manticore
Bounty: Mountain Troll
Bounty: Roc
Bounty: Snake
Bounty: Werewolf
Level 30
Sets that are completed here:
Bounty: Gargoyle
Bounty: Gnar
Bounty: Golem
Bounty: Gravemaker
Bounty: Fire Elemental
Bounty: Flying Serpent
Bounty: Scarab
Bounty: Scorpion
Bounty: Tarrasque
Bounty: Titan
Bounty: Troglodyte
Bounty: Umbral
Bounty: Vampire
Bounty: Vespid
Bounty: Vhar
Level 35a
Sets that are completed here:
Bounty: Arcane Construct
Bounty: Badger
Bounty: Diamond Golem
Bounty: Drake
Bounty: Fleshly Undead
Bounty: Ghost
Bounty: Hunting Cat
Bounty: Lorn
Bounty: Mistwalker
Bounty: Naga
Bounty: Oreling
Bounty: Razorbeast
Bounty: Siltreaver
Bounty: Water Elemental
Bounty: Will-o-wisp
Level 35b
Sets that are completed here:
Bounty: Air Elemental
Bounty: Anubian
Bounty: Barghest
Bounty: Earth Elemental
Bounty: Flesh Golem
Bounty: Harpy
Bounty: Hill Giant
Bounty: Iron Golem
Bounty: Lodebrink
Bounty: Ram
Bounty: Seacap
Bounty: Shambler
Bounty: Skeleton
Bounty: Sobek
Bounty: Spider
Level 50
Sets that are completed here:
Bounty: Bogling
Bounty: Centaur
Bounty: Cephalon
Bounty: Cyclops
Bounty: Demon
Bounty: Devil
Bounty: Dragon Whelp
Bounty: Dragonian
Level 60
Sets that are completed here:
Bounty: Architect
Bounty: Cat
Bounty: Coyote
Bounty: Crocodile
Bounty: Deep One
Bounty: Dragon
Bounty: Dragon Turtle
Bounty: Imp
Bounty: Lich
Bounty: Mutant
Bounty: Ogre
Bounty: Razormaw
Bounty: Shaper
Bounty: Terrormaw
Bounty: Trampler
Level 65
Sets that are completed here:
Bounty: Yeti
Bounty: Prairie dog
Bounty: Golden Maw
Bounty: Verdain
Bounty: Bandit
Bounty: Dwarf
Bounty: Ettin
Bounty: Chimera
Setting up your target macros
Having looked at bounty macros in other guides, I found a few small mistakes with them, such as mis-spelt names or dashes/apostrophise that don’t work. The macros below have been thoroughly tested and edited by myself, you may want to replace any older target macros that you have with these ones.
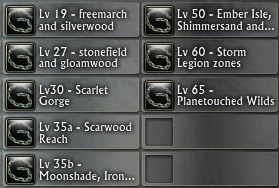
Set up your macros, one for each of the zone groups.
Remember to switch between them as you switch zones.
You may need to delete and retype the apostrophes [ ‘ ] while in the macro UI as they dont copy/paste very well.
Level 19
targetexact Beatrice
targetexact Bloody Fang
targetexact Feol
targetexact Gnawer
targetexact Grakuul
targetexact Kelo
targetexact Oolo
targetexact Retorius
targetexact Reziar
targetexact Squidget
targetexact The Claw
targetexact The Ravenous Desolator
targetexact The Seductress
targetexact Tod
targetexact Yenuo
Level 27
targetexact Bessie
targetexact Deathlight
targetexact Eialos
targetexact Eye Gouger
target Fluffy
targetexact Gore Ripper
targetexact Grunk
targetexact Harbinger of Regulos
targetexact Ieasis
targetexact Packmaster Vrexis
targetexact Queen Ia
targetexact Skyslayer
targetexact Stonegaze
targetexact Tewop
targetexact Yedisth
Level 30
targetexact Baroness Maelifica
targetexact Carrion
targetexact Char
targetexact Drone 576
targetexact King Ruioa
targetexact Ojin’ali
targetexact Qialis
targetexact Rifak
targetexact Rot Claw
targetexact Sand Stalker
targetexact Serial Number 532
targetexact Ternios
targetexact The Soul of Darkness
targetexact Uilis
targetexact Windscale
Level 35a
targetexact Akimo
targetexact Belrat the Bloodcloud
targetexact Ganel
targetexact Gha’unta
targetexact Globulous
targetexact Ightild
targetexact Inatai the Unliving
targetexact Model 35L
targetexact Nus
targetexact Rhuardar, Scourge of Scarwood
targetexact Ril’ash the Chained
targetexact Rynnysa
targetexact Tas’toni
targetexact The Walker
targetexact Umcha the Claw
Level 35b
targetexact Amalgam
targetexact Deathweaver
targetexact Ferrite
targetexact Flamewake
targetexact Gedal
targetexact Hulonk
targetexact Isanga
targetexact Mk VIIX A v2.0
targetexact Moldermound
targetexact Render, Hound of Death
targetexact Renih
targetexact Sapiheci
targetexact Soulquake
targetexact The Executioner
targetexact Waveracer
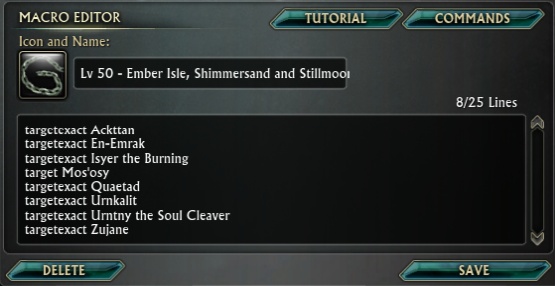
Level 50
targetexact Ackttan
targetexact En-Emrak
targetexact Isyer the Burning
target Mos’osy
targetexact Quaetad
targetexact Urnkalit
targetexact Urntny the Soul Cleaver
targetexact Zujane
Level 60
targetexact Augh-ech
targetexact Ia’raki
targetexact Ildtai
targetexact Imaw
targetexact Isyer the Thuderer
targetexact Kitty the Souldrinker
targetexact Lortas
targetexact Ogaro
targetexact Rak’say the Demolisher
targetexact Ruawbur
targetexact Shallows
targetexact Shyuang the Icestorm
targetexact Tor’garo
targetexact Uskghao the Fleshmelder
targetexact Ydogo the Outcast
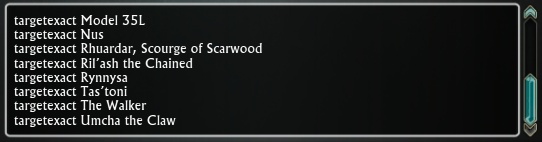
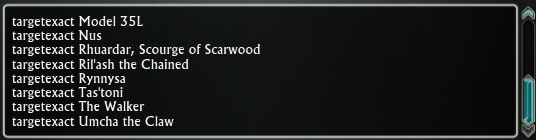
Delete and retype the apostrophes to ensure your macro works correctly, you can see in these pictures the apostrophes in Ril’ash and Tas’toni have a slightly different shape after they have been replaced.