Dont forget to work on the rest of your gear too! You can find a full guide to Level 70 Gear here. You can find a guide to Raid Specs here.
Quick Answers to Common Questions
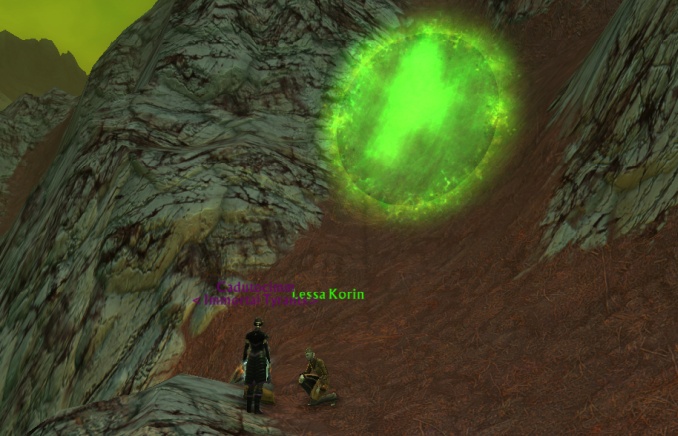
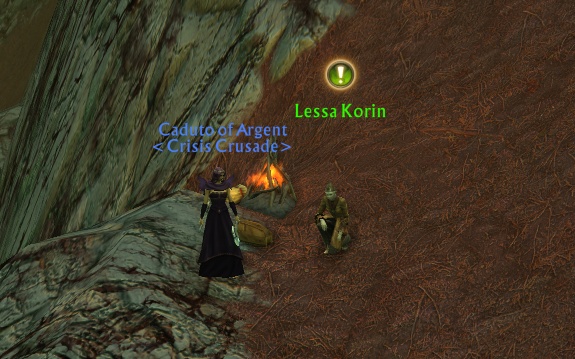
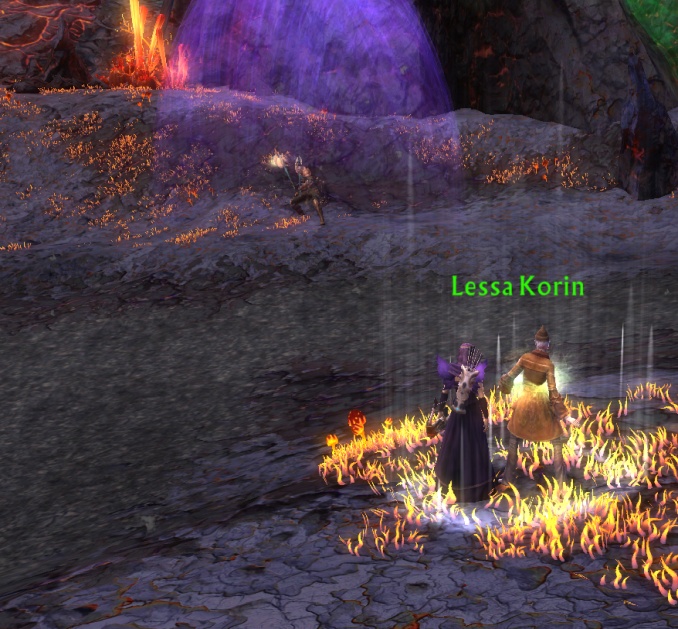
— To pick up the very first quest of the eternal weapon questline, go to Lessa Korin just outside of Alittu at /setwaypoint 4010 6194
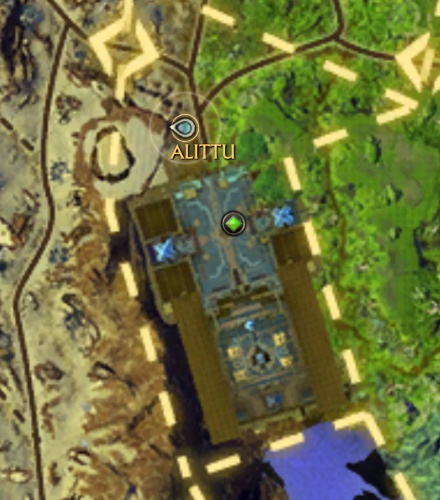
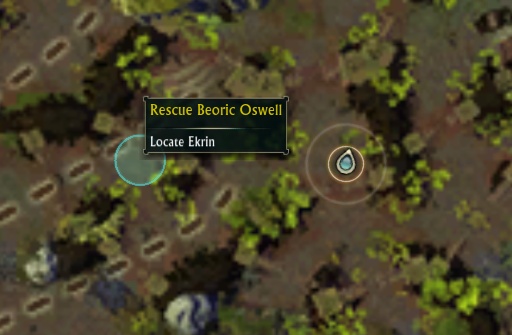
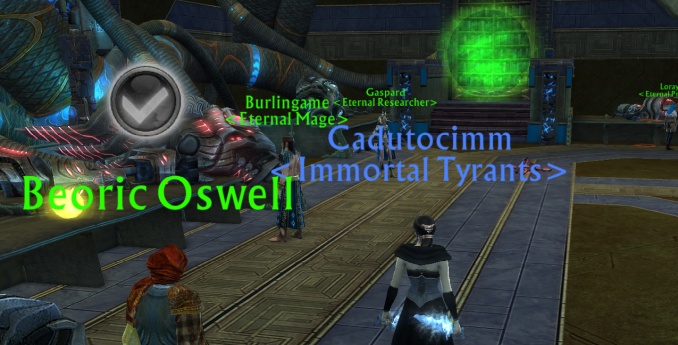
— If you are here because you cant find Beoric Oswell!! Or, you need to ‘complete a quest’ but it doesn’t say where the questgiver is!! You may find him in Alittu /setwaypoint 4021 6365 or at /setwaypoint 4457 4073 in Xarth Mire.
— If you go to the locations and cant see him, some peeps find that unequipping the weapon helps
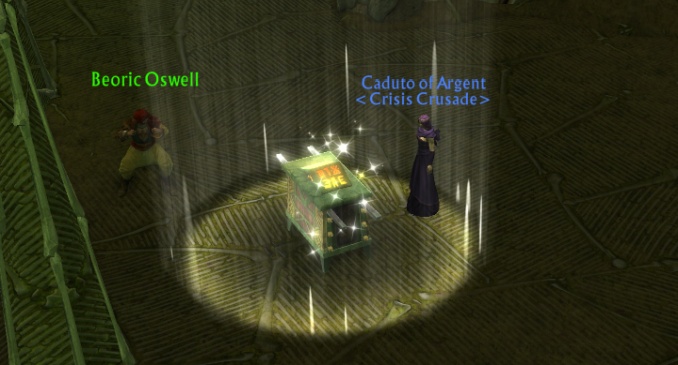
— Players can collect the minion ‘Wicket’ once they have completed the quest “Skullduggery” (Upgrade 3.1). Speak with the NPC named ‘Wicket’ in Saint Taranis in Gedlo Badlands /setwaypoint 3672 6227
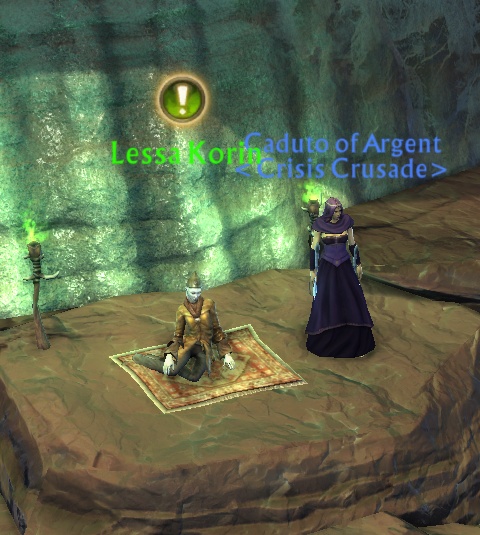
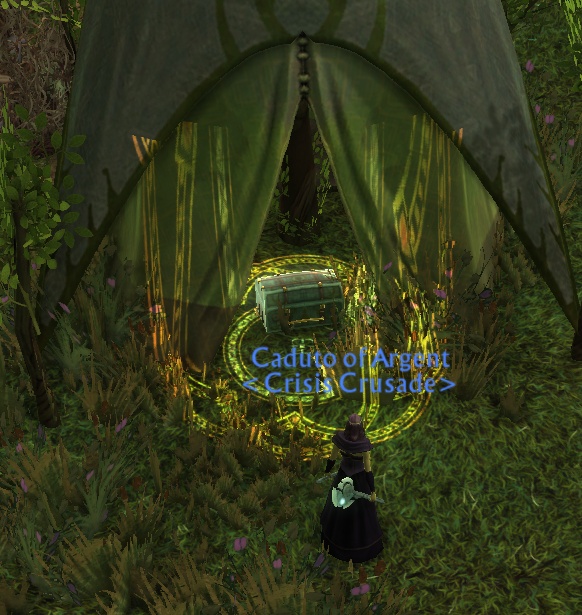
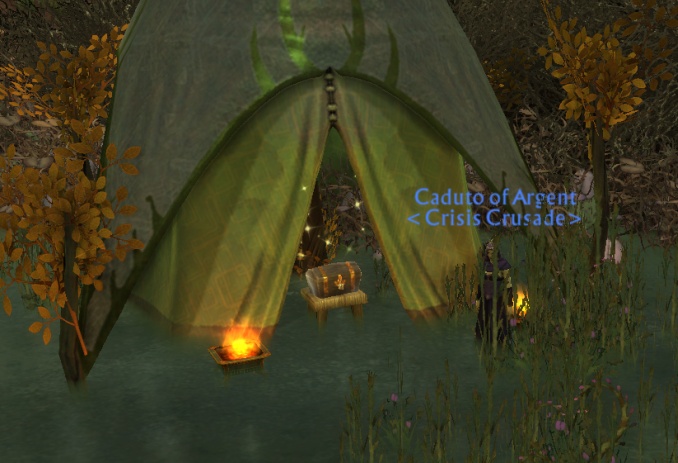
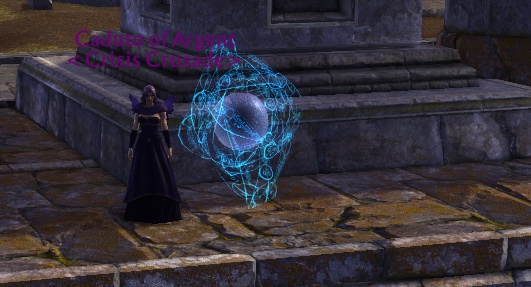
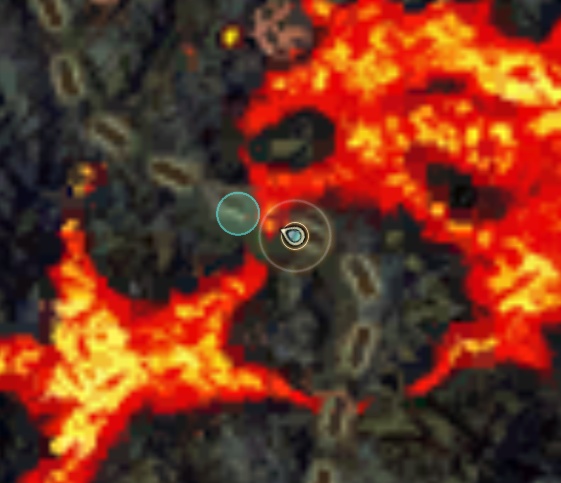
— If you cant see the portal for the Skullduggery quest.. its shown in the picture below.. this is at /setwaypoint 4457 4073 in Xarth Mire.
The Quest To Get Your Weapon
Your first task as soon as you hit level 70 is to pick up the eternal weapon questline. Go straight to Lessa Korin at /setwaypoint 4009 6193 – just outside Alittu
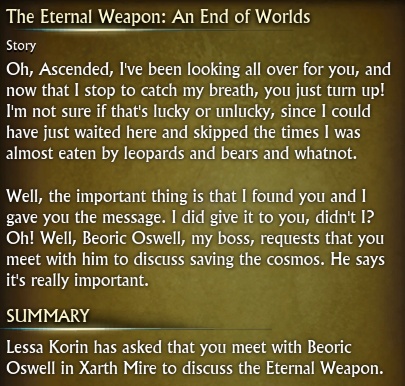
QUEST 1: The Eternal Weapon: An End of Worlds PICK UP: The quest is picked up from Lessa Korin at /setwaypoint 4009 6193 – Just outside of Alittu TO COMPLETE: Speak to Beoric Oswell in the Marsh Gate. Go to the Marsh Gate area of Xarth Mire and find Beoric Oswell at /setwaypoint 4454 4076 Hand in the quest.
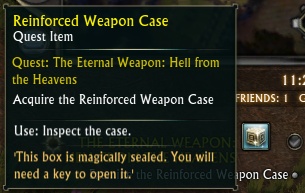
QUEST 2: The Eternal Weapon: Hell From The Heavens PICK UP: The quest is picked up from Beoric Oswell at /setwaypoint 4454 4076 – In the Marsh Gate area of Xarth Mire TO COMPLETE: Use the remote key to search expedition chests.
For this quest you will be given the ‘remote key’ quest item.
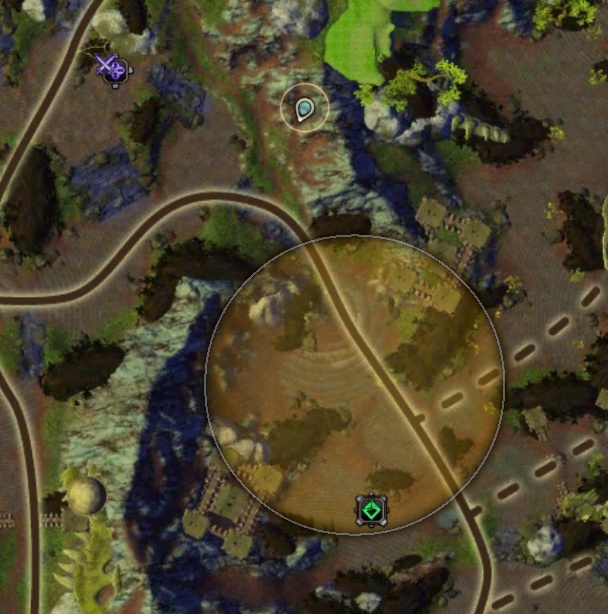
There will be a large quest circle on the map just south of the questgiver. Go to this area and find the chests on the ground, select the quest item and place the circle over the chest to open it.
If there is nothing in the chest you will get a message saying ‘the expedition chest is empty’. When you find the correct chest (this is random and could take quite a few tries – you can just switch shard on the same chest if you want to) the chest will open up and be clickable. Right click the chest to loot the reinforced weapon case – as soon as you loot the item there will be 3 bad guys who come along and try to hurt you, you can kill them if you want or just run away from them.
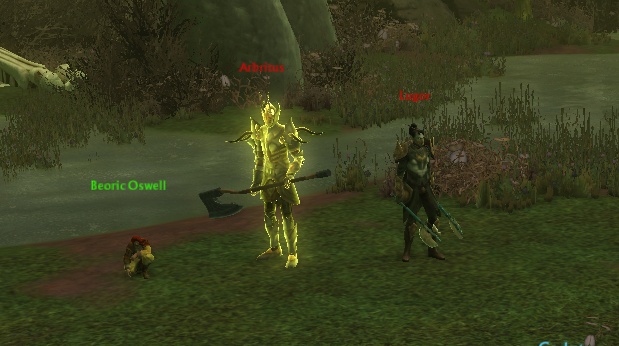
You will now have the reinforced weapon case as your quest item. Your quest objective will change to ‘examine the reinforced weapon case’. Simply click the quest item to inspect the case. Your quest objective will now change to ‘defeat Arbritus the tuath’de commander’
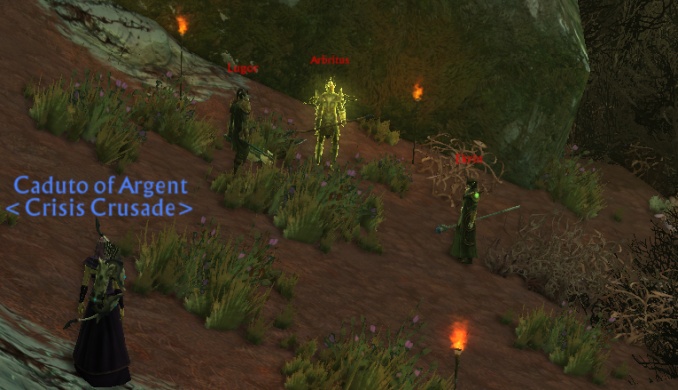
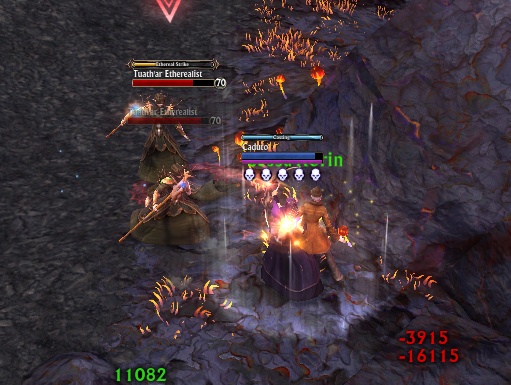
Arbritus is at /setwaypoint 4436 4235 When you approach him he will start having a chat with his two mates, after a couple of minutes of chatting his mates will leave and you will face Arbritus alone.
You will get Arbritus to around 20% health and he will disappear. Your quest objective will change to ‘get the case key’.
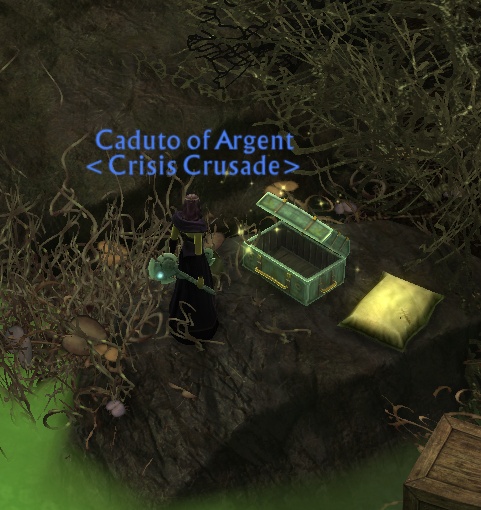
Just to the south, tucked away in a little tent is the chest you need to open. /setwaypoint 4457 4254 Right click it to loot the case key.
Your quest objective will now change to ‘bring the weapon case and key to Beoric Oswell in the marsh gate’
Go back to Beoric Oswell at /setwaypoint 4454 4076 – In the Marsh Gate area of Xarth Mire. Hand in the quest. The reward for this quest is your first stage eternal weapon.
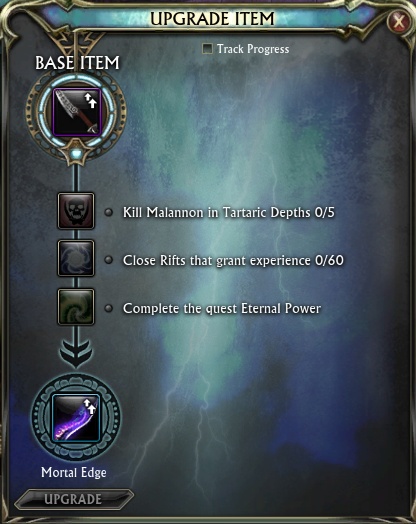
Your Eternal Weapon
The weapon you receive will be different depending on your class.
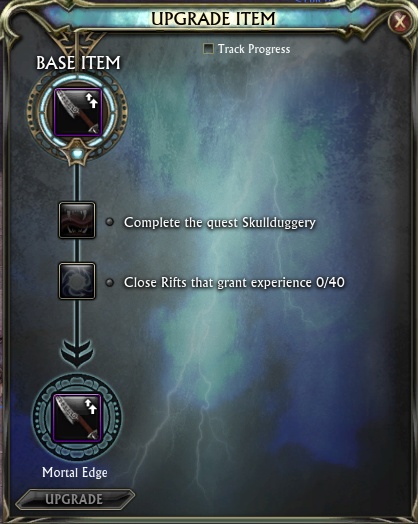
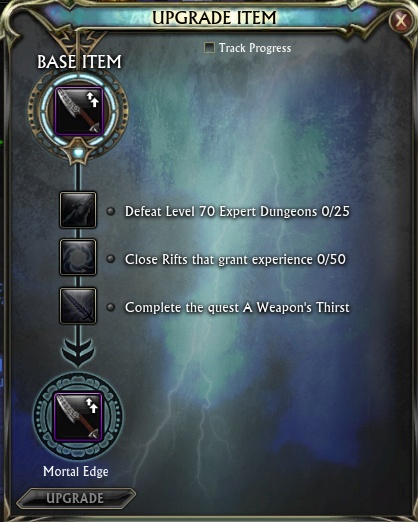
A ROGUE will receive a one handed sword called ‘Mortal Edge’. A second one handed weapon will be received once the weapon has been upgraded to eternal quality.
A WARRIOR will receive a two handed sword called an ‘Oblivion Blade’. A shield and a one handed weapon will be received once the weapon has been upgraded to eternal quality (for tanking purposes). Warriors that want to Dual Wield will have to use the One Hand Eternal weapon plus the One Hand weapon that drops from the first boss of Tartaric Depths NORMAL mode. (Or the Planar Weapon, but, you really don’t have to!)
A CLERIC will receive a two handed hammer called an ‘Maul of Obliteration’. A shield and a one handed weapon will be received once the weapon has been upgraded to eternal quality (for tanking purposes).
A MAGE will receive a two handed staff called the ‘Eyes of Eternity’. As a mage doesn’t require a shield to tank the staff simply upgrades without being added to.
A PRIMALIST will receive a two handed axe called ‘Judgement’. As a primalist doesn’t require a shield to tank the axe simply upgrades without being added to.
You can press ALT+LEFT CLICK on your weapon to see the upgrade path for it. Your weapon starts at blue/rare quality and upgrades to purple/epic and then to pale blue/eternal. The eternal weapon upgrades require a lot of work but it is well worth it! – It is currently the best weapon in game for a level 70 – Even non-raiders can go most of the way through the upgrade path to get a very decent weapon. There is also the eternal weapon questline, which runs alongside the eternal weapon upgrades, this is a small series of quests that you will be required to do in order to upgrade your weapon. The rest of this guide will now explain each separate upgrade stage of the eternal weapon along with the quests and other requirements to upgrade.
Runes added to your weapon will disappear when you upgrade your weapon. Due to this it is recommended that you don’t bother with runes until your weapon is at least level 5.
I HIGHLY RECOMMEND that you also get your planar crafted helm and ranged weapon before you start farming! This is because a lot of the upgrade requirements for the helm/ranged are the same as the requirements for the eternal. You can find info about this in the Level 70 Gear Guide.
Upgrade One
Each upgrade stage has a list of requirements which you will need to complete before you can hit the upgrade button.
You can use the ‘track progress’ tick box at the top to put the requirements in your quest stickies so you can easily keep track of them.
Some of these requirements will be open world killing bad guys stuff. There will generally be a requirement of reaching a certain point in the eternal weapon questline. Towards the end of the upgrade path you will also need to do dungeons and raids. I recommend that you log off and back on again to ensure the system properly registers the weapon and starts to credit your quest/weapon properly.
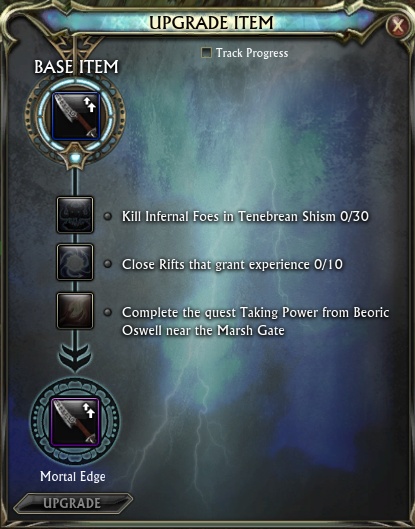
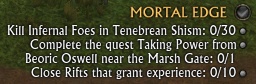
Upgrade One - Requirement One
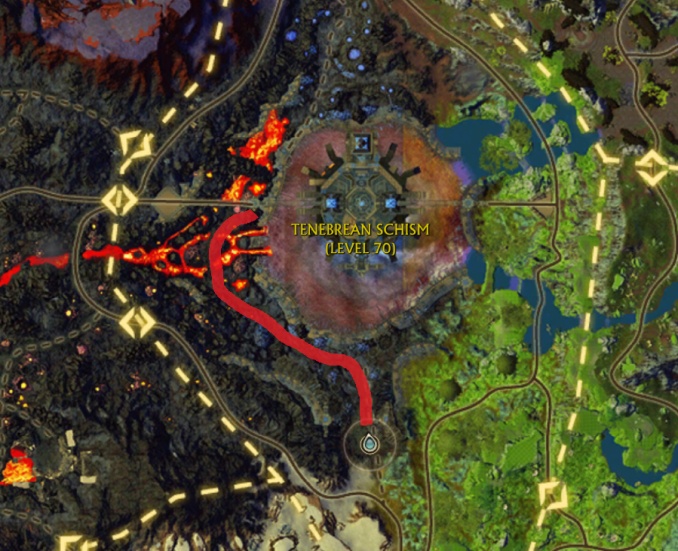
Kill Infernal Foes in the Tenebrean Shism 0/30
The Infernal Foes can be found all around the middle of the Tenebrean Shism.
I find the best path to follow is just around the bottom left quarter.
You can kill all the enemies that are up (hover your mouse over them to see if they count) and then switch shard for the next batch.
These bad guys are all level 70 elites and may be a little tough for your fresh 70 character, so bring a friend with you if you can! (Your friend can kill the mobs for you, you don’t even need to hit them to get credit, this can be super useful if you are power-levelling an alt using two accounts) Otherwise, just take it slow, pull one at a time!
Upgrade One - Requirement Two
Close Rifts That Grant Experience 0/10
Any rift that grants experience will do for this requirement.
For Level 70 rewards Queue up for Celestial Instant Adventures and hope to get inside the splinter of life/fire, here you will be closing rifts while looting items/mats relevant to level 70.
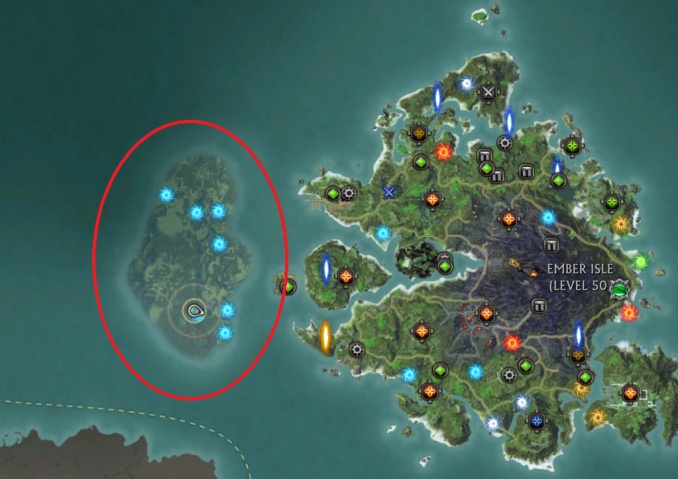
For Speed Most peeps find the level 60 quest area just to the west of ember isle is a quick and easy spot to farm. This area has a lot of rift tears that respawn very quickly.
The area is all underwater, you can get two hours of underwater breathing from one of the many ‘Atragatrian gifts’. There is one near the portal at /setwaypoint 11936 3591
You will need to mentor down to level 65 to get credit.
The quickest way to close these rifts is by only completing the first stage of the rift and then allowing the second stage to time out before closing the rift on stage 2. Complete the first stage of all the rifts on one shard, then switch shard and complete first stage there too, go through all the shards completing stage 1 of each rift, when you get back to the shard you started on, the rifts can then all be closed on stage 2.
If there is more than one of you farming these rifts then you should split up and have one player complete stage one and then the second player let stage 2 ‘time out’ and then close the rift while the first player is doing stage one of the next rift. Give the first player a head start of a few minutes, the second player follows after the head start.
In short, if you find a rift one stage 1 then complete stage 1 and then move to the next rift. If you find the rift on stage 2 with the timer run out, then close it. Check all rifts on each shard in order.
Upgrade One - Requirement Three
Complete the Quest: Taking Power from Beoric Oswell near the Marsh Gate
QUEST 3: THE ETERNAL WEAPON: TAKING POWER PICK UP: The quest is picked up from Beoric Oswell at /setwaypoint 4454 4076 – In the Marsh Gate area of Xarth Mire TO COMPLETE: Capture 10 particles of cosmic energy.
This is a puzzle type quest found in the Tenebrean Schism.
This part of the quest requires only 10 particles, later on in the upgrade path you will need to capture 15 and then the full 20 particles.
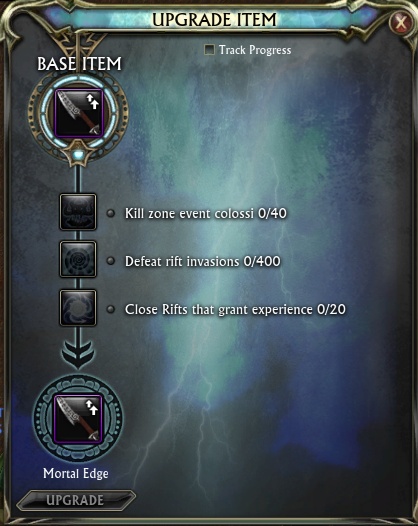
When you have completed all the requirements, ALT+LEFT CLICK your weapon and hit the upgrade button
Upgrade Two
ALT + LEFT CLICK your weapon again to see the new upgrade path.
I recommend that you log off and back on again to ensure the system properly registers the upgrade and starts to credit your quest/weapon properly
Upgrade Two - Requirement One
Kill Zone Event Colossi 0/40
A colossi is the very last boss that spawns during a zone event.
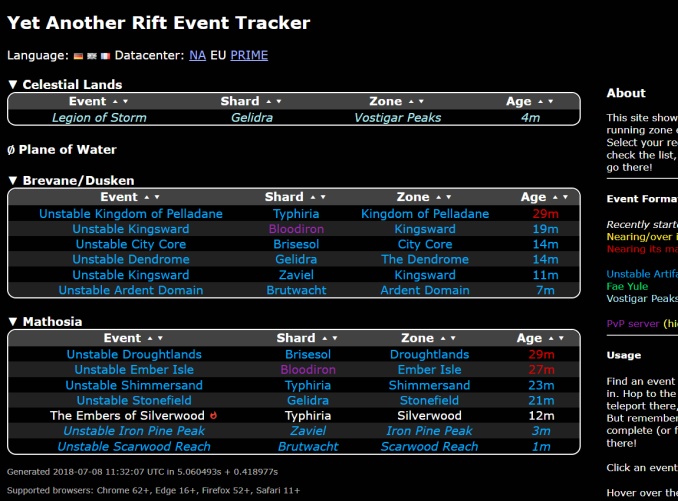
This is the moment when YARET is going to become your very best friend! (other zone event trackers are available)
YARET will tell you exactly where the zone events are. Your job then is to go and participate in the event, and make sure you hit the final boss WHILE MENTORED to get XP (7 levels above the boss).
Unstable events do not count, there are no bosses in these events. You need to hit the FINAL BOSS of a zone event. Just tagging a rift or invasions and then running to the next zone event will not work.
You need to tag 40 event bosses in this way.
Try to help by closing rifts/invasions to progress the events and get the boss spawning. This will help you complete the other requirements for the weapon upgrade and help towards your helm/ranged as well.
Your priority should be tagging the events in Vostigar Peaks as these will also give you much needed intel (currency).
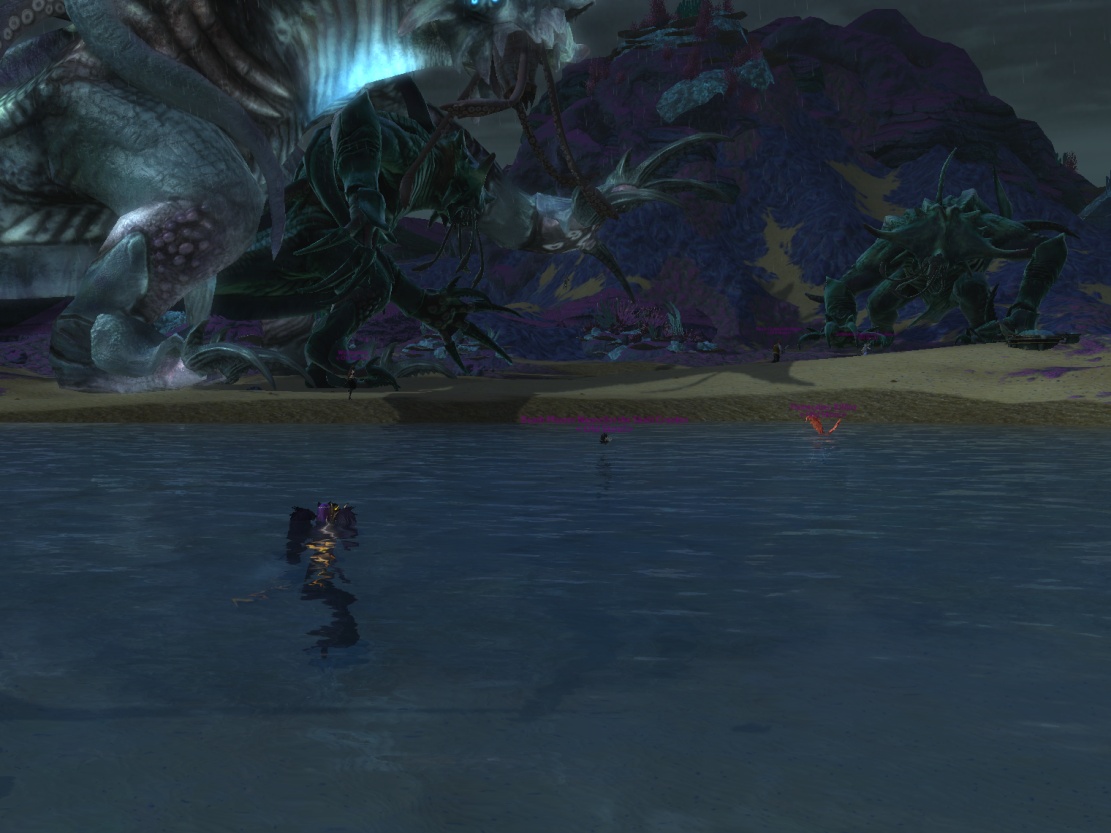
Most player will complete the 40 Colossi using one event in Tyrants Throne. This zone has only one kind of zone event, the Leviathan. The tactics for completing this event and do the 40 Colossi in one hit are explained below..
Tyrants Throne is a small Island on the south of the Plane of Water. You will need at least 5 players in the zone to spawn the event. Mostr players believe that moving from the portal towards the beach helps the event spawn faster, So it is best to go stand near the beach while trying to spawn the event.
When the event first starts, your group should complete the two objectives to spawn the boss. — Disarm the Storm Legion Annhilation Charges x3. — Charge up Defense Generators x4.
The boss will spawn in the water and make his way to the beach. You will need to DPS the boss down to 75% health to make the first wave of Reflections spawn. After the boss is at 75% you should avoid damaging him further until you have your Colossi completed.
Kill the two Reflection mobs that spawn and then all players should jump into the water, swim a little way out and select yourself to be sure you are not doing damage to the boss. This will ‘reset’ the boss and he will spawn the Reflections again. Get out of the water to kill the new Reflections! Then go back into the water to reset the boss again and spawn more!
— Be sure to always get back in the water as soon as both Reflections are dead. — Only leave the water when both of the 2 new Reflections have spawned. — If you are finding it hard to tag the reflections, you can use the macro tar reflection to help you target them quicker, or just go heal spec and heal/buff the raid. — Go slow with your DPS, even as a fresh level 70, you can easily kill stuff too quickly and then make it harder for others to tag or kill the boss prematurely!
Your priority should be tagging the events in Vostigar Peaks as these will also give you much needed intel (currency).
Most player will complete the 40 Colossi using one event in Tyrants Throne. This zone has only one kind of zone event, the Leviathan. The tactics for completing this event and do the 40 Colossi in one hit are explained below..
Upgrade Two - Requirement Two
Defeat Rift Invasions 0/400
You may have tagged a few invasions while you were completing zone events for the colossi, however it is unlikely that you will have tagged 400 of them! So now you need to farm invasions! The best place to do this is Planetouched Wilds – as the invasions here are level 65 so they grant XP and credit your quest without having to mentor down, these invasions are a whole expansion below you, so you kinda murder them very quickly! There are 5 locations in Planetouched Wilds where you can spawn massive invasion events.
Ovog Shirne – Air – /setwaypoint 9234 6026
Khort – Air – /setwaypoint 9698 7067
Jad – Earth – /setwaypoint 11663 5751
Woe – Death – /setwaypoint 9370 4993
Shal Korva – Earth – /setwaypoint 10303 5975
You see I have noted the plane of the invasions, this is because you should also be upgrading your planar crafted helm and ranged weapon, you will need to destroy invasions during those upgrade paths too..
mage: Air (helm) + Fire (ranged)
rogue: Air (helm) + Death (ranged)
cleric: Earth (helm) + Fire (ranged)
primalist: Air (helm) + Death (ranged)
warrior: Earth (helm) + Death (ranged)
So its a good idea to get these items to the invasion stage as well and then do all the invasions at the same time.
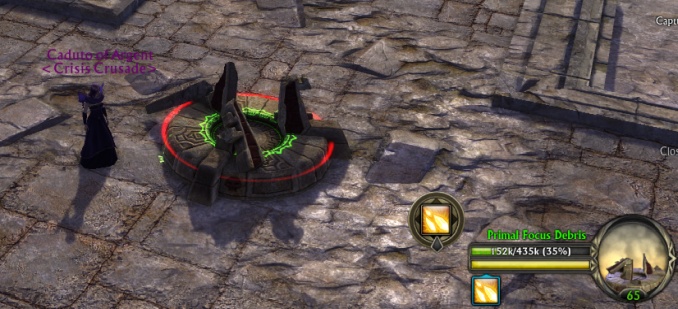
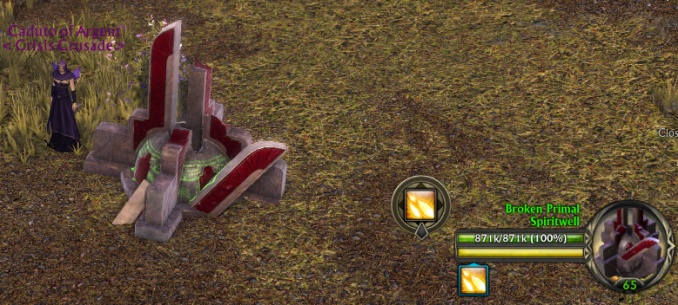
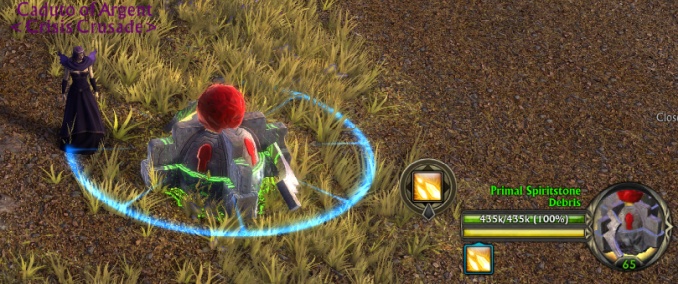
When you reach the waypoints in Planetouched Wilds, there will hopefully be a ‘primal focus’ up. If there isn’t, then you will need to switch shards to find one, or try a different location
If you are farming a certain plane and there are none up at that planes locations, go the other locations and upgrade those and let them fail, then go back to the one you wanted and hope it respawns there. Around the focus are Spiritstones and Spiritwells that can be upgraded, upgrading these will increase the flow of invasions, as will having more people in your group.. So be careful if you are solo not to upgrade too many and end up with a flow that you cant handle, I recommend upgrading 2 or 3 of the Spiritwells to start you off and see how you go (the Spiritwells will splash small heals on you while the Spiritstones are turrets that will agro some of the invasions away from you). Remember you can use your ‘fury of the ascended’ ability to help you out if it gets a bit too much!
There will be a few ‘ancestral conflux’ around to help you upgrade everything (destroy them and stand in the blue bubble to refill your planar charges). If the primal focus is destroyed the invasions will stop, keep it alive! The invasions will stop automatically after 15 mins or so, then you can switch shard at the same location to go again, or go to a different location.
If you are farming in a group, agree a spot to stand in (usually just outside the area) and STAY there. Let the mobs come to you and then lay ground AOE to destroy them, ensure everyone is able to tag them by killing them slowly!
Upgrade Two - Requirement Three
Close Rifts That Grant Experience 0/20
Any rift that grants experience will do for this requirement.
For Level 70 rewards Queue up for Celestial Instant Adventures and hope to get inside the splinter of life/fire, here you will be closing rifts while looting items/mats relevant to level 70.
For Speed Most peeps find the level 60 quest area just to the west of ember isle is a quick and easy spot to farm. This area has a lot of rift tears that respawn very quickly.
The area is all underwater, you can get two hours of underwater breathing from one of the many ‘Atragatrian gifts’. There is one near the portal at /setwaypoint 11936 3591
You will need to mentor down to level 65 to get credit.
The quickest way to close these rifts is by only completing the first stage of the rift and then allowing the second stage to time out before closing the rift on stage 2. Complete the first stage of all the rifts on one shard, then switch shard and complete first stage there too, go through all the shards completing stage 1 of each rift, when you get back to the shard you started on, the rifts can then all be closed on stage 2.
If there is more than one of you farming these rifts then you should split up and have one player complete stage one and then the second player let stage 2 ‘time out’ and then close the rift while the first player is doing stage one of the next rift. Give the first player a head start of a few minutes, the second player follows after the head start.
In short, if you find a rift one stage 1 then complete stage 1 and then move to the next rift. If you find the rift on stage 2 with the timer run out, then close it. Check all rifts on each shard in order.
When you have completed all the requirements, ALT+LEFT CLICK your weapon and hit the upgrade button
Upgrade Three
ALT + LEFT CLICK your weapon again to see the new upgrade path.
I recommend that you log off and back on again to ensure the system properly registers the upgrade and starts to credit your quest/weapon properly
Upgrade Three - Requirement One
Complete the Quest: Skullduggery
Go to Lessa Korin in the Marsh Gate in Xarth Mire at /setwaypoint 4455 4077 She will give you the Skullduggery quest (this quest will only show up if you have upgraded your weapon!).
Called ‘creuseurs de crâne’ in French
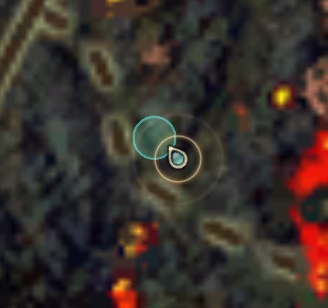
QUEST 4: THE ETERNAL WEAPON: SKULLDUGGERY PICK UP: The quest is picked up from Lessa Korin at /setwaypoint 4457 4073 – in Xarth Mire TO COMPLETE: Enter the portal at Beoric’s camp. Once you have picked up the quest, a portal will appear near the NPC
This is at /setwaypoint 4457 4073 in Xarth Mire. Enter through the portal for the next part of the quest… you can bring one friend with you! If you cannot see the portal, don’t worry it is still there! Look at the picture above and walk towards where the portal is until you go through it. You need to rescue Beoric Oswell.
This quest instance is set in the inner area of Xarth Mire called Xarths Skull.
Opening up your map will tell you what to do next.. Firstly we need to find Ekrin.
Erkin will have a little chat with you and then you get to kill him!
Now we need to go and find Beoric Oswell – The location is marked on your map Beoric Oswell is being held captive by two bad guys called Arbritus and Lugor.
The fight is pretty simple, stay out the bad (big red cone) and every so often Lugor will put up a shield around himself which protects you from Arbritus’ big spell, so make sure you move into that.. You only need to shoot Arbritus down to around 25% and then they all have a chat, don’t waste your DPS on Lugor. Then speak to Beoric and he will open the door so you can go into the room at the back and click the thingydoodah.. move through the portal VERY QUICKLY after you have done this.. as apparently clicking the thingydoodah upsets a LOT of people!
the thingydoodah
You will be sent back to Alittu where you can hand in the quest to Beoric Oswell at /setwaypoint 4021 6365 Handing in this quest completes this first weapon requirement.
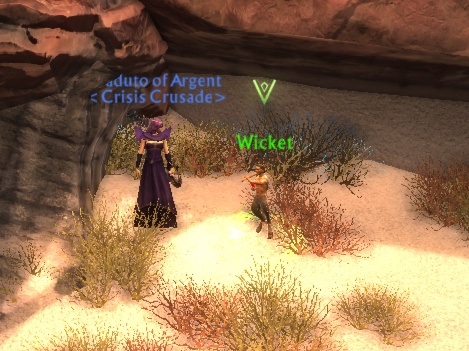
HOWEVER!!! Now that you have done this quest, you can go grab your Wicket minion card!
Go to /setwaypoint 3672 6227 at Saint Taranis in Gedlo Badlands. Here you will find Wicket! After a short conversation with him he will give you the Wicket minion card.
‘Back in my day’ you would have to get the Wicket minion to level 25 in order to progress your weapon. During the eternal weapon questline nerf Trion tried to reduce this to level 20, to make it easier/quicker for people.. However because of various factors (bad code bad!) this didn’t work very well, so they decided to remove Wicket from the weapon requirements entirely.
Upgrade Three - Requirement Two
Close Rifts That Grant Experience 0/40
Again, you can go back to ember isle and close some easy rifts there.
Any rift that grants experience will do for this requirement.
For Level 70 rewards Queue up for Celestial Instant Adventures and hope to get inside the splinter of life/fire, here you will be closing rifts while looting items/mats relevant to level 70.
For Speed Most peeps find the level 60 quest area just to the west of ember isle is a quick and easy spot to farm. This area has a lot of rift tears that respawn very quickly.
The area is all underwater, you can get two hours of underwater breathing from one of the many ‘Atragatrian gifts’. There is one near the portal at /setwaypoint 11936 3591
You will need to mentor down to level 65 to get credit.
The quickest way to close these rifts is by only completing the first stage of the rift and then allowing the second stage to time out before closing the rift on stage 2. Complete the first stage of all the rifts on one shard, then switch shard and complete first stage there too, go through all the shards completing stage 1 of each rift, when you get back to the shard you started on, the rifts can then all be closed on stage 2.
If there is more than one of you farming these rifts then you should split up and have one player complete stage one and then the second player let stage 2 ‘time out’ and then close the rift while the first player is doing stage one of the next rift. Give the first player a head start of a few minutes, the second player follows after the head start.
In short, if you find a rift one stage 1 then complete stage 1 and then move to the next rift. If you find the rift on stage 2 with the timer run out, then close it. Check all rifts on each shard in order.
When you have completed all the requirements, ALT+LEFT CLICK your weapon and hit the upgrade button
Upgrade Four
ALT + LEFT CLICK your weapon again to see the new upgrade path.
I recommend that you log off and back on again to ensure the system properly registers the upgrade and starts to credit your quest/weapon properly
Upgrade Four - Requirement One
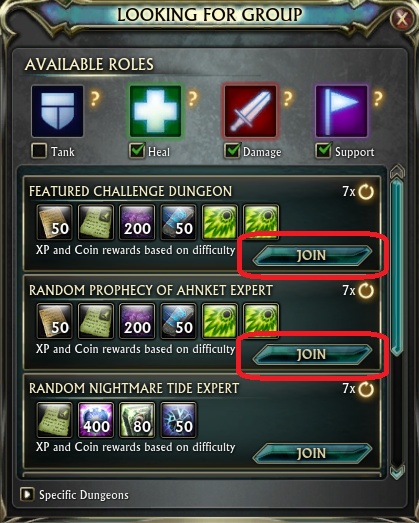
Defeat Level 70 Expert Dungeons 0/25
There are 4 different level 70 expert dungeons. Tuath’de Coven Intrepid: Darkening Deeps Intrepid: Gyel Fortress Temple of Ananke
And a Level 70 Challenge Dungeon Enclave of Ahnket
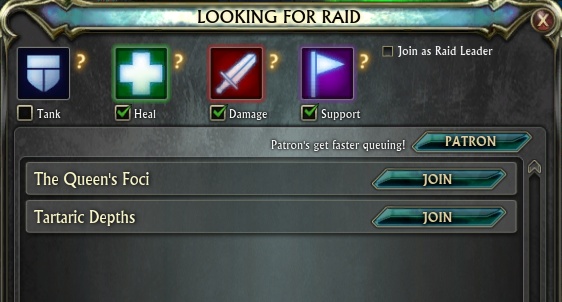
There are different ways to enter these dungeons… You can group up with 4 other players to create your dungeon group of 5 and then either enter the portal or use the queuing system to get in. You can solo queue or queue with less than 5 and use the queuing system to get PUG players to fill your group.
If you are new to dungeons then I HIGHLY recommend that you join a nice guild with helpful people who will at least do one run of each dungeon with you to help you learn tactics before you venture into the queuing system by yourself! You can find guides and tactics to all the Prophecy of Ahnket dungeons here.
You will need a spec that is specific to running dungeons, a high DPS spec or a decent HEAL or TANK spec are a must. Better yet will be the ability to do multiple roles/specs so you can switch between them! Ask your guildies and/or read the forums for help with specs.
The Challenge Dungeon, Enclave of Ahnket is much more difficult than the normal queue, you should wait til your DPS is over 500k before queuing for EoA, or find some nice friends/guildies willing to carry you through!
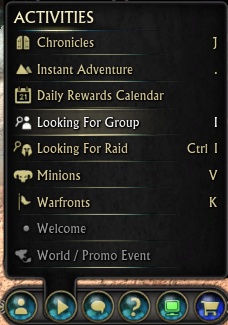
The dungeon queuing system can be accessed by pressing [ i ] or by the activities menu. Click the join button to start your queue! If you are only DPS then you may find the queues take a LOOOOONG time.. either find a group another way (guild or public chats) or diversify by creating a tank or heal spec.
Once you are inside the dungeon, be sure to explain if you don’t know the tactics, most peeps will attempt to guide you through them as long as you ask nicely! Be courteous of other peoples play styles, some peeps may want to skip the trash, others may want to kill it.. This is pretty much up to the tank and his/her capabilities — Tanking is hard when you first start, have patience!
Be sure to download a DPS meter and check your damage compared to others.. If its very low, try to improve it before queuing again, either by upgrading your gear/fragments or by refining your spec and practising on dummies.
This is the start of your multiplayer journey, be kind, courteous and contribute!
You need to complete 25 expert level dungeons in order to complete this requirement.
Upgrade Four - Requirement Two
Close Rifts That Grant Experience 0/50
Again, you can go back to ember isle and close some easy rifts there.
Any rift that grants experience will do for this requirement.
For Level 70 rewards Queue up for Celestial Instant Adventures and hope to get inside the splinter of life/fire, here you will be closing rifts while looting items/mats relevant to level 70.
For Speed Most peeps find the level 60 quest area just to the west of ember isle is a quick and easy spot to farm. This area has a lot of rift tears that respawn very quickly.
The area is all underwater, you can get two hours of underwater breathing from one of the many ‘Atragatrian gifts’. There is one near the portal at /setwaypoint 11936 3591
You will need to mentor down to level 65 to get credit.
The quickest way to close these rifts is by only completing the first stage of the rift and then allowing the second stage to time out before closing the rift on stage 2. Complete the first stage of all the rifts on one shard, then switch shard and complete first stage there too, go through all the shards completing stage 1 of each rift, when you get back to the shard you started on, the rifts can then all be closed on stage 2.
If there is more than one of you farming these rifts then you should split up and have one player complete stage one and then the second player let stage 2 ‘time out’ and then close the rift while the first player is doing stage one of the next rift. Give the first player a head start of a few minutes, the second player follows after the head start.
In short, if you find a rift one stage 1 then complete stage 1 and then move to the next rift. If you find the rift on stage 2 with the timer run out, then close it. Check all rifts on each shard in order.
Upgrade Four - Requirement Three
Complete the Quest: A Weapon's Thirst
QUEST 5: THE ETERNAL WEAPON: A WEAPON’S THIRST PICK UP: The quest is picked up from Beoric Oswell at /setwaypoint 4021 6365 – in Alittu. TO COMPLETE: Capture 15 particles of cosmic energy.
This is a puzzle type quest found in the Tenebrean Schism.
This part of the quest requires 15 particles, a bit trickier than the previous 10 so it may take a bit more practice before you hit the 15!
When you have captured 15 particles, go back to Beoric Oswell in Alittu at /setwaypoint 4021 6365 Talk to him. Your quest objective will now change to: Enter the Portal. In the same room opposite Beoric’s position a portal will open – /setwaypoint 4013 6342
Enter the portal — you CAN bring a friend with you!!! (yes even if that friend is not on the quest) This portal takes you to an instance set in the lake of fire area of Ashenfell. Your quest objective will change to ‘Spy on Lugor and Zorthik’.
Just ahead of you will be a blue quest circle. Move to it. You will be stood near Lessa Korin while the NPCs ahead of you will have a short conversation. Then a shield will pop up around the small area and the NPCs will start to attack you. Your quest objective will change to ‘Slay the Dragonian Attackers 0/2’ Kill the two bad guys who are attacking you. Your quest objective will now change to ‘Clear the Path for Lessa Korin’.
If you kill the NPC’s too quickly during any of these encounters then it may break the progression of the instance, if that happens you need to leave the instance then right click your portrait and select to reset instances before re-entering.
A path of blue quest dots will appear. Kill all the NPCs on the path,
Be aware that the white circle beneath Lessa Korin will keep your health topped up if you stand in it! She will move with you towards the packs of bad guys, allowing you to receive her healing the whole time!
Your quest objective will now change to ‘Observe Lugor and Zorthik’.
Again there will be a blue quest circle to show you where to stand an invisible barrier will stop you moving too far forward!
The NPC’s will all have a short conversation, then its killing time again! Your quest objective will change to ‘Kill Zorthik’.
A fiery red bubble will appear over Zorthik and his mates. When you enter the bubble Zorthik’s mates will start attacking you one at a time (everything else will be immune and not attack). When the first dies then next will take over until all his mates are dead.
During this phase Zorthik will be placing a red AOE damage circle around himself and will also do a pizza slice ability, be sure to stand in the safe area!
When his mates are dead Zorthik will become active and attack you, he will stop doing the pizza slice ability but will continue with the red AOE around him, be sure to move out of it (zorthik will stay still when he casts this aoe spell)
Once he is dead your quest objective will change to ‘Intercept Lugor’.
Just ahead of you, Lugor will be stood near the portal. Move towards him. When you get there, Lessa Korin will come along and close the portal, stopping him from escaping. Your quest objective will now change to ‘Defeat Lugor’.
Lugor will put up a purple bubble around himself. You can stand with Lessa Korin to receive her heals again. Lugor and his bubble will teleport around while he attacks from a distance.
You can only attack Lugor from INSIDE the bubble, so you will need to move inside the bubble to attack, then move out when your health gets too low (during ‘biocide’ cast) and go to Lessa for heals.
Once he is dead your quest objective will change to ‘Return to Beoric Oswell in Alittu’. A portal will appear to take you back to Alittu.
Go back to Beoric Oswell in Alittu at /setwaypoint 4021 6365 Hand the quest in. This completes this requirement.
When you have completed all the requirements, ALT+LEFT CLICK your weapon and hit the upgrade button
Upgrade Five
ALT + LEFT CLICK your weapon again to see the new upgrade path.
I recommend that you log off and back on again to ensure the system properly registers the upgrade and starts to credit your quest/weapon properly
I HIGHLY recommend that the warriors/clerics/rogues do the ‘eternal power’ quest before touching the rest of the requirements, completing this quest will give you your off hands/shields to make your lives much easier!
Upgrade Five - Requirement One
Kill Malannon in Tartaric Depths 0/5
Tartaric Depths is a 10 man raid with 2 different difficulty tiers. >> An LFR (easy) difficulty — In the chat this is called TDEM, TDEZ or TD:LFR — TDEM has no weekly lockout, it can be run as many times as you like, but after the first 2 runs (in a weekly cycle) you will need to spend individual reward charges to get loot (you do not need to spend charges to credit your weapon quest or to receive intel) >> A T1 (normal) difficulty – In the chat this is called TDNM — TDNM has a weekly lockout like any normal raid
Both raids have the same 4 bosses, tho in normal mode the bosses have extra tactics, extra heath and extra hard hitting spells. Malannon is the last boss in both the raid tiers.
By now, after 25 dungeons, you should have a semi-decent DPS spec and maybe have expanded into heals or tanking! You will also have picked up some gear which will will have improved your DPS. You can find a full guide to the Level 70 Gear here.
The TDEM stat/hit requirements are the same as for dungeons. For TDNM you will need the T1 hit/stats/DPS requirements.
Pretty much everyone will complete this requirement by running 6 TDEM in one night, they really are that easy! You may even be able to join a 2 hour TDEM farm – Peeps do this because TDEM drops LOADS of intel, and a token boost vial lasts 2 hours!
You can also queue for TDEM using the LFR system [ ctrl + i ] is the default keybinding for the LFR UI. Be aware though that pretty much NO-ONE uses the LFR queuing system – Peeps much prefer to form groups using the level 70 chat on EU shards or the crossevents chat on NA shards.
Upgrade Five - Requirement Two
Close Rifts That Grant Experience 0/60
Again, you can go back to ember isle and close some easy rifts there.
Any rift that grants experience will do for this requirement.
For Level 70 rewards Queue up for Celestial Instant Adventures and hope to get inside the splinter of life/fire, here you will be closing rifts while looting items/mats relevant to level 70.
For Speed Most peeps find the level 60 quest area just to the west of ember isle is a quick and easy spot to farm. This area has a lot of rift tears that respawn very quickly.
The area is all underwater, you can get two hours of underwater breathing from one of the many ‘Atragatrian gifts’. There is one near the portal at /setwaypoint 11936 3591
You will need to mentor down to level 65 to get credit.
The quickest way to close these rifts is by only completing the first stage of the rift and then allowing the second stage to time out before closing the rift on stage 2. Complete the first stage of all the rifts on one shard, then switch shard and complete first stage there too, go through all the shards completing stage 1 of each rift, when you get back to the shard you started on, the rifts can then all be closed on stage 2.
If there is more than one of you farming these rifts then you should split up and have one player complete stage one and then the second player let stage 2 ‘time out’ and then close the rift while the first player is doing stage one of the next rift. Give the first player a head start of a few minutes, the second player follows after the head start.
In short, if you find a rift one stage 1 then complete stage 1 and then move to the next rift. If you find the rift on stage 2 with the timer run out, then close it. Check all rifts on each shard in order.
Upgrade Five - Requirement Three
Complete the Quest: Eternal Power
QUEST 6: THE ETERNAL WEAPON: ETERNAL POWER PICK UP: The quest is picked up from Beoric Oswell at /setwaypoint 4021 6365 – in Alittu. TO COMPLETE: Enter the portal. Again, just opposite Beoric in the same room a portal will open – /setwaypoint 4013 6342
Go through the portal – Again, you can bring a friend if you want to! This portal takes you to an instance set in Xarth’s Skull of Xarth Mire.
Your quest objective will now change to ‘Kill Tuath’ar 0/12
You start right in the centre of Xarth’s Skull in the building, you need to go out of the building to the courtyard area where you will find the Tuath’ar to kill.
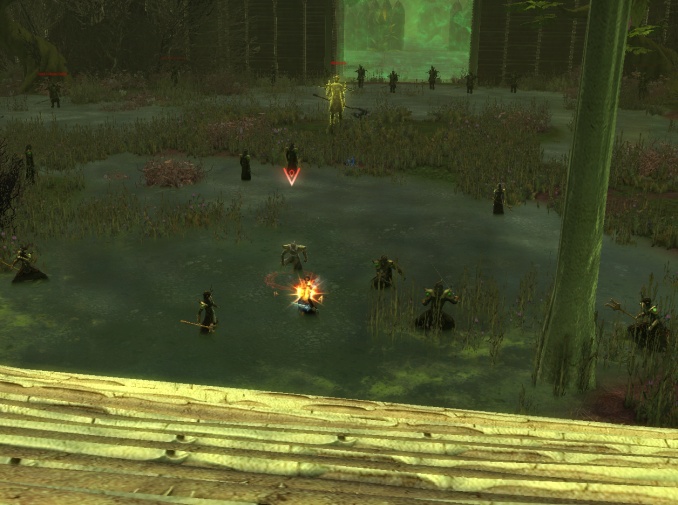
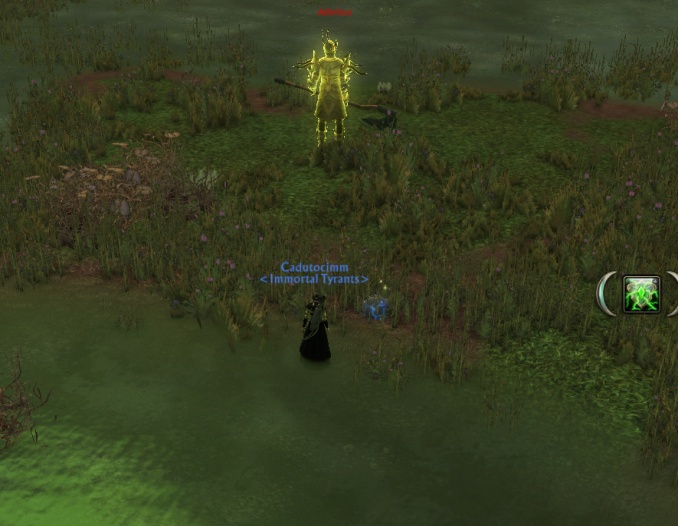
You will find quite a few of the Tuath’ar to kill. They are surrounding ‘Arbritus’ who is currently untargetable. Kill 12 of the Tuath’ar to progress.
Your quest objective will now change to ‘Activate the Shield Override’. This is a small clickable item on the ground near Arbritus. When you have clicked it your quest objective will change to ‘Confront Arbritus’. There will be a lot of talking/roleplay before you can start shooting, have patience! Your quest objective will change to ‘Slay Arbritus’.
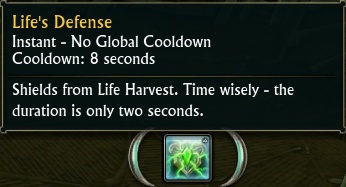
This is a pretty easy fight, tho be aware you have been given a reactive for a reason! Every so often he will cast the spell ‘Life Harvest’ you need to use the reactive ability ‘Life’s Defense’ just at the end of the cast so the buff that lasts only 2 seconds is there when his cast is finished. There is also some red pizza slices to get out of and a interruptable spell that wont do too much damage if you cant interrupt it.
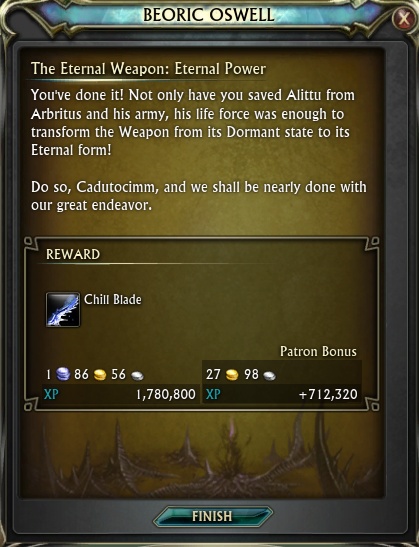
Once he is dead, your quest objective will change to ‘Return to Beoric Oswell in Alittu’. You can use the portal back in the building where you started to take you back to Alittu. Go back to Beoric Oswell in Alittu at /setwaypoint 4021 6365 Hand the quest in.
When you hand this quest in the warriors, rogues and clerics will get their UBER SUPER eternal off hands and/or shields.
Make sure you equip your new shiny items and then log off and back on again to make sure the weapon starts ‘counting’ your advancement on the upgrade requirements.
When you have completed all the requirements, ALT+LEFT CLICK your weapon and hit the upgrade button
Upgrade Six
ALT + LEFT CLICK your weapon again to see the new upgrade path.
I recommend that you log off and back on again to ensure the system properly registers the upgrade and starts to credit your quest/weapon properly
Upgrade Six - Requirement One
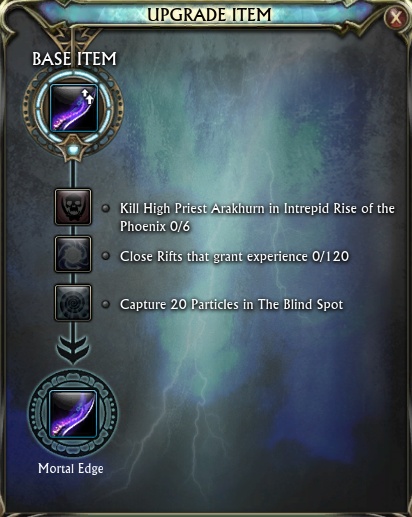
Kill High Priest Arakhurn in Intrepid Rise of the Phoenix 0/6
Intrepid Rise of the Phoenix is a 10 man T1 raid often called IROTP in chat. The raid has 4 bosses, High Priest Arakhurn is the last boss. You will need 2200 HIT to participate in this raid, along with a recommended DPS of at least 500k. If you dont have this DPS yet then you will need to work on your other gear and ensure you are using the correct specs. Hopefully you will have found yourself a nice guild who is now willing to take you through the raid and show you the ropes. If you plan on pugging this raid, then be sure to make it clear to the raid leader if this is your first time and to research tactics online before you go in.
By now you should definitely have the latest version of KBM installed. This will help you out massively during the fights!
Upgrade Six - Requirement Two
Close Rifts That Grant Experience 0/120
Again, you can go back to ember isle and close some easy rifts there.
Any rift that grants experience will do for this requirement.
For Level 70 rewards Queue up for Celestial Instant Adventures and hope to get inside the splinter of life/fire, here you will be closing rifts while looting items/mats relevant to level 70.
For Speed Most peeps find the level 60 quest area just to the west of ember isle is a quick and easy spot to farm. This area has a lot of rift tears that respawn very quickly.
The area is all underwater, you can get two hours of underwater breathing from one of the many ‘Atragatrian gifts’. There is one near the portal at /setwaypoint 11936 3591
You will need to mentor down to level 65 to get credit.
The quickest way to close these rifts is by only completing the first stage of the rift and then allowing the second stage to time out before closing the rift on stage 2. Complete the first stage of all the rifts on one shard, then switch shard and complete first stage there too, go through all the shards completing stage 1 of each rift, when you get back to the shard you started on, the rifts can then all be closed on stage 2.
If there is more than one of you farming these rifts then you should split up and have one player complete stage one and then the second player let stage 2 ‘time out’ and then close the rift while the first player is doing stage one of the next rift. Give the first player a head start of a few minutes, the second player follows after the head start.
In short, if you find a rift one stage 1 then complete stage 1 and then move to the next rift. If you find the rift on stage 2 with the timer run out, then close it. Check all rifts on each shard in order.
Upgrade Six - Requirement Three
Capture 20 Particles in the Blind Spot
This is a puzzle type quest found in the Tenebrean Schism.
This part of the quest is the hardest, requiring 20 particles.
When you have completed all the requirements, ALT+LEFT CLICK your weapon and hit the upgrade button. Congratulations!
Using Your Weapon
Once you hit the Eternal stage of the weapon, your weapon will have a ‘Use’ ability. To use the ability, drag the weapon to your skill bar and click to use it. The ability will only work while you have your weapon equipped.
The weapon ability will place a buff on yourself, and on any party/raid members you are grouped with. Players need to be in line of sight to receive the buff, so wait until your raid is stacked together before you apply them all! It is a good idea for a raid to have a player of each class to maximise the benefit from these buffs. The buffs do not stack, so having 5 Rogues in your group will not give you 20% extra damage! The buffs do not work in PVP.
You can see which eternal weapon buffs you have on your buff bar or you can use an add on like KBM to track it for your whole group!
Spirit of the Shadows
A ROGUE will increase all party and raid members outgoing damage by 4%.
Spirit of Arms
A WARRIOR will decrease all party and raid members incoming damage by 4%.
Spirit of Divinity
A CLERIC will increase all party and raid members healing received by 4%
Spirit of the Arcane
A MAGE will increase party and raid member maximum health by 4%.
Spirit of the Wilds
A PRIMALIST will increase all party and raid members outgoing damage and healing by 2% and increases their maximum health by 2%.