Freemarch

Freemarch

Quests found in Meridian, along with the Tutorial quests that are granted when you reach a certain level, are all explained on the Meridian guide page.

  • Freemarch is a level 6-20 zone.
  • This is the first zone you enter after finishing the Tutorial as a Defiant. (Guardians can just swim across from Silverwood to get here).
  • There are 3 portals in the zone.
  • Main quest hubs include: Ark of the Ascended, King’s Retreat, Kelari refuge, Eliam Fields, Scarred Mire, Lakeshore Crossroad, Gramaton Station and Denegar’s Stand.
  • Other points of interest are..
    — The Defiant Capital city, Meridian is in the West of Freemarch.
    — Entrance to The Iron Tomb Dungeon /setwaypoint 6170 4810
    — Entrance to Return to Iron Tomb Dungeon /setwaypoint 6178 4800

Below is a guide for all 97 quests in Freemarch. (Plus a few extra fishing and crafting quests)
Starting with 69 Main Quests, then some fishing and crafting quests, and finally the 28 Carnages.

For the Freemarch rares go here
For the Freemarch puzzle go here
For the other Freemarch cheevos go here

This guide is for the Defiant Questline in Freemarch.
For the Guardian version of this page, click here!

Quest Cheevos

There are 97 quests in Freemarch, you will not have to complete all of them to get the cheevo.

The Long March
Death Defying Acheesement
No More Kings

69 Main Quests

When you first enter Freemarch you will still have the quest ‘Into the Time Machine’ from Terminus.
You can hand in this quest to Trinian Nillor in Freemarch – /setwaypoint 6196 4293

Introduction: Soul Tree

QUEST 1

PICK UP
The quest is picked up from Trinian Nillor in Ark of the Ascended
/setwaypoint 6196 4293

TO COMPLETE
Talk to Trinian Nillor about your Soul Tree

Talk with Trinian Nillor and watch the Introduction video about the soul tree.

Once you are finished, hand in the quest to Trinian Nillor in Ark of the Ascended
/setwaypoint 6196 4293

Into the Ark

QUEST 2

PICK UP
The quest is picked up from Trinian Nillor in Ark of the Ascended
/setwaypoint 6196 4293

TO COMPLETE
Speak with Sanora Rellwyn
Use the Imagistancer to display Sylver’s message

Go into the nearby cave and speak with Sanora Rellwyn
/setwaypoint 6158 4402

Towards the back of the cave
/setwaypoint 6146 4423
is an Imagistancer to click on

Click it to watch the message from Sylver Valis.
Stay nearby while the message is playing or you will have to play it again.

Hand in the quest to Sanora Rellwyn
/setwaypoint 6158 4402

I'm an Old Soul

QUEST 3

PICK UP
The quest is picked up from Trinian Nillor in Ark of the Ascended
/setwaypoint 6196 4293

TO COMPLETE
Speak with the Endless Court Captive

Head out of the cave and find the Endless Court Captive in his cage at
/setwaypoint 6249 4341

Right click to talk to him, it does not matter which text options you choose.

Once finished, head back towards the camp area and hand in the quest to Optio Fairna
/setwaypoint 6215 4378

I Feel Better Already

QUEST 4

PICK UP
The quest is picked up from Optio Fairna in Ark of the Ascended
/setwaypoint 6215 4378

TO COMPLETE
Collect Shadow Core Remnants x8

In the area to the East are some highlighted quest circles, here you will find mobs that drop the Shadow Core Remnants.

There are quite a few different types of mobs here, you can hover over them and read the Tooltip to see if they drop the item you need, most of them do.
You will also pick up your first carnage quest from this area.

Kill and loot mobs till you have 8 Shadow Core Remnants

Your quest obejective will now change to ‘Bring the Shadow Core Remnants to Da Vidmoore’

Go to Da Vidmoore near the bridge
/setwaypoint 6248 4345
talk to him

Your quest obejective will now change to ‘Use the Planar Reactor and step into the energy beam’
Go back to the cave and click the Planar Reactor to the left, then step into the middle of the central platform and let the beam hit you.

Your quest obejective will now change to ‘Return to Optio Fairna in Ark of the Ascended’
Head back towards the camp area and hand in the quest to Optio Fairna
/setwaypoint 6215 4378

You will also receive the Planar Lure ability for completing this quest. This will be an item in your bags that you right click to learn the ability. You will then find the ability in your ability book under Ascended Powers > Lures
The Planar Lure is used at a Rift Tear to fully open a Rift.

Stand in the tear and use the Planar Lure ability to turn it into a Rift.

The Porticulum

QUEST 5
PICK UP: The quest is picked up from Kermis Verdon in Ark of the Ascended at /setwaypoint 6225 4391
TO COMPLETE: Speak with Kermis Verdon about Soul Recall

Take the quest from Kermis Verdon and then right click to speak to him about the Soul Recall ability.

Completing this quest will grant you the Soul Recall ability. (If you are already level 10 then you would have been granted the ability automatically already)
It will show up in your new abilities pop-up, or you can find it in your ability book in the General abilities tab.

Soul Recall can be used to take you back to a Portal of your choosing. When you receive the ability it will already be bound to your main city, Meridian.
Once you pass level 50 you will likely want to change your Recall point to Tempest Bay, the shared main city.

Making the Connection

QUEST 6
PICK UP: The quest is picked up from Kermis Verdon in Ark of the Ascended at /setwaypoint 6225 4391
TO COMPLETE: Speak with the Porticulum Master in Meridian or at Denegar’s Stand

Open up your map to see two places where you can hand in this quest.
In the West, the Portal Master in Meridian.
In the East, the Portal Master in Denegar’s Stand.
You will eventually visit both of these place, likely ending up at Meridian first, so don’t worry about rushing there now, you can hand in this quest later when you get to the location.

When you reach the second location, speak with the portal master and then hand in the quest to them.

You can find more info about using portals and their locations in the Porticulums List.

Come Again Another Day

QUEST 7

PICK UP
The quest is picked up from Optio Fairna in Ark of the Ascended
/setwaypoint 6215 4378

TO COMPLETE
Suppress the Northern Portal x1
Suppress the Southern Portal x1

When you pick up this quest you will notice there are two other quests available for you to pick up nearby, you should pick up these quests too and complete them all before coming back to the quest-hub to hand them all in.
These extra quests are side quests, not the main storyline, but the extra XP makes them well worth it.
You can see on the map how the quests are all completed in the same area.

The Northern Portal is at
/setwaypoint 6309 4232
The Southern Portal is at
/setwaypoint 6453 4337
Stand in the middle of the Portal area and use the Quest Item Planar Suppression Device to close the Portal.
Your quest obejective will now change to ‘Return to Optio Fairna in Ark of the Ascended’
Head back towards the camp area and hand in the quest to Optio Fairna
/setwaypoint 6215 4378

One Way Ticket

QUEST 8
PICK UP: The quest is picked up from Warden Sentoran in Ark of the Ascended at /setwaypoint 6216 4379
TO COMPLETE: Kill Bomani Shadowclaws x4 and Kill Bomani Darkspears x4
These mobs can all be found in Regent’s Cove to the East.
/setwaypoint 6294 4259
This quest will auto-complete when you finish.

Charged by the Planes

QUEST 9
PICK UP: The quest is picked up from Da Vidmoore in Ark of the Ascended at /setwaypoint 6248 4345
TO COMPLETE: Close a Rift to Gain Planar Charge

You will be able to see a rift a short distance away to the East, if its not there it will respawn within a couple of minutes.
Note: This rift does not show up on the main map like a Rift normally would, it is there specifically to help you easily complete this quest.

Go to the Rift and kill all the things till it closes!

You will note that when it closes you will gain a Planar Charge, your Planar Charge count is shown in the bottom left of your character portrait.
You can find more information about Planar Charges in the new player guides page.

Your quest objective will change to ‘Return to Da Vidmoore in Ark of the Ascended’
Go back to Da Vidmoore in Ark of the Ascended at /setwaypoint 6248 4345 and hand in the quest.

A Shift in Focus

QUEST 10
PICK UP: The quest is picked up from Satchel of Explosives in Regent’s Cove at /setwaypoint 6321 4313
TO COMPLETE: Place Ethian Explosives on Obelisks x4

Around Regent’s Cove are Obelisks that you can click.
Kill any mobs that are defending them, then right click the Obelisk to blow it up!
Do this 4 times to complete the quest

This quest will auto complete so you don’t need to go back to a questgiver to hand it in. Click the completed quest loot bag to collect your rewards. You can ‘store’ completed quests here, but be sure not to go over 10 or you will lose them. Storing quests here can be beneficial if you want to use an XP or Token Vial/boost before you hand them in.

Unsettling Icon

QUEST 11
PICK UP: The quest is picked up from destroying the Unsettling Icon in Warden’s Point at /setwaypoint 6564 4242
You will loot an Unsettling Icon Fragment, right click it to start the quest
TO COMPLETE: Deliver the Icon of Undeath to Optio Fairna in Ark of the Ascended
Head back towards the camp area and hand in the quest to Optio Fairna
/setwaypoint 6215 4378

Aura Augmentation

QUEST 12
PICK UP: The quest is picked up from Da Vidmoore in Ark of the Ascended at /setwaypoint 6248 4345
TO COMPLETE: Use Planar Charge to Cast Fury of the Asdcended

You can find the Fury of the Asdcended ability in your ability book under Ascended Powers > Planar War.
Click the ability to consume a Planar Charge and gain a buff that makes you hit planar mobs harder.
This ability can be very useful during zone events when the zone gets very busy with planar mobs.

Your quest objective will change to ‘Return to Da Vidmoore in Ark of the Ascended’
Go back to Da Vidmoore in Ark of the Ascended at /setwaypoint 6248 4345 and hand in the quest.

A Better Methodology

QUEST 13

PICK UP
The quest is picked up from Optio Fairna in Ark of the Ascended
/setwaypoint 6215 4378

TO COMPLETE
Use the Dissolution Apparatus on the Bomani Veck

At the top of Warden’s Point
/setwaypoint 6509 4351
In a small building you will find the Bomani Veck.
Use the quest item on your quest sticky, Dissolution Apparatus. You dont need to kill the mob, but you might as well!

Your quest obejective will now change to ‘Return to Optio Fairna in Ark of the Ascended’
Head back towards the camp area and hand in the quest to Optio Fairna
/setwaypoint 6215 4378

Point Taken

QUEST 14
PICK UP: The quest is picked up from Burned Barricade in Warden’s Point at /setwaypoint 6467 4440
TO COMPLETE: Burn the Bomani Barricades x5

Continue up the hill, right clicking the barricades on the way to make them burn!

This quest will autocomplete when you finish.

Advance to the Retreat

QUEST 15

PICK UP
The quest is picked up from Optio Fairna in Ark of the Ascended
/setwaypoint 6215 4378

TO COMPLETE
Find Dame Sigga in King’s Retreat

To the south is the next main quest hub, King’s Retreat.
Go to it and hand in the quest to Dame Sigga at /setwaypoint 6271 4526

Assault on King's Retreat

QUEST 16

PICK UP
The quest is picked up from Dame Sigga in King’s Retreat
/setwaypoint 6271 4526

TO COMPLETE
Collect Controlling Stones x8

In the area to the south
/setwaypoint 6292 4626
are a lot of Degenerated Defiants, kill 8 of them and loot the stones.

When you have collected 8, your quest objective will change to ‘bring the Controling Stones to Dame Sigga in King’s Retreat’.
Go back to Dame Sigga in King’s Retreat
/setwaypoint 6271 4526
Hand the quest in.

Call for Help

QUEST 17
PICK UP: The quest is picked up from Turaj Planeseeker in King’s Retreat at /setwaypoint 6270 4540
TO COMPLETE: Return to Turaj Planeseeker in King’s Retreat

This quest will award you will the Ascended Power: Defiant’s Flare
Defiant’s Flare can be used to call for assistance when you are trying to destroy planar footholds in the Mathosian continent.
Hand in the quest to Turaj Planeseeker in King’s Retreat at /setwaypoint 6270 4540

Planarite is Power

QUEST 18
PICK UP: The quest is picked up from Turaj Planeseeker in King’s Retreat at /setwaypoint 6270 4540
TO COMPLETE: Collect Planarite from rifts and invasions x5

You will likely already have more than 5 Planarite due to your previous closing of the rift for a quest. If you don’t then you can attack some rifts or invasions while you are doing the next batch of quests.

You can keep track of how much Planarite you have in your currencies tab on your character screen.
When you have enough Planarite, hand in the quest to Turaj Planeseeker in King’s Retreat at /setwaypoint 6270 4540

This quest will reward you with an Unstable Source Core (Focus), this item goes into the central slot at the bottom of your character gear screen. This focus will only hold 2 essences, so you will want to replace it with a 6 slot focus asap.

Aiding the Injured

QUEST 19
PICK UP: The quest is picked up from Defiant Medic in King’s Retreat at /setwaypoint 6305 4631 (or from one of the other medics, like the one at /setwaypoint 6311 4767)
TO COMPLETE: Use Cloth Bandages on Injured Wardens x5

You will have a ‘Cloth Bandage’ item attached to your quest sticky. Find Injured Wardens around the area, select them and use the item on them. You can switch shard at the same location to make this easier!

Sunken Confession

QUEST 20
PICK UP: The quest is picked up from A Jug under water in King’s retreat at /setwaypoint 6369 4673
TO COMPLETE: 
Collect the Gold Bracelet
Collect the Silverwood Cane
Collect the Ivory Figurine

Pick up the quest from the sunken jug
3 yellow quest dots will be highlighted on your map.

When you have collected all 3 items, hand in the quest to Lord Nicols in King’s retreat
/setwaypoint 6272 4558

Gold Bracelet
/setwaypoint 6434 4750
On the upper floor of the house

Silverwood Cane
/setwaypoint 6406 4633
Between the lake and the road

/setwaypoint 6304 4711
Ivory Figurine
On the floor between the trees

Assistance for Kelari Refuge

QUEST 21

PICK UP
The quest is picked up from Dame Sigga in King’s Retreat
/setwaypoint 6271 4526

TO COMPLETE
Find Attis Resta in Kelari Refuge

Head over to Kelari Refuge and hand in the quest to Attis Resta
/setwaypoint 6634 4545

Stalked in the Forest

QUEST 22
PICK UP: The quest is picked up from Wolf Flank , dropped from wolves in Kindra’s Thicket at around /setwaypoint 6401 4523
TO COMPLETE: Collect Wolf Flanks x8

Kill wolves to pick up the quest item then right click the quest item to activate the quest.
Collect 8 flanks from the wolves and then hand the quest in to Freeman Krunkle in Kelari Refuge at /setwaypoint 6590 4580 (be aware this NPC walks along the shoreline a little)

Memories from the Sea

QUEST 23

PICK UP
The quest is picked up from Attis Resta in Kelari refuge
/setwaypoint 6634 4545

TO COMPLETE
Collect Lost Kelari Valuables x6

In the sea nearby are chests filled with valuables!
/setwaypoint 6631 4501
pick up 6 of them to complete the quest.

Go back to Kelari Refuge and hand in the quest to Attis Resta
/setwaypoint 6634 4545

Freeman Krunkle, Master Hunter

QUEST 24
PICK UP: The quest is picked up from Steel Arrow, dropped from Thrashjaw Crocodiles in Kelari refuge at around /setwaypoint 6608 4488
TO COMPLETE: Deliver the Steel Arrow to Freeman Krunkle in Kelari refuge

Find Freeman Krunkle in Kelari refuge at /setwaypoint 6590 4580 and hand in the quest (be aware this NPC walks along the shoreline a little)

Keepers of the Flame

QUEST 25

PICK UP
The quest is picked up from Attis Resta in Kelari refuge
/setwaypoint 6634 4545

TO COMPLETE
Use the Arcane Net to capture Fire Squirrels
Collect Fire Squirrels x10

Go to the area marked on your map
/setwaypoint 6585 4685
to find loads of little Fire Squirrels running around.

On your quest sticky you will have the quest item ‘Arcane Net’, you need to use this net to catch the squirrels.

Click the net to use it and target the ground where a squirrel is.
The squirrels move pretty fast, try to target in front of them to be sure you catch them.
You may find this easier if you drag the net ability to your bar.

When you have collected 10, go back to Kelari Refuge and hand in the quest to Attis Resta
/setwaypoint 6634 4545

Letter to Leighton

QUEST 26

PICK UP
The quest is picked up from Attis Resta in Kelari refuge
/setwaypoint 6634 4545

TO COMPLETE
Deliver Attis’s Letter to Cyriac Leighton in Ellam Fields

Go to Cyriac Leighton in Ellam Fields and hand in the quest
/setwaypoint 6460 4860

The fate of Norman Bintley

QUEST 27

PICK UP
The quest is picked up from Cyriac Leighton in Ellam Fields
/setwaypoint 6460 4860

TO COMPLETE
Investigate the fate of Norman Bintley

Out in the fields you will find Norman Bintleys corpse.
/setwaypoint 6563 4981
Right click the corpse then go back to hand in the quest to Cyriac Leighton in Ellam Fields
/setwaypoint 6460 4860

Wild Growth

QUEST 28

PICK UP
The quest is picked up from Jaren Stwyn in Eliam Fields
/setwaypoint 6461 4853

TO COMPLETE
Use the Fumigator on overgrown Life Spores x6

In the ploughed fields nearby are Life Spores

Stand right next to the Life Spores and use your quest item on your quest sticky called Fumigator, this will destroy them

Do this 6 times to complete the quest

Then return to Jaren Stwyn in Eliam Fields
/setwaypoint 6461 4853
to hand in the quest

Mutated Meat

QUEST 29
PICK UP: The quest is picked up from Mutated Meat, dropped by Razorbacks in Eliam Fields at around /setwaypoint 6494 4867
TO COMPLETE: Collect Mutated Meat x10

Kill more of the Razorbacks and loot 10 of the meat from them
Hand in the quest to Bergan Lundren in Eliam Fields at /setwaypoint 6466 4859

Lost Locket

QUEST 30
PICK UP: The quest is picked up from Alla’s Locket, dropped by Razorbacks in Eliam Fields at around /setwaypoint 6494 4867
TO COMPLETE: Deliver the Lost Locket to Cyriac Leighton in Ellam Fields

Go back to Cyriac Leighton in Ellam Fields /setwaypoint 6460 4860 to hand in the quest.

What I've Sown

QUEST 31
PICK UP: The quest is picked up from Burned Out Energy Infuser in Eliam Fields at /setwaypoint 6571 4898
TO COMPLETE: Collect Life Energy Infusers x8

Around the ploughed fields and especially around the Life Spores you will find more of the Energy Infusers, pick up 8 of them to complete the quest.
When you have 8, go to to Jaren Stwyn in Eliam Fields /setwaypoint 6461 4853 to hand in the quest

Stampede of Justice

QUEST 32

PICK UP
The quest is picked up from Cyriac Leighton in Ellam Fields
/setwaypoint 6460 4860

TO COMPLETE
Use the Firecracker to cause a stampede

Go to the area in Todrin Estate marked on the map
/setwaypoint 6609 5073
Here you will find a small herd of cows.
Stand in the middle of them and use your quest sticky item, Firecracker
The cows will stampede towards the enemy!

Your quest objective will now change to ‘Collect Charged Sourcestones x6’

Around Todrin Estate are blue shiny stones to pick up.
/setwaypoint 6618 5005
Pick up 6 of them
Then go back to Cyriac Leighton in Ellam Fields /setwaypoint 6460 4860 and hand in the quest

A Bloody Bounty

QUEST 33
PICK UP: The quest is picked up from Endless Court Insignia, dropped by Endless Defilers in Todrin Estate at /setwaypoint 6630 4958
TO COMPLETE: Collect Endless Court Insignias x8

Kill more Endless Defilers to collect 8 Endless Court Insignias
Go back to Cyriac Leighton in Ellam Fields /setwaypoint 6460 4860 to hand in the quest.

The Line That Divides

QUEST 34

PICK UP
The quest is picked up from Cyriac Leighton in Ellam Fields
/setwaypoint 6460 4860

TO COMPLETE
Charge the Shade Collector at the North Death Idol
Charge the Shade Collector at the West Death Idol
Charge the Shade Collector at the South Death Idol

In the area to the North East are three yellow quest dots
Head to this area to find the three Death Idols

Right click each of the idols to charge them
North Death Idol – /setwaypoint 6714 4689
West Death Idol – /setwaypoint 6729 4730
South Death Idol – /setwaypoint 6772 4729

Your quest objective will then change to ‘Use the Shade Collector at the Planar Flux’

Stand in the black smoke on the top floor of the small building
/setwaypoint 6758 4679
Click the item on your quest sticky, Shade Collector
Void Fiend Xalos will appear, Kill him!

Then go back to Cyriac Leighton in Ellam Fields /setwaypoint 6460 4860 and hand in the quest

Into The Mire

QUEST 35

PICK UP
The quest is picked up from Cyriac Leighton in Ellam Fields
/setwaypoint 6460 4860

TO COMPLETE
Speak with Optio Kerrick in the Scarred Mire

Go to Optio Kerrick in Scarred Mire at /setwaypoint 6670 5337 and hand in the quest.

Where There's a Wisp, There's a Way

QUEST 36
PICK UP: The quest is picked up from Othar Hareldo in Longshore Highway at /setwaypoint 6787 5037
TO COMPLETE: 
Use the Faebane Net to capture wisps
Captured Wisps x6
Captured Profane Wisp

On your quest sticky you will have a usable quest item called ‘Faebane Net’
With the net you need to capture a single ‘Profane Wisp’ and 6 normal wisps.

You will find the normal wisps all around the small lake nearby /setwaypoint 6741 5127
the Profane wisps are on the small island in the middle of the lake

Target a wisp and then use your Faebane Net to capture them

When you have captured all the wisps hand the quest back in to Othar Hareldo in Longshore Highway at /setwaypoint 6787 5037

Like Moths to a Flame

QUEST 37

PICK UP
The quest is picked up from Optio Kerrick in Scarred Mire
/setwaypoint 6670 5337

TO COMPLETE
Activate a Shade Thresher
Kill undead near the Shade Threshers x5

In the Scared Mire you will find Shade Threshers on the ground, this one is at
/setwaypoint 6637 5397

Click the Shade Thresher and then drag Undead mobs to it
Kill the mobs while the beam is hitting them to credit the quest.

The beam doesn’t last very long, so be sure to keep the Shade Thresher active, or to wait till the mob is low health before clicking it.

Hand in the quest to Optio Kerrick in Scarred Mire
/setwaypoint 6670 5337

Worth a Thousand Words

QUEST 38

PICK UP
The quest is picked up from Legionnaire Brianna in Scarred Mire
/setwaypoint 6672 5336

TO COMPLETE
Use the Chronolink at Eliam’s Monument

In the middle of Scarred Mire you will find Eliam’s Monument
Stand just in front of it at
/setwaypoint 6615 5430
Use the quest item on your sticky, Chronolink
You will watch a small fight between March Warden Eliam and Jakub the Tyrant.

Your quest objective will change to ‘Use the Chronolink at Jakub’s Tomb’

Find Jakub’s Tomb at
/setwaypoint 6822 5435

Use the quest item on your sticky, Chronolink

Here you will see Alsbeth resurrecting Jakub to join her army

Hand in the quest to Legionnaire Brianna in Scarred Mire
/setwaypoint 6672 5336

A Final Request

QUEST 39
PICK UP: The quest is picked up from Muddy Journal, dropped by Iron Fortress Mobs in Scarred Mire at /setwaypoint 6638 5370
TO COMPLETE: Kill Abelus Crane in the Scarred Mire

Find Abelus Crane in the Scarred Mire
/setwaypoint 6555 5395
Kill him!

Hand in the quest to Sarah Martins in Meridian
/setwaypoint 6141 5150

The Tech is Mightier than the Sword

QUEST 40

PICK UP
The quest is picked up from Optio Kerrick in Scarred Mire
/setwaypoint 6670 5337

TO COMPLETE
Power up the Positive Energy Cannon
Kill attacking undead x20

Find the Positive Energy Cannon at the mark on your map
/setwaypoint 6539 5325
Click the cannon and fight the wave of undead, the cannon will do most of the work for you so don’t worry!
Jakub will the destroy the cannon and then portal away.

Hand in the quest to Optio Kerrick in Scarred Mire
/setwaypoint 6670 5337

A Haven for Those Defiant

QUEST 41

PICK UP
The quest is picked up from Legionnaire Brianna in Scarred Mire
/setwaypoint 6672 5336

TO COMPLETE
Report to Asha Catari in Meridian

You may find this map of Meridian helpful for navigation

You will find Asha Catari in the PVP area, this area is underground so doesn’t show up on the map until you enter the tunnel.

Go through the doorway at
/setwaypoint 6133 5128
Go to Asha in Catari Command Center (the PVP area) /setwaypoint 6086 5057 and hand in the quest

When you hand in this quest, Asha will give you another quest to go speak with the Faceless Man. The Faceless Man has the next quest for Freemarch.

Meridian has many different quests that will take you in lots of different directions. You can pretty much ignore most of them till you are higher level! You can find information about all the different quests to pick up in Meridian on the Meridian Guide page.
This freemarch guide will continue with the Freemarch questline.

Something Rotten in Lakeside

QUEST 42

PICK UP
The quest is picked up from Faceless Man in Orphiel’s Spire, Meridian (top floor)
/setwaypoint 5997 5135

TO COMPLETE
Find Ziara Altanin outside of Lakeside Outpost

To the South East of Meridian you will find Ziara Altanin at the Lakeshore Crossroad
/setwaypoint 6256 5571

Hand in the quest.

Lakeside Investigation

QUEST 43

PICK UP
The quest is picked up from Ziara Altanin in Lakeshore Crossroad
/setwaypoint 6256 5571

TO COMPLETE
Find evidence of strange activity
Talk to Lena Linder
Investigate the Lakeside Outpost Docks

Find evidence of strange activity

Go into the village and find the barrel at /setwaypoint 6229 5641

Right click the barrel to find the quest item ‘Half Human Hand’

Talk to Lena Linder

Find Lena Linder at
/setwaypoint 6165 5613

Right click to talk to her

Sure you are luv

Investigate the Lakeside Outpost Docks

Go to /setwaypoint 6124 5693 stand on the yellow quest dot til the quest ticks off.

Then go back to Ziara Altanin in Lakeshore Crossroad
/setwaypoint 6256 5571
Hand in the quest.

Not Lost but Found

QUEST 44

PICK UP
The quest is picked up from Ziara Altanin in Lakeshore Crossroad
/setwaypoint 6256 5571

TO COMPLETE
Investigate Old Meadow Farm
Kill Abyssal Cultists x10

Go into the Old Meadow Farm at /setwaypoint 6373 5625 to find the pile of corpses!

Kill Abyssal Cultists x10, these mobs are all around the farm area.

Then go back to Ziara Altanin in Lakeshore Crossroad
/setwaypoint 6256 5571
Hand in the quest.

Washed Away

QUEST 45

PICK UP
The quest is picked up from Ziara Altanin in Lakeshore Crossroad
/setwaypoint 6256 5571

TO COMPLETE
Use the Transmutation Idol to uncover Deep Ones x3
Use the Transmutation Idol on Mayor Jerrin x1

You will have a quest item on your quest sticky called ‘Transmutation Idol’

Find the Mayor first at
/setwaypoint 6229 5631

Select the Mayor and use the Transmutation Idol on him, this will turn him into a ‘Deep One’ mob which you can kill.
You can then use the Transmutation Idol on 3 of the other villagers, some of which will also turn into Deep Ones.

Then go back to Ziara Altanin in Lakeshore Crossroad
/setwaypoint 6256 5571
Hand in the quest.

I Heard a Strom was Coming

QUEST 46

PICK UP
The quest is picked up from Ziara Altanin in Lakeshore Crossroad
/setwaypoint 6256 5571

TO COMPLETE
Meditate at the Abyssal Marker
Find and kill Fathomlord Budlopudlul

Both the quest objectives are out in the Lake of Solace

Meditate at the Abyssal Marker
This one is close to shore, near one of the boats at the dock, swim underwater to click the Abyssal Marker on the Lake bed
/setwaypoint 6184 5772
Clicking the Abyssal Marker will give you a swim speed buff

Then go to /setwaypoint 6323 6136 much further out in the lake.

Fathomlord Budlopudlul is down in the water, find him and kill him!

Be careful not to stay too long under water as you can drown!

Your quest objective will change to ‘Report to Marius Venden at Gramaton Station’

Go to Gramaton Station and hand in the quest to Marius Venden
/setwaypoint 6864 5687

Burning Down the Hill

QUEST 47

PICK UP
The quest is picked up from Marius Venden in Gramaton Station
/setwaypoint 6864 5687

TO COMPLETE
Light Kerosene Urns x4

You will find the Light Kerosene Urns up on the Savage Hill
/setwaypoint 6900 5862
Generally around the tents.
Pick up 4 of them
This will burn down the nearby tents!

Go back to Marius Venden at Gramaton Station and hand in the quest
/setwaypoint 6864 5687

Smith's Haven is Burning

QUEST 48

PICK UP
The quest is picked up from Marius Venden in Gramaton Station
/setwaypoint 6864 5687

TO COMPLETE
Speak with March Warden Denegar at Denegar’s Stand

Continue down the main road to find Denegar’s Stand

March Warden Denegar is inside the tent at
/setwaypoint 7263 5419
Hand in the quest to him

Delivered from Danger

QUEST 49

PICK UP
The quest is picked up from March Warden Denegar in Denegar’s Stand
/setwaypoint 7263 5419

TO COMPLETE
Talk to Ted Powell in Smith’s Haven

Ted Powell is in a cave  in the West of Smith’s Haven

Enter Smith’s Haven and then head to the cave entrance at
/setwaypoint 7089 5308
Go into the cave and speak to Ted Powell

You will now have a ‘Trapped Citizen’ following you.

Head straight out of Smith’s Haven, killing any mobs you encounter on the way.
Its best to stick to the right side wall as you leave the cave and follow it to the exit.
Cross the bridge with the Trapped Citizen still following and the quest will complete.

If you lose the Trapped Citizen then go back to Ted Powell and speak to him again to get another one

Go back to March Warden Denegar in Denegar’s Stand
/setwaypoint 7263 5419
Hand in the quest to him

Born of Water

QUEST 50

PICK UP
The quest is picked up from Greilyn Sevillien in Denegar’s Stand
/setwaypoint 7257 5418

TO COMPLETE
Use the Waterborn Orb
Use Sea Serfs to put out fires in Smith’s Haven x3

Go to the well in the middle of Smith’s Haven
/setwaypoint 7185 5265

Use your quest sticky item ‘Waterborn Orb’

You will now have a ‘Sea Serf’ mob following you.

Look around Smith’s Haven to find buildings that are on fire.
Walk into/near the burning buildings and the Sea Serf will follow you and then put out the fire. The Sea Serf will be destroyed in the process.

Go back to the well and use the Orb again to get another Sea Serf.

Put out 3 fires in this way to complete the quest

Hand in the quest to Greilyn Sevillien in Denegar’s Stand
/setwaypoint 7257 5418

Undo

QUEST 51
PICK UP: The quest is picked up from Endless Null Totem, dropped by Endless Pactbrand in Smith’s Haven at /setwaypoint 7121 5336
TO COMPLETE: Collect Endless Null Totems x6

Kill more of the Endless Mobs and loot the Totems from them
Once finished, hand in the quest to Kight Marshal Tremaine in Denegar’s Stand /setwaypoint 7259 5426

Saving That Which is Sacred

QUEST 52
PICK UP: The quest is picked up by picking up any of the three items listed
TO COMPLETE: 
Collect Portrait of the First Warden – Hung on the wall in the upper floor of the house – /setwaypoint 7164 5285
Collect Ancient Vase – On the floor in the upper floor of the house – /setwaypoint 7180 5204
Collect Freemarch Imperial Stout – In ‘The Hammered Smith’ Pub – /setwaypoint 7255 5309

Portrait of the First Warden
Ancient Vase
Freemarch Imperial Stout

Go back to March Warden Denegar in Denegar’s Stand to hand in the quest
/setwaypoint 7263 5419

The Towers Ablaze

QUEST 53

PICK UP
The quest is picked up from March Warden Denegar in Denegar’s Stand
/setwaypoint 7263 5419

TO COMPLETE
Find and Collect the Uncanny Box

Half way up the hill to the Iron Fortress is a single watchtower
/setwaypoint 7040 5620

Go up to the top of the tower and pick up the box

Your quest objective will now change to..
Destroy the Altar of Sacrifice
Destroy the Altar of the Despoiled
Destroy the Altar of the Walking Dead

The three Altars are in 3 of the towers in the Iron Fortress, these are marked on your map with a yellow quest dot.

Right click the Altars to destroy them

Altar of Sacrifice
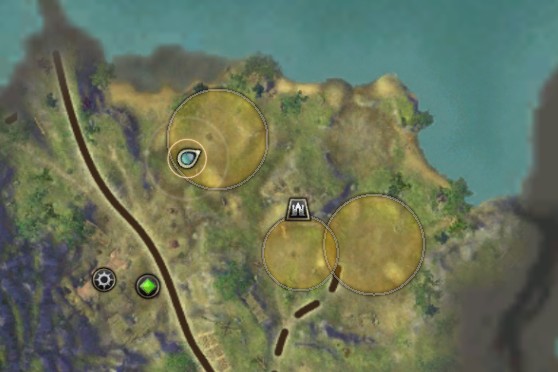
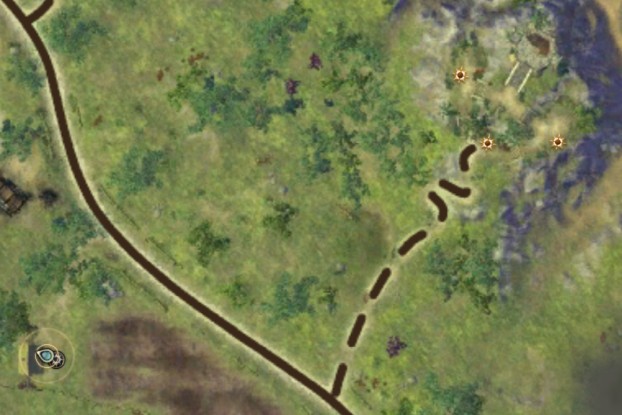
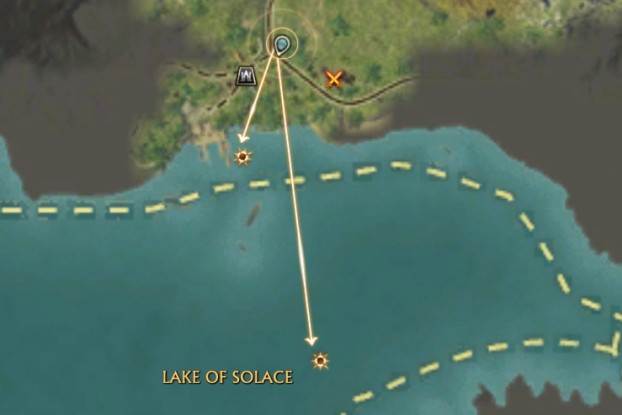
/setwaypoint 7019 5402
Altar of the Despoiled
/setwaypoint 6959 5471
Altar of the Walking Dead
/setwaypoint 6890 5410

Your quest objective will now change to..
Destroy Jakub’s Altar

Go up to the top of the tower at /setwaypoint 6958 5347 and right click on Jakub’s Altar

The ‘March Edge, Sword of Kings’ will appear for you to hand in your quest

Pages of History

QUEST 54
PICK UP: The quest is picked up from Philobian Mikkarz in Denegar’s Stand at /setwaypoint 7248 5420
TO COMPLETE: Gather the Ancient Tomes x8

You will find the Tomes all around the Iron Fortress, especially up along the walls.
These two pictured are at /setwaypoint 7026 5364

Collect 8 Tomes and then hand in the quest to Philobian Mikkarz in Denegar’s Stand at /setwaypoint 7248 5420

Unholy Alliance

QUEST 55
PICK UP: The quest is picked up from Discourse on Extra Planar Entities (a book) in The Iron Fortress at /setwaypoint 6955 5456
TO COMPLETE: Place nine Corrupted Skulls in the Brazier of Torment and Kill Legul

Pick up the quest from the book
Kill Iron Fortress mobs around the Iron Fortress and loot the skulls from them, you can see how many you have in your quest items bag on your quest log

When you have 9 skulls, go to the Brazier of Torment at /setwaypoint 6958 5344 (bottom floor of the tower)

Click the Brazier to make Legul appear and kill him

Hand in the quest to Philobian Mikkarz in Denegar’s Stand at /setwaypoint 7248 5420

King for a Day

QUEST 56

PICK UP
The quest is picked up from ‘March Edge, Sword of Kings’ in The Iron Fortress
/setwaypoint 6958 5347

TO COMPLETE
Use March Edge near the Idol of Regulos

Go down to the middle of the tower and then along the walkway to the tower further North, go up to the top of this tower

Find the Idol of Regulos on the top floor at /setwaypoint 6964 5303

Use your quest item ‘March Edge’ while stood next to the Idol

Jakub the Tyrant will spawn next to you on a purple circle, he will talk a little and then teleport away, stand in the purple circle to follow him
You will now be on top of one of the inaccessable towers with Jakub the Tyrant, kill him!
You can then use the purple circle to go back to where you were, or jump off the tower towards Denegar’s Stand and hand in the quest to March Warden Denegar
/setwaypoint 7263 5419

Completing this quest will grant you the cheevo ‘No More Kings’

A Debt of gratitude

QUEST 57

PICK UP
The quest is picked up from March Warden Denegar in Denegar’s Stand
/setwaypoint 7263 5419

TO COMPLETE
Talk to Philobian Mikkarz
Talk to Knight Marshall Tremaine

The two NPCs are just outside of the tent in Denegar’s Stand

Speak to them both

Then hand in the quest to March Warden Denegar in Denegar’s Stand
/setwaypoint 7263 5419

Trial of Strength

QUEST 58
PICK UP: The quest is picked up from Sir Olgedon in Knight’s Stand at /setwaypoint 7036 5108
TO COMPLETE: Destroy the Practice Dummy with a single blow

To the left of Sir Olgedon are 3 target dummys
They all have 40 hit points, so it doesn’t matter which one you choose to hit.
Use your hardest hitting spell to destroy the dummy in one hit.

Then return to Sir Olgedon in Knight’s Stand at /setwaypoint 7036 5108 and hand in the quest.

Trial of Fleetness

QUEST 59
PICK UP: The quest is picked up from Sir Olgedon in Knight’s Stand at /setwaypoint 7036 5108
TO COMPLETE: Touch the first Checkpoint Banner

This quest is a time trial race.
Along the route are banner which you need to click before moving to the next one, all the banners are mark with a yellow quest dot on your mini-map
Squire Chauncey is also running the race with you, try to beat him!
After the sixth banner, chaunceys cousin will come along to attack you, you can just keep running and ignore him

Then return to Sir Olgedon in Knight’s Stand at /setwaypoint 7036 5108 and hand in the quest.

Trial of Endurance

QUEST 60
PICK UP: The quest is picked up from Sir Olgedon in Knight’s Stand at /setwaypoint 7036 5108
TO COMPLETE: Eat cheese within the time limit x24

In the tent just behind Sir Olgedon are 3 tables filled with cheeses
You will also notice there are cups of ‘Healing Draft’
Eating the cheese will damage you, so you need to drink the Healing Draft to heal up, keep an eye on your health and react accordingly!
You can also use your own healing spells to keep you alive.
Be aware the quest is timed, you only have 1min 30seconds!

Then return to Sir Olgedon in Knight’s Stand at /setwaypoint 7036 5108 and hand in the quest.

Trial of Combat

QUEST 61
PICK UP: The quest is picked up from Sir Olgedon in Knight’s Stand at /setwaypoint 7036 5108
TO COMPLETE: Defeat Sir Olgedon in Battle

Go to the arena just across the road and click the signal torch to start the fight
/setwaypoint 7050 5169
Fight Sir Olgedon, you only need to get him to around 20% and then the fight is over

Then return to Sir Olgedon in Knight’s Stand at /setwaypoint 7036 5108 and hand in the quest.

Completing this quest will give you the ‘Death Defying Acheesement’ cheevo

Beautiful Wreck

QUEST 62
PICK UP: The quest is picked up from Clicking the book on the boat in Fortune’s End at /setwaypoint 7089 4851
TO COMPLETE: Collect Glamour Stones x10

You will find the Glamour Stones underwater, the area where the stones spawn is bigger than the quest circle.
The stones are small, but very sparkly!

When you have picked up 10, hand in the quest to Drogo Sunderand in Fortune’s End
/setwaypoint 7008 4943
If there is a foothold nearby then you will need to destroy it to make Drogo appear

The Inside Scoop

QUEST 63
PICK UP: The quest is picked up from Drogo Sunderand in Fortune’s End at /setwaypoint 7008 4943
If there is a foothold nearby then you will need to destroy it to make Drogo appear
TO COMPLETE: Harvest Seacap Eggs x8

Down on the beach are corpses that you can right click to collect sea cap eggs from.
This one pictured is at /setwaypoint 7046 4893

Loot 8 eggs

When you have picked up 8, hand in the quest to Drogo Sunderand in Fortune’s End
/setwaypoint 7008 4943

Unending Waves

QUEST 64
PICK UP: The quest is picked up from Alys White in Trawling Post at /setwaypoint 6561 5696
TO COMPLETE: Kill Living Oceans x3
Entrap Living Water with the Band of Tidal Sway x6

You will have a quest item on your sticky called ‘Band of Tidal Sway’

Nearby are large water mobs called Living Oceans.
When you kill a Living Ocean, 2 Living Water mobs will appear.
Use your Band of Tidal Sway to place a ground AOE under the Living Water mobs to capture them.
Kill 3 Living Oceans to capture the 6 Living Waters needed.

Your quest objective will now change to ‘Fill the Hydrotech Vessel’
Back at the Trawling Post at /setwaypoint 6568 5701 you will find a Vessel that you can right click to fill with the Living Waters

You can then hand in the quest to Alys White in Trawling Post at /setwaypoint 6561 5696

Wayward Package

QUEST 65
PICK UP: The quest is picked up from Alys White in Trawling Post at /setwaypoint 6561 5696
TO COMPLETE: Collect the Wayward Package

On the floor at /setwaypoint 6782 5733 you will find the missing courier.
Right click the courier to loot the package.

Your quest objective will change to ‘Deliver the Wayward Package to Marius Venden at Gramaton Station’

Go to Marius Venden at Gramaton Station at /setwaypoint 6864 5687 and hand in the quest.

Close the Door Behind You

QUEST 66
PICK UP: The quest is picked up from Erathis Menel in Crook Ridge at /setwaypoint 5975 5640
TO COMPLETE: Obtain the Force Core

Find the Force Core in the top floor of the ruined house in Vestige at /setwaypoint 5912 5746
Right click the vessel to take the Force Core

You quest objective will now change to ‘Activate the Planar Reactor’
In the larger building, click the Planar Reactor in the corner at /setwaypoint 5947 5793

You can then hand in the quest to Erathis Menel in Crook Ridge at /setwaypoint 5975 5640

Eldritch Attack

QUEST 67
PICK UP: The quest is picked up from a scroll on the table in Lakeside Outpost at /setwaypoint 6124 5737
TO COMPLETE: Collect Eldritch Weaponry x4

Right click 4 of the weapon racks to collect the weaponry

When you have collected all 4, hand in the quest to Ziara Altanin in Lakeshore Crossroad
/setwaypoint 6256 5571

If you can’t see the scroll then come back when you are higher level!

Servant of the Fathomlord

QUEST 68
PICK UP: The quest is picked up from Abyssal Talisman, looted from Tidecaller Rygigas in Bronze Tomb Passage at /setwaypoint 5907 5512
TO COMPLETE: Deliver the Abyssal Talisman to Ziara Altanin outside of Lakeside Outpost

Pick up the quest by killing Tidecaller Rygigas in Bronze Tomb Passage at /setwaypoint 5907 5512 and loot the Abyssal Talisman

Go to Ziara Altanin in Lakeshore Crossroad /setwaypoint 6256 5571
Hand in the quest.

The King's Lady, Part 2

QUEST 69
PICK UP: The quest is picked up from Zareph’s Letter in Port Scion Bay at /setwaypoint 6131 4238
TO COMPLETE: Speak with Asha Catari in Meridian

Go to Asha Catari in Meridian at /setwaypoint 6086 5057 and hand in the quest

Fishing Quests

A short series of quests in Kelari Refuge to introduce you to the joys of fishing!

Your first Fishing Pole

PICK UP: The quest is picked up from Palometa in Kelari Refuge at /setwaypoint 6580 4580
TO COMPLETE: Return to Palometa in Kelari Refuge

Simply hand the quest straight back in to the questgiver to complete the quest and receive your Beginner’s Fishing Pole.

How to Catch a Fish

PICK UP: The quest is picked up from Palometa in Kelari Refuge at /setwaypoint 6580 4580
TO COMPLETE: Follow the instructions in the quest to fish up a Lost Sea Turtle.

In your bags will be a Beginner’s Fishing Pole
I suggest you move this to an area of your bags that’s for ‘permanent storage’ and then drag the pole onto one of your ability bars.
Once its on your bars you can key bind it, which will make fishing a little easier.

Head to the water and lets catch a fish!
ANY water can be used to catch a fish, there are ‘schools’ of fish that will increase your chances of catching usable fish, but any water has a chance to have fish in it.
The water just behind the questgiver will do fine for this quest.

Click on your pole to activate it and then hover over the water, you will note that the water close to shore shows a red circle, this is because you are too close to this area to fish, move the mouse further away until it turns blue. Blue is the colour for shallow water, left click to start fishing.
Wait for your mouse to turn into the ‘fish’ symbol and then left click to reel the fish in, it may take a few tries before the fish is caught successfully.

Your catch will be a ‘Lost Sea Turtle’ which is all you can fish up while you are on this quest.
Hand in your completed quest to Palometa in Kelari Refuge at /setwaypoint 6580 4580

For a more detailed guide on fishing you can have a look at the original ZamRift guide.

Shallow Water Fishing

PICK UP: The quest is picked up from Palometa in Kelari Refuge at /setwaypoint 6580 4580
TO COMPLETE: Fish up a Forest Pondleaper from shallow water

Forest Pondleapers can be fished up in shallow water in Freemarch
Continue to fish in shallow water until you catch a Forest Pondleaper and then hand your quest in to Palometa in Kelari Refuge at /setwaypoint 6580 4580

Deep Water Fishing

PICK UP: The quest is picked up from Palometa in Kelari Refuge at /setwaypoint 6580 4580
TO COMPLETE: Fish up a False Shark from deep water

False Sharks can be fished up in deep water in Freemarch.
Deep water is found a little further away from the shore.
You can use the wooden walkways to go out over the water until you find the deep water.
A good spot to head to is /setwaypoint 6621 4512
Hovering over Deep water will make the target circle turn yellow.

Catch a False Shark and then hand your quest in to Palometa in Kelari Refuge at /setwaypoint 6580 4580

Making Lures

PICK UP: The quest is picked up from Palometa in Kelari Refuge at /setwaypoint 6580 4580
TO COMPLETE: Craft an Irresistible Water Snail

Lures are applied to your pole to help you fish up better fish or specific fish/items.
Currently when you fish in open water you will have a chance to fish up grey items instead of fish. This chance will reduce as you level up your fishing skill and craft better poles. Using a lure will ensure you only fish up the fish/items you want, even at low level.

Lures are crafted using your fishing skill. You do not need a craft station to craft with fishing, you can stand right next to the questgiver and open up your crafting UI. The default keybind for this is , (the comma key) or you can use the menu in the bottom left, Player > Crafting

Use the dropdown in the top left to switch to fishing and here you will see the recipe for the lure has been given to you.
This is a temporary recipe that will only show up while you are on the quest.
Select the recipe on the list and then click craft in the bottom right corner.
After a short craft time, the Irresistible Water Snail will be in your bags.

Hand your quest in to Palometa in Kelari Refuge at /setwaypoint 6580 4580

Fishing With Lures

PICK UP: The quest is picked up from Palometa in Kelari Refuge at /setwaypoint 6580 4580
TO COMPLETE: Use a Rayfin Shad Lure on your fishing pole + Fish up Rayfin Shad from water in Freemarch x3

You will be given a special Rayfin Shad Lure to use, you will find this lure attached to your quest sticky and also as an item in your bags.
Right click the Rayfin Shad Lure and then left click your pole (click the pole in your bags not the shortcut on your ability bar).
The lure is now applied to your pole, when you hover over your pole you will be able to see the applied lure on the tooltip.

Cast your line to fish as before, shallow water will do fine.
As you have the lure active, you will only fish up Rayfin Shads, the lure will work for 3 charges, to allow you to fish up 3 Rayfin Shads.
If you accidentally interrupt a fishing attempt, the lure charge will still be consumed but you wont get a fish, in this case you will need to abandon the quest and then retake it to get a fresh lure with 3 charges.

When you have 3 Rayfin Shads you can hand the quest in to Palometa in Kelari Refuge at /setwaypoint 6580 4580

Fishing For Survival

PICK UP: The quest is picked up from Adjo in Kelari Refuge at /setwaypoint 6586 4580
TO COMPLETE: 
Fish up Blue Widemouths from deep water x10
Fish up False Sharks from deep water x10

Go back to the deep water and fish!
it is a good idea to use the Irresistible Water Snail lure that you crafted earlier for this quest, as this will prevent you from fishing up greys for 5 minutes.

When you have the required fish, hand in the quest to Adjo in Kelari Refuge at /setwaypoint 6586 4580
This quest rewards you with the recipe for Speedy Shark Snack.
This is a survivalist recipe that craft edible food that will heal you and restore your mana, it also increases your out of combat movement speed by 10%.

Crafting Quests

A short series of quests in Kelari Refuge to introduce you to the joys of crafting!

Tricks of the Trades

PICK UP: The quest is picked up from Julia Tanner in Kelari Refuge at /setwaypoint 6556 4594
TO COMPLETE: 
Speak with Thos Nishim about Mining
Speak with Olthin Idren about Foraging
Speak with Zenre Palux about Butchering

Just to the left, 3 NPCs will now have speech bubbles above their heads.
Speak with each of them about their craft and then right click them again to train the skill.
If you are a new player to the game on your first character then I highly recommend that you pick these 3 gathering skills for your skill set. This will allow you to collect all the different materials as you level, you should keep all these materials, preferably sending them to a bank alt. Then when you reach the higher levels you can choose to switch out a gathering skill for a crafting skill, or to put crafting skills on alts and keep gathering on your main, or to add extra skill slots to your current character (credits only) and learn all the things!
In your general abilities tab you will have the ability to track plants, ore and wood. ensure these are switched on all the time so you can see locations of materials on your mini-map. Gather as you quest and pop the materials in your bank or send them to your alt.

When you have trained the 3 skills, each of the skill trainers will give you a quest to collect materials which you will find in Freemarch as you quest, you can come hand in these quests any time, so don’t be too worried about completing them on your next run out into the wild.

You will find daily crafting quests and more skill trainers once you reach Meridian.

28 Carnage Quests

I have ordered the carnage quests in the order of amount of mobs to kill starting with the smallest, as you are most likely to be missing the ones with fewer amount of mobs.

CARNAGE: Carnage: Malgar
PICK UP: You will find them in Fortune’s End at around /setwaypoint 7065 4849 (patrols the whole area) 
TO COMPLETE: Kill Malgar (a large crocodile)

CARNAGE: Carnage: No Mercy for the Merciless
PICK UP: You will find him in Savage Hill at around /setwaypoint 6872 5878
TO COMPLETE: Kill Iriri the Merciless

CARNAGE: Carnage: Durgin the Keeper
PICK UP: You will find him in The Iron Fortress at the top of the tower at around /setwaypoint 6803 5504
TO COMPLETE: Kill Durgin the Keeper

CARNAGE: Carnage: The Gory Glutton
PICK UP: You will find him in Leighton Farmstead at around /setwaypoint 6861 5131
TO COMPLETE: Kill Duldrun (a large razorbeast)

CARNAGE: Carnage: Worgar
PICK UP: You will find them in Kindra’s Thicket at around /setwaypoint 6650 4652
TO COMPLETE: Kill Worgar

CARNAGE: Carnage: Grazzar
PICK UP: You will find him in Misty Shoals at around /setwaypoint 6835 4440
TO COMPLETE: Kill Grazzar (a large crocodile)

CARNAGE: Carnage: Rognar
PICK UP: You will find Rognar in Eliam Fields at around /setwaypoint 6500 4999
TO COMPLETE: Kill Rognar

CARNAGE: Carnage: Smith’s Haven Vengeance
PICK UP: Kill any of the 3 mobs listed to pick up the quest
TO COMPLETE:
Kill Fiendlord Vedigo – In front of the locked gate – /setwaypoint 7144 5174
Kill Sergeant Bikesh – In ‘The Hammered Smith’ Pub – /setwaypoint 7249 5300
Kill Lieutenant Ahdrek – On the platform across the bridge – /setwaypoint 7348 5177

CARNAGE: Carnage: Dishonorable Discharge
PICK UP: Kill any of the 3 mobs listed to pick up the quest
TO COMPLETE:
Kill Carleb the Axiomatic – /setwaypoint 6841 5462
Kill Haron the Belligerent – /setwaypoint 6659 5485
Kill Tyroth the Ironword – /setwaypoint 6496 5461

CARNAGE: Carnage: Alphas and Omega
PICK UP: You will find them in Kindra’s Thicket at around /setwaypoint 6401 4523
TO COMPLETE: Kill 5 Shadetouched Alphas

CARNAGE: Carnage: Protecting Meridian’s Walls
PICK UP: You will find them in Iron Tomb Passage at around /setwaypoint 6256 4886
TO COMPLETE: Kill 6 Endless Court Assassins and Agents

CARNAGE: Carnage: Restoring the March
PICK UP: You will find them in Warden’s Point at around /setwaypoint 6468 4408
TO COMPLETE:
Kill 4 Bomani Mystics
Kill 4 Bomani Defenders

CARNAGE: Carnage: An Endless Rabble
PICK UP: You will find them in Kings Retreat at around /setwaypoint 6314 4652
TO COMPLETE:
Kill 4 Endless Reavers
Kill 4 Endless Sorceresses

CARNAGE: Carnage: Defeating the Sons of Solace
PICK UP: You will find them in The Long Strand at around /setwaypoint 6543 5793 (all the way down the sea front in both directions)
TO COMPLETE:
Kill 4 Abyssal Keepers
Kill 4 Abyssal Sentinels

CARNAGE: Carnage: Strike at the Endless
PICK UP: You will find them in Regent’s Cove at around /setwaypoint 6284 4304
TO COMPLETE: Kill 8 Endless Court Cultists

CARNAGE: Carnage: Abyssal Secret
PICK UP: You will find them in Lakeside Outpost at around /setwaypoint 6133 5727
TO COMPLETE: Kill 8 Abyssal Mystics and Arcanists

CARNAGE: Carnage: A Risky Task
PICK UP: You will find them in Kelari refuge at around /setwaypoint 6608 4488
TO COMPLETE: Kill 8 Thrashjaw Crocodiles

CARNAGE: Carnage: Cold Dead Hands
PICK UP: You will find them in Todrin Estate at around /setwaypoint 6580 5066
TO COMPLETE: Kill 10 Undead

CARNAGE: Carnage: Changing of the Guard
PICK UP: You will find them in Iron Tomb Passage at around /setwaypoint 6287 4841
TO COMPLETE: Kill 10 Endless Court Guards

CARNAGE: Carnage: Man V Mandible
PICK UP: You will find them in Fremon Run at around /setwaypoint 6994 5063
TO COMPLETE: Kill 12 Marchspiders

CARNAGE: Carnage: Savage Beat Down
PICK UP: You will find them in Savage Hill at around /setwaypoint 6880 5742
TO COMPLETE: Kill 12 Endless Cultists at Savage Hill

CARNAGE: Carnage: An Old Flame
PICK UP: You will find them in Vestige at around /setwaypoint 5974 5753
TO COMPLETE:
Kill 3 Flamewrought Horror
Kill 3 Wanton Blaze
Kill 6 Twisted Aberration

CARNAGE: Carnage: Agents of Akylios
PICK UP: You will find them in Fortune’s End at around /setwaypoint 6964 4877
TO COMPLETE: 
Kill 3 Abyssal Cabalists and Commanders (on the boats)
Kill 4 Abyssal Demolishers
Kill 6 Shellback Thrashers

CARNAGE: Carnage: Granting a Death Wish
PICK UP: You will find them in Seastone Bluff at around /setwaypoint 6717 4748
TO COMPLETE:
Kill 6 Risen Thralls
Kill 4 Wailing Spirits
Kill 4 Doomed Spirits

CARNAGE: Carnage: Stay Dead
PICK UP: You will find them in Scarred Mire at around /setwaypoint 6639 5368
TO COMPLETE
Kill 8 Iron Fortress Undead
Kill 8 Debased Undead

CARNAGE: Carnage: Fire Fight
PICK UP: You will find them in Smith’s Haven at around /setwaypoint 7213 5314
TO COMPLETE:
Kill 10 Depraved Undead
Kill 8 Iron Fortress Undead

CARNAGE: Carnage: The Dead of Freemarch
PICK UP: You will find them in The Iron Fortress at around /setwaypoint 6959 5412
TO COMPLETE: 
Kill 12 Iron Fortress Defenmders, Deathblades and Dragoons
Kill 5 Iron Fortress Deadshots
Kill 3 Deathhowl Mastiffs

CARNAGE: Carnage: Twenty is a Crowd
PICK UP: You will find them in The Iron Fortress at around /setwaypoint 6993 5514
TO COMPLETE:
Kill 8 Iron Fortress Watchers
Kill 8 Iron Fortress Guards
Kill 4 Iron Fortress Berserkers

Breadcrumb Quests

Quests that will lead you into other zones/areas

Assistance for Granite Falls

PICK UP
The quest is picked up from March Warden Denegar in Denegar’s Stand
/setwaypoint 7263 5419
This quest can also be picked up from Joss Farwraker in Defiant’s Approach at /setwaypoint 6186 5253

TO COMPLETE
Speak with Khaleem Vensworn in Meridian
Speak with Seth Merrick at Coterie Camp

This is the breadcrumb quest that will lead you into Stonefield, the second Defiant zone.

You can find Khaleem Vensworn in Meridian right next to the portal
/setwaypoint 6134 5178

This NPC may attempt to give you a PVP quest when you right click him, you can take the quest and then click again to talk, or close/decline the quest and then the dialogue option will be there to select.

You will be teleported to Stonefield where you can then speak to Seth Merrick at Coterie Camp
/setwaypoint 5695 5126

Then hand the quest in to Optio Dohon at
/setwaypoint 5700 5111

Notes for Completionist..

  • The Quest ‘Something Rotten in Lakeside‘ does not tick off from completionist even if you complete it.
LIVE on Twitch OFFLINE
on Twitch