Cheevo found in H > Zones > Rift
Quick Links for Guides on This Page
The Contraptions Detailed Guide Basic Guide World Map
The Story
In May 2018 Dead Simon hid 110 contraptions around Mathosia for people to find. A competition was set up by Trion: the first person to complete the cheevo and find all the contraptions would win the most epic of epic prizes.. silver tier loyalty. Over the course of the month, everyone else who then finished the cheevo would go into a prize draw and then 3 more random people would be chosen to also receive silver tier.
And so.. we got to see the RIFT community at its finest… because instead of hiding away locations, the community shared them all.. Public spreadsheets were set up to allow people to share any locations that were found, a thread on the forums was created for people to be able to share locations and help others with the more difficult to reach locations, the whole community pulled together and the first players to complete the hunt did so within 5 days, leaving all the locations listed publicly, so that during the month any player could complete the hunt and go into the draw for the 3 random silver tiers.
You can find one of those original spreadsheets here.
It was a great joy to see the RIFT community pull together like this and I want to thank each and every player who shared locations and helped others to reach the more difficult contraptions.. you are all awesome!
The Contraptions
Hidden throughout the original 11 zones of Mathosia are 110 confounding contraptions.
These are very small clickable boxes.
Some of them are in very easy to get to locations, others are extremely well hidden and will require some work to get to.
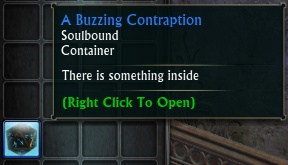
When you click each contraption you will loot a container.
Inside the containers are varying amounts of platinum and planarite, along with some food items. The amount you get will depend on your characters level, a level 50 character will receive around 2 platinum and 100 planarite, a level 70 character will receive around 10 platinum and 600 planarite.
Looting all 110 of the boxes is a very nice way to earn some platinum!
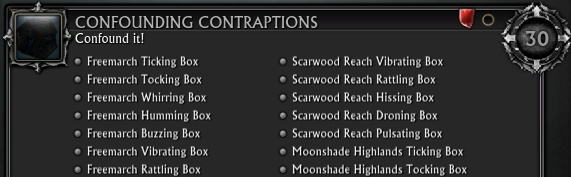
When you have found all the contraptions you will earn the cheevo ‘Confounding Contraptions’ found in H > Zones > Rift
This cheevo grants 30 cheevo points and awards a title ‘The Confounded’.
Detailed Guide
Each of the zones has a separate page with a detailed guide of each of the Contraption locations.
Each page has a full map of the zone, a detailed explanation of how to get to each box along and the more difficult locations include videos to show you how its done.
All the video guides are done with as few speed buffs as possible and no jumping mounts.
You can use racial jumps to help you with jumping up high, or one of the jump mounts, Opie or the Jetpack. You can also use Glyph of the Shilastri (crafted by runecrafters) to give you an extra bouncy jump that will help you reach some places easier. Even just a normal run speed buff on your character will help you move faster and jump further.
Here is a quick list of those detailed instruction pages..
Basic Guide
Below is basic guide, which is a list of every contraption and a waypoint of where to find it.
There is also a large map of Mathosia that shows you where all of the contraptions are so you can work out which ones are closest to your location (scroll to the very bottom of this page to see the world map).
The list is colour coded..
Yellow text means the contraption is in a very easy to get to spot with no complex jumping involved.
Orange text means the contraption is hidden in a slightly more difficult spot with some jumping involved – Most of the orange locations will have video guides to help you out. (You can find these in the detailed guide pages).
Red text means the contraption is hidden in a very complex spot and that you will want to use the jumping mounts or other buffs to get to it – Although it is possible to get to every spot without jumping mounts so don’t worry if you don’t have one — These red locations all have video guides to help you. (You can find these in the detailed guide pages).
>> LINK TO FREEMARCH DETAILED GUIDE PAGE <<
1. FREEMARCH TICKING BOX – /setwaypoint 6969 5307 – Under bush by the tree on the outside of the fortress
2. FREEMARCH TOCKING BOX – /setwaypoint 6772 4664 – On the ground below the balcony
3. FREEMARCH WHIRRING BOX – /setwaypoint 6652 4461 – In the water inside the boat hard to see
4. FREEMARCH HUMMING BOX – /setwaypoint 6180 4793 – (Iron Tomb entrance) between the trees roots to the right of the portal
5. FREEMARCH BUZZING BOX – /setwaypoint 5841 5145 – Highest peak behind Meridian
6. FREEMARCH VIBRATING BOX – /setwaypoint 5998 5143 – Climb up to the end of the telescope
7. FREEMARCH RATTLING BOX – /setwaypoint 6140 4420 – In the cave
8. FREEMARCH HISSING BOX – /setwaypoint 7304 5797 – On the rock under the waterfall
9. FREEMARCH DRONING BOX – /setwaypoint 7194 5327 – On top of the building
10. FREEMARCH PULSATING BOX – /setwaypoint 5926 5793 – Second floor behind the crystal tubes
>> LINK TO SILVERWOOD DETAILED GUIDE PAGE <<
11. SILVERWOOD TICKING BOX – /setwaypoint 6114 2467 – At the bottom of the structure
12. SILVERWOOD TOCKING BOX – /setwaypoint 7522 3082 – In Sanctum, on top of the dome
13. SILVERWOOD WHIRRING BOX – /setwaypoint 7342 2789 – Inside a clam shell
14. SILVERWOOD HUMMING BOX – /setwaypoint 5660 2820 – At the top of the fallen hollow tree trunk
15. SILVERWOOD BUZZING BOX – /setwaypoint 6539 3000 – Beneath the balcony between the walls
16. SILVERWOOD VIBRATING BOX – /setwaypoint 6082 3602 – On the tree branch
17. SILVERWOOD RATTLING BOX – /setwaypoint 6206 3133 – On a root inside the spider cave
18. SILVERWOOD HISSING BOX – /setwaypoint 6413 3029 – Just below the reward box for the zone puzzle
19. SILVERWOOD DRONING BOX – /setwaypoint 6345 2834 – Hidden in the shrub
20. SILVERWOOD PULSATING BOX – /setwaypoint 6563 2633 – On top of the building
>> LINK TO STONEFIELD DETAILED GUIDE PAGE <<
21. STONEFIELD TICKING BOX – /setwaypoint 4864 4667 – On a large rock
22. STONEFIELD TOCKING BOX – /setwaypoint 5125 4917 – Down in the very back of the cave
23. STONEFIELD WHIRRING BOX – /setwaypoint 4848 5283 – On the roof
24. STONEFIELD HUMMING BOX – /setwaypoint 5892 4330 – Halfway down the cliff
25. STONEFIELD BUZZING BOX – /setwaypoint 5474 5054 – At the back of the little cave
26. STONEFIELD VIBRATING BOX – /setwaypoint 4849 4990 – Up on the side of the cliff above granite falls
27. STONEFIELD RATTLING BOX – /setwaypoint 4123 5762 – On top of the tent
28. STONEFIELD HISSING BOX – /setwaypoint 5575 5205 – Up on the hill
29. STONEFIELD DRONING BOX – /setwaypoint 4336 5611 – Up on the hill overlooking the last valley
30. STONEFIELD PULSATING BOX – /setwaypoint 5257 4780 – In the small cave
>> LINK TO GLOAMWOOD DETAILED GUIDE PAGE <<
31. GLOAMWOOD TICKING BOX – /setwaypoint 5252 3087 – On the ivy off the spiral ramp near the top
32. GLOAMWOOD TOCKING BOX – /setwaypoint 5902 3955 – Drop down from the top of the mountain
33. GLOAMWOOD WHIRRING BOX – /setwaypoint 4462 2442 – Top of building
34. GLOAMWOOD HUMMING BOX – /setwaypoint 4910 2441 – On a wooden ledge halfway down the cliff
35. GLOAMWOOD BUZZING BOX – /setwaypoint 4302 2672 – In a cave underwater
36. GLOAMWOOD VIBRATING BOX – /setwaypoint 4313 2935 – On top of the stone archway
37. GLOAMWOOD RATTLING BOX – /setwaypoint 5346 3415 – On top of the hill
38. GLOAMWOOD HISSING BOX – /setwaypoint 4602 2908 – In the barrel, in the tunnel, inside Greybriar Hollow
39. GLOAMWOOD DRONING BOX – /setwaypoint 4715 2499 – In cave behind root
40. GLOAMWOOD PULSATING BOX – /setwaypoint 5025 2402 – At pipe behind the gutter, get there from above
>> LINK TO SCARLET GORGE DETAILED GUIDE PAGE <<
41. SCARLET GORGE TICKING BOX – /setwaypoint 4776 4075 – High up on the rocks
42. SCARLET GORGE TOCKING BOX – /setwaypoint 4444 4265 – Jump off the lift onto the rock pillar
43. SCARLET GORGE WHIRRING BOX – /setwaypoint 3787 2555 – On the rock hanging off the crane
44. SCARLET GORGE HUMMING BOX – /setwaypoint 4425 4846 – On the top beam of the bridge
45. SCARLET GORGE BUZZING BOX – /setwaypoint 4859 3656 – Drop down to the houses on the cliff
46. SCARLET GORGE VIBRATING BOX – /setwaypoint 3859 2944 – On a ledge under the bridge – in the bucket
47. SCARLET GORGE RATTLING BOX – /setwaypoint 3930 3496 – In the cave – In a cauldron
48. SCARLET GORGE HISSING BOX – /setwaypoint 3701 2725 – Behind the mill-house
49. SCARLET GORGE DRONING BOX – /setwaypoint 4440 3388 – On a ledge behind the waterfall
50. SCARLET GORGE PULSATING BOX – /setwaypoint 4166 3505 – On top of the rock pillar – Drop from above
>> LINK TO SCARWOOD REACH DETAILED GUIDE PAGE <<
51. SCARWOOD REACH TICKING BOX – /setwaypoint 4039 4652 – At the end of the rope above you!
52. SCARWOOD REACH TOCKING BOX – /setwaypoint 2577 3378 – At the base of the tree
53. SCARWOOD REACH WHIRRING BOX – /setwaypoint 3129 3235 – Inside the cave on upper floor
54. SCARWOOD REACH HUMMING BOX – /setwaypoint 3850 3840 – On the water tower
55. SCARWOOD REACH BUZZING BOX – /setwaypoint 3713 3794 – Top of the mountain
56. SCARWOOD REACH VIBRATING BOX – /setwaypoint 3102 4605 – In the Trollblight Caverns, under a bush
57. SCARWOOD REACH RATTLING BOX – /setwaypoint 3294 4721 – Inside the fallen hollow tree trunk
58. SCARWOOD REACH HISSING BOX – /setwaypoint 2951 4238 – On top of the very large tree stump
59. SCARWOOD REACH DRONING BOX – /setwaypoint 2970 3976 – Go to very top of the tree then drop down
60. SCARWOOD REACH PULSATING BOX – /setwaypoint 3633 3821 – Underneath the roots of the tree stump
>> LINK TO MOONSHADE HIGHLANDS DETAILED GUIDE PAGE <<
61. MOONSHADE TICKING BOX – /setwaypoint 6476 1716 – Down in the lake
62. MOONSHADE TOCKING BOX – /setwaypoint 6409 1195 – On a ledge, drop down from above
63. MOONSHADE WHIRRING BOX – /setwaypoint 6440 2052 – Under the mushrooms
64. MOONSHADE HUMMING BOX – /setwaypoint 7310 2066 – Up on the roof
65. MOONSHADE BUZZING BOX – /setwaypoint 5479 2156 – On the roof of the tent
66. MOONSHADE VIBRATING BOX – /setwaypoint 7575 2151 – On the boat
67. MOONSHADE RATTLING BOX – /setwaypoint 7626 1584 – Behind a tree at the end of the bridge
68. MOONSHADE HISSING BOX – /setwaypoint 6971 1073 – In the window of the chapel
69. MOONSHADE DRONING BOX – /setwaypoint 6125 1400 – In the centre of the round sculpture
70. MOONSHADE PULSATING BOX – /setwaypoint 5940 2190 – On the column
>> LINK TO DROUGHTLANDS DETAILED GUIDE PAGE <<
71. DROUGHTLANDS TICKING BOX – /setwaypoint 7656 6285 – Drop down from hole in tree
72. DROUGHTLANDS TOCKING BOX – /setwaypoint 8384 7529 – At the back of the cave
73. DROUGHTLANDS WHIRRING BOX – /setwaypoint 8840 6729 – Portal up then drop down to second floor
74. DROUGHTLANDS HUMMING BOX – /setwaypoint 7961 7117 – On top of the mountain
75. DROUGHTLANDS BUZZING BOX – /setwaypoint 7524 6893 – At the very top of the ruins
76. DROUGHTLANDS VIBRATING BOX – /setwaypoint 7693 5664 – On the top floor of ruins
77. DROUGHTLANDS RATTLING BOX – /setwaypoint 8031 6771 – Tucked under the rock, stand above box to loot it
78. DROUGHTLANDS HISSING BOX – /setwaypoint 7126 6355 – On top of the archway
79. DROUGHTLANDS DRONING BOX – /setwaypoint 7692 6960 – Behind the altar
80. DROUGHTLANDS PULSATING BOX – /setwaypoint 8002 6319 – In a cage
>> LINK TO IRON PINE PEAK DETAILED GUIDE PAGE <<
81. IRON PINE PEAK TICKING BOX – /setwaypoint 4658 1894 – Under the ice
82. IRON PINE PEAK TOCKING BOX – /setwaypoint 3821 2170 – Up near the puzzle
83. IRON PINE PEAK WHIRRING BOX – /setwaypoint 2824 2428 – In the cave
84. IRON PINE PEAK HUMMING BOX – /setwaypoint 3804 1326 – In the cave
85. IRON PINE PEAK BUZZING BOX – /setwaypoint 4840 1687 – Above cave entrance
86. IRON PINE PEAK VIBRATING BOX – /setwaypoint 4015 1863 – Under the ice
87. IRON PINE PEAK RATTLING BOX – /setwaypoint 3157 1782 – In the pool
88. IRON PINE PEAK HISSING BOX – /setwaypoint 4007 1162 – In Cloudborne Caverns
89. IRON PINE PEAK DRONING BOX – /setwaypoint 3570 2332 – In the cave
90. IRON PINE PEAK PULSATING BOX – /setwaypoint 3426 2069 – Inside the tent
>> LINK TO SHIMMERSAND DETAILED GUIDE PAGE <<
91. SHIMMERSAND TICKING BOX – /setwaypoint 6604 6933 – Down in the grate
92. SHIMMERSAND TOCKING BOX – /setwaypoint 7804 7255 – Up and between two stones
93. SHIMMERSAND WHIRRING BOX – /setwaypoint 7537 7621 – In stone window
94. SHIMMERSAND HUMMING BOX – /setwaypoint 6670 6341 – On an awning
95. SHIMMERSAND BUZZING BOX – /setwaypoint 6450 6759 – In cave under table
96. SHIMMERSAND VIBRATING BOX – /setwaypoint 7608 7097 – Above the cave entrance in the tree
97. SHIMMERSAND RATTLING BOX – /setwaypoint 5050 5901 – Top of the ruins
98. SHIMMERSAND HISSING BOX – /setwaypoint 6003 7036 – On the mountain
99. SHIMMERSAND DRONING BOX – /setwaypoint 6089 7780 – Top of the tent
100. SHIMMERSAND PULSATING BOX – /setwaypoint 6321 6868 – In a pipe at the end of the bridge
>> LINK TO STILLMOOR DETAILED GUIDE PAGE <<
101. STILLMOOR TICKING BOX – /setwaypoint 1849 2672 – On the ground
102. STILLMOOR TOCKING BOX – /setwaypoint 1707 2311 – Halfway up the tower
103. STILLMOOR WHIRRING BOX – /setwaypoint 749 2699 – On top of the arch
104. STILLMOOR HUMMING BOX – /setwaypoint 1909 3557 – On the table
105. STILLMOOR BUZZING BOX – /setwaypoint 2201 2853 – On the roof!
106. STILLMOOR VIBRATING BOX – /setwaypoint 2894 2827 – Top of the hill
107. STILLMOOR RATTLING BOX – /setwaypoint 1898 3079 – Inside the alcove
108. STILLMOOR HISSING BOX – /setwaypoint 1437 2469 – On top of the burned building
109. STILLMOOR DRONING BOX – /setwaypoint 2017 1922 – Under the rock
110. STILLMOOR PULSATING BOX – /setwaypoint 1756 1880 – Next to the tower
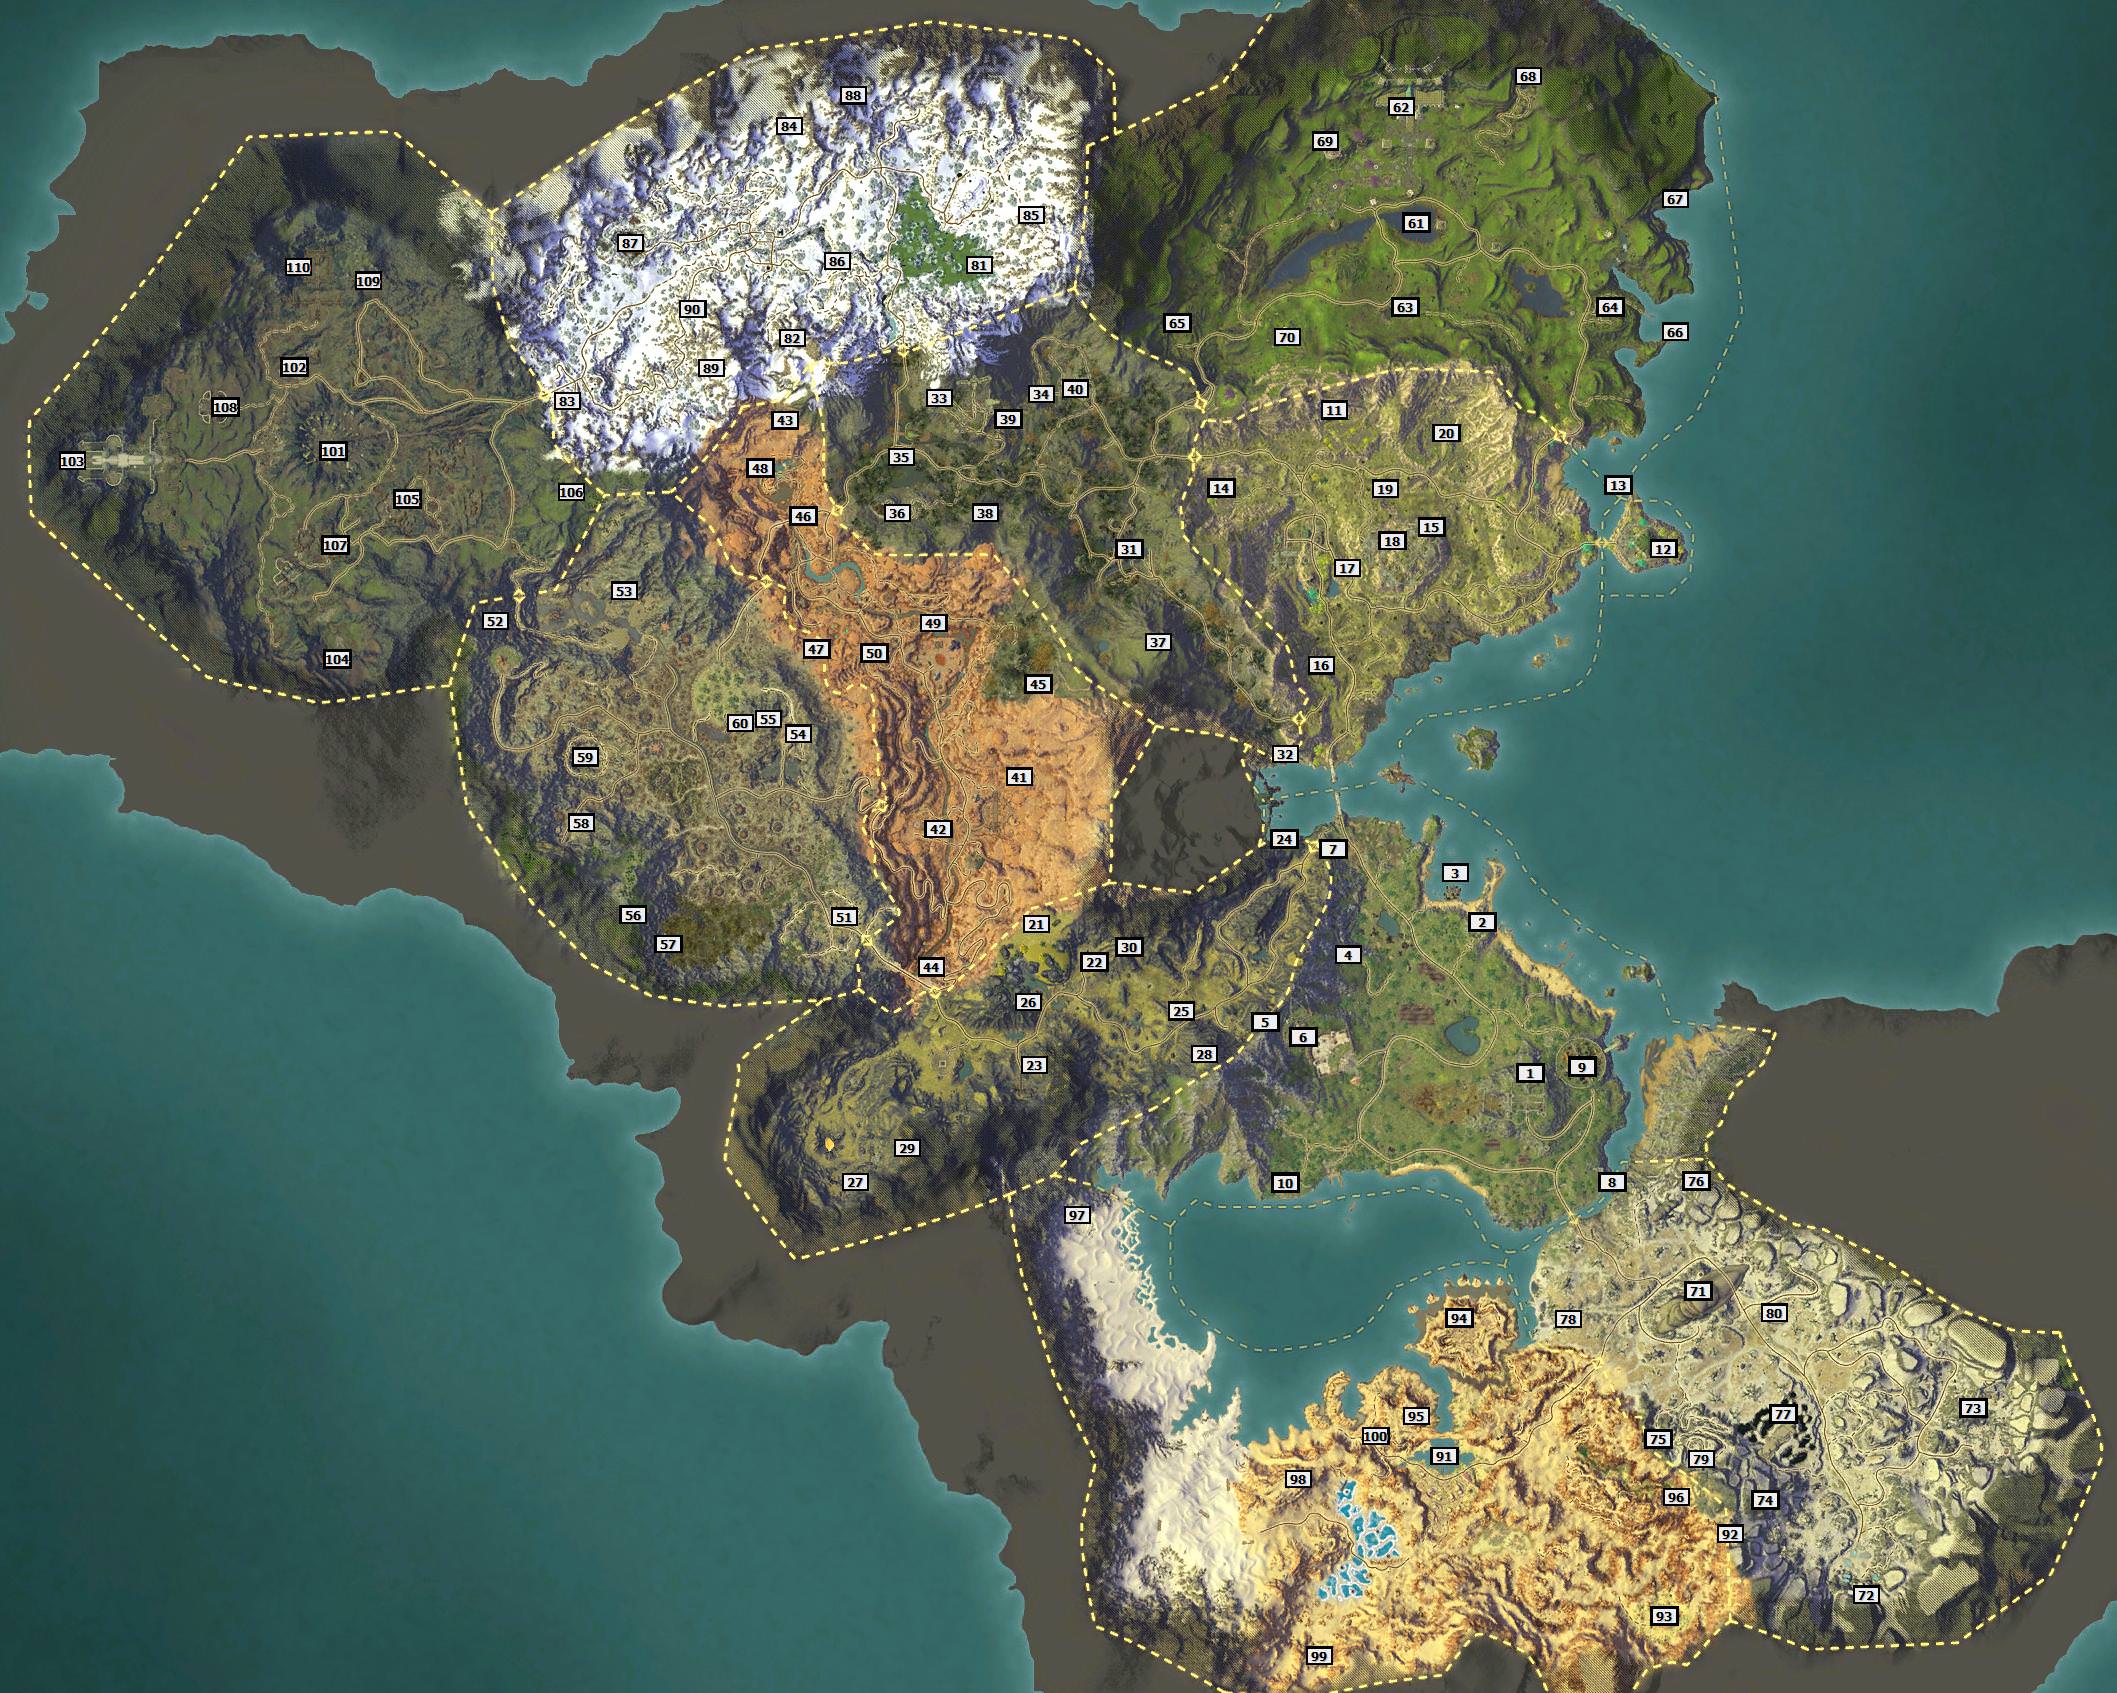
World Map
Here is the world map showing the locations of all the boxes – Each of the instruction pages have their own zone map.
You can right click the map and select ‘view image’ to make it bigger!